Wednesday, April 30, 2014

May Stamp of the Month Blog Hop: You've Got a Friend

Does anyone else start singing the Disney "Fox in the Hound" tune when you see the May CTMH stamp of the month's name?  You've got a friend in me!  Be sure to check out all my friends' creations with the cool sentiments of this stamp set.  (If you're already hopping then you've probably arrived from Fancy Melissa Laverty's blog.  You'll go to Krista Ritskes's blog next.)

As a former French teacher, I had to use the merci beaucoup sentiment!  I paired it with a CTMH/Cricut Artiste speech bubble and stamped the sentiment in Ponderosa Pine to go with the Timberline paper pack. I then stamped the sentiment again in Chocolate onto Chocolate card stock and cut out the mustache to paper piece it to the sentiment.  The big, bold, chunky style made it super easy to cut out by hand. (This sketch is from Make It From the Heart, Vol. 1.)  Some Lagoon shimmer trim, hemp baker's twine, and triangle durables studs finished off the card.

Here are all of the images from this cool set.  Wouldn't these make a great set of cards to give (or receive)?

Now, I mustache you to leave a comment before hopping off to Krista's blog next!  Be sure to check out all the great ideas with this versatile stamp set!

Monday, April 28, 2014

Base & Bling Jewelry Buffet


Just in time for Mother's Day, I'm offering a base & bling jewelry buffet (complete with card for gift giving) on Friday, 5/9 (drop in from 7-8 PM).  Make a necklace or pendant for yourself and/or for a special lady in your life!  I will have a large selection of goodies to chose from.  (If you'd like to customize your pendant with a photo, please bring one that is cut to 1" square- or I can help you cut it that evening.)
Here's a sampling of the Base & Bling pieces. 
While an RSVP is not required, if you know you'd like to make a necklace (or two), let me know!

{I would like to extend a huge thanks to Bren Yule for sharing this class idea and her buffet sign!}


Friday, April 25, 2014

Balloon Talk Hello Card

It's not too late to get your April stamp of the month, Balloon Talk!
The mod stamped background was super easy to make: just stamp your outline speech bubbles several times in several colors, overlapping and rotating them.  I kept mine pretty geometric- parallel and perpendicular to each other.  My papers and color palette are from the Lollydoodle collection (as is that cute green faceted gem).  Aqua Dots, Flamingo Dots, and Slate washi tape are fun embellishments.  The focal sentiment speech bubbles were cut with the CTMH/Cricut Artiste cartridge.

Remember, this set is only available this month!

Thursday, April 24, 2014

Happy 13th Birthday!

It is almost absolutely impossible to believe that our baby turns 13 today!  Here's a little walk down memory lane with a few layouts throughout the years...
The Day She Was Born
Age 8
Age 10

Age 12
And here she is this past Sunday (Big Sis is on the left)...
Happy birthday, Macey!  We love you and are so proud of the young lady you've become!

Tuesday, April 22, 2014

Skylark Side Stair Cards

At my recent card class, the lovely ladies tried their hand at making a side stair step card with the beautiful Skylark paper pack.  They did such a great job that I had to feature them here!
Peg and Sandy
 We first learned how to cut and score our card stock.  (You can find my tutorial HERE.)  Each lady was given the same basic materials, and I love how no two are exactly alike!
Joy and Ann
 The stamps and cutouts are from the CTMH/Cricut Art Philosophy collection.  I added some Chocolate card stock to make some of the images pop.
Monica
Aren't their cards beautiful?  I am not even going to post my sample card because theirs are so pretty.

Make today a great one!

Monday, April 21, 2014

H2H Challenges: Once Upon a Time

This week's Heart 2 Heart challenge is called "once upon a time."  Do you think of princesses or damsels in distress?  Do you think about your favorite children's book?  There are so many different ways to incorporate this fun theme into your crafty projects this week.
For this challenge, I decided to make a bracket frame for our new "library."  I have been in love with this saying for quite some time, so I used the upcoming July stamp of the month (Circus Alphabet) to stamp my letters and numbers.
You do know what you'll find in the library section 398.2, right?
The entire project uses the Skylark collection.  These banners are on the B&T Duos- the stripes at right are on the background B&T and the others are fussy cut from the Desert Sand B&T.  I used Aqua Dots to embellish the project.  (You'll also find pieces of Gold Polka Dot and Lagoon washi tape too.)

The bracket frame and the interior bracket frame with swirls are both cut from the CTMH/Cricut Art Philosophy collection.

Here's a final peek at the inside of the shadow box:
Be sure to check out all of the H2H DT inspiration for this challenge.  All of the April challenges are open until the end of the month.  

What is your favorite fairy tale?  My older daughter always loved Sleeping Beauty, little sister loved Cinderella, and my fave is probably Beauty and the Beast.

Friday, April 18, 2014

Hello!

At my recent card class, we made this cute spring-y card with the Hello Blooms stamp set and the Artiste CTMH/Cricut cartridge.  (Thank you, Joy, for the stamp set loan!)  Everyone had a different color (mine was Buttercup), and we worked on random stamping and on generational stamping (except Buttercup is too light for the look I wanted).
Instead of nesting my rectangles, I tilted the main frame and then cut off the excess.  A little Slate washi tape and a (retired) Licorice pearl on the pop-dotted flower coordinated nicely with the Slate hello.  Easy peasy lemon squeezy!

May you enjoy this most blessed weekend!  (I'm linking up this card to the H2H Flower challenge.)

Wednesday, April 16, 2014

Skylark Birthday

We recently celebrated my MIL's birthday (unfortunately I forgot to take pictures!), and here is the card that I made for her.
Can you believe that it was made with scraps?  I started with a 4.5"x3" Lagoon card stock base and layered a piece of Skylark B&T Duos on top.  I had to make sure that the pretty dragonfly was visible on the front.  The zip strip across the front and the pennants were all scraps too.  I cut the frame with my CTMH/Cricut Artiste cartridge to match up with the Holiday Tags stamp set (stamped in Lagoon and Sweet Leaf).  Some Teal shimmer trim, Lagoon washi tape, and Aqua Dots finished it off.

Since this week's Heart 2 Heart challenge is to use the Sweet Leaf and Lagoon color combo, I have to link up my card.  Be sure to spread your wings today!


Thursday, April 10, 2014

AHS #50 and Balloon Talk Thanks

We were very fortunate to be able to take our sophomore daughter (and 7th grade little sis) to visit the University of the South and Vanderbilt University over spring break last week.  One of my MIL's friends is a dean at Vanderbilt, and we got the royal treatment while there.  I made this thank you card for her, inspired by the Atlantic Hearts Sketch Challenge #50 and the beautiful day we had there.


The Skylark paper pack screams spring to me, so it was my first choice for a thank you card.  The "believe" piece was perfect because the recipient really believes in our daughter!  Did you know that the top piece and the bottom piece are from the same 12"x12" piece of B&T Duos?  The stripes across the card are gold polka dot washi tape and Lagoon shimmer trim.  I cut the speech bubble with the CTMH/Cricut Artiste cartridge then stamped the sentiment in Lagoon.  The square durables are the perfect finishing touch, coordinating well with the quatrefoil pattern, the washi tape, and the bird.

Here are a few fun pictures from our trip:


Big Sis leaves tonight for a chorus trip to Chicago for the next five days, so I would appreciate your prayers for her and the group's safe travel!

Thanks {big time} for letting me share my card and a little of our trip!

Tuesday, April 8, 2014

Easter Egg Card

This cute little egg is actually a 3" high Easter card!  (If you'd like to see a few 3-D egg decorations I made recently, click HERE.)
To make it, I used a few clicks and cuts on my CTMH/Cricut Art Philosophy cartridge and the Ariana paper pack.  I just kept all my measurements at 3" for the White Daisy card base, the floral egg, and the Coral overlay.  (The blue pieces are scrap that I cut to fit behind the cutout opening.)  The pretty (self-adhesive) bow is from the Ariana Assortment.
This little flower on the inside is leftover from one of the egg cutouts from my 3-D projects.

Because this is my first-ever egg card, I am linking it up to the Fantabulous Cricut Challenge #205: Spring Cleaning.  They are challenging us to use a cartridge or a key that we've never used before.  Thanks for hopping by!  I hope that you have an egg-cellent day!

Monday, April 7, 2014

H2H Challenges: Twisted Cricut

This week's Heart 2 Heart challenge is to use your Cricut in a "twisted" or different/unique way.
When my friend Joy sent me a tutorial link for 3-D paper Easter eggs, I knew what my Cricut project would be for this challenge!  I have my own quick tutorial for the two different types of eggs you can see in the bowl (and close ups of them too).
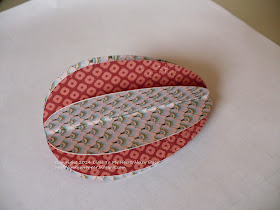
1.  Start with five die-cut eggs.  (Mine use the Ariana paper pack and the CTMH/Cricut Art Philosphy cartridge.)  Fold four in half vertically.  Place two folded eggs on either side of the one egg that you didn't fold.  (I alternated my patterns for a very pretty final effect.)  The two eggs below the flat egg fold down and the two eggs above the flat egg fold up.  (Don't worry if you don't get that part right because you can fold them again after you staple them.)

2.  Stack the eggs on top of each other.
3.  Staple the center fold all the way through all five eggs.  Fold the pieces again to fan them out.
 Here are the other two eggs, also from the Ariana paper pack.
For this one, I used two eggs that have a flower cutout.  (This is one of the egg options on the CTMH/Cricut Art Philosphy cartridge.)
 For my final egg, I decided to get fancy and create a honeycomb effect.  You can find a link to the honeycomb tutorial HERE if you'd like to learn how to do this for yourself.  (I think that I used 20 identical die cut eggs and lots of patience, so this one isn't for the faint of heart!)
Be sure to visit the H2H blog to check out all the creative Cricut projects our design team made for you this week.  You have until the end of the month to play along with all of our April challenges, and there's also a special giveaway going on this month too.  Go check it all out!