Tuesday, December 15, 2020

Blissful Brackets Technique Blog Hop

It's time for a technique challenge with some brackets, and no, we're not talking March Madness!  (If you're already hopping, then you've probably arrived from Wendy's blog, and from here you'll click on her name to continue on to Alyson's blog.)  For my cards, I used the Stitched Scalloped Thin Cuts with the Serenity collection.

My first card is a slimline 8"x3.5" card with a Sapphire cardstock base and that gorgeous Serenity floral as my background.  I stamped the sentiment (from the Sentiments by Melissa Esplin set) in Sapphire on the White Daisy bracket.  I used Blue Belle glitter paper, gold shimmer trim, and gold glitter gems.

Here's a close up of that sentiment cluster.  I love offsetting the bracket and cutting off one side!

My second card uses the larger Thin Cut with the same technique, but this time with the December stamp of the month, Happiness Never Grows Old, in Sapphire and Blue Belle.

My final card uses the entire small bracket with Blue Belle.

Thanks for letting me share these cards with you.  I'd love for you to leave a comment before hopping on to the amazingly talented Alyson's blog to continue the Blissful Brackets technique hop!


Saturday, December 5, 2020

Operation Smile Every Bit of Wonderful Blog Hop

 Close To My Heart is proud to support Operation Smile, a charitable organization that provides cleft palate surgeries for children in need.  (You can learn more HERE.)  Did you know that you could round up your order and give your change to Operation Smile?  It only takes $240 to change a child's life!  This year, the Operation Smile stamp set is Every Bit of Wonderful, and $7 from its sales go to Operation Smile.  Join me on this blog hop to show off this pretty set.  (If you're already hopping, then you've probably arrived from Michelle's blog.  From here, you'll visit Becca's blog next.

My first card features the Lovely papers and palette (Blue Belle, Ballerina, Canary, and Sage).  I used my Hexagon Thin Cuts to cut each piece and played around with the colors and patterns until I liked the arrangement.  Notice that I used a piece of Blue Belle glitter paper, plus I stamped (tone-on-tone) on the Sage and Blue Belle cardstock.
This close up shows the fussy cutting and layering I did after stamping the floral image on the card directly with Sage, on Sage cardstock, and on Ballerina cardstock.  I grabbed my watercolor pencils (sans eau) to quickly shade in the bud.  It didn't photograph well, but I dotted the little sprig of "berries" with clear shimmer brush.  I used 3D foam tape to pop the flower and then added a Blue Belle glitter gem.

For my second card, I played with a monochromatic color scheme of Blue Belle and Sapphire.

On a 3.75"x5" White Daisy cardstock panel, I random stamped floral images in Sapphire to cover the cardstock.  I cut the sentiment brackets with my new Simple Brackets Thin Cuts and both the Blue Belle glitter paper and Sapphire cardstock layers with the Fancy Borders die cuts.  The sentiment is stamped in Sapphire.

Thanks for letting me share these two card ideas with you.  Every CTMH fan needs this stamp set in their collection!  Please leave a comment before you hop to the next blog.  You won't want to miss the beautiful project that BECCA has on her blog for you!

{Click HERE for all the hop participants and their blogs.}


Tuesday, December 1, 2020

December Stamp of the Month Blog Hop: Happiness Never Grows Old

Welcome to the December stamp of the month featuring Happiness Never Grows Old!  You will love the beautiful floral designs and sentiments in this set, so hop along to get lots of great ideas.  (If you're already hopping then you've probably arrived from Michelle's blog.  From here, you'll visit Becca's blog next.


If you're a regular visitor, then you'll know that I don't love to color, so I wanted to show off this beautiful set without coloring it (although I will be challenging myself with some coloring techniques later this month).  Toile was my inspiration.  All three of my cards feature our color of the year, Blue Belle.

My first card is a monochromatic take on this set using only Blue Belle.  I let the pretty flowers and sentiment be the focal point and only embellished with Blue Belle shimmer trim.  If I recreate this card, I will probably use the light side of the Blue Belle cardstock for bracket (which was cut with the Stitched Scalloped Bracket, Z3688) so that the stamped sentiment "pops" a bit more.
My second card is a bit more modern and uses Sapphire ink for the flowers on Blue Belle cardstock, and Blue Belle ink on the sentiment.  I also added Blue Belle glitter gems.
My third card is my favorite of the three. I had originally stamped the flowers with Blue Belle on White Daisy, but they just didn't "pop" enough, so I used Sapphire instead.  That panel was mounted onto a Blue Belle cardstock base (light side up) with a strip of Sapphire cardstock and Blue Belle shimmer trim.  I used the same Thin Cut collection and Blue Belle cardstock, but stamped the sentiment with Sapphire.  I couldn't resist a few more of those pretty Blue Belle gems.

Here's a look at the entire stamp set:

Thank you for letting me share these cards with you.  I know you're going to see some fabulously creative ideas with this set, and hopefully I've shown you that simple can also be pretty (if I do say so myself).  I'd love a comment before you visit the incredibly talented Becca next!

{Click HERE for all the hop participants and their blogs.}

Friday, November 27, 2020

November Stamp of the Month Side Stair Step Card

This card was a lot of fun to make!  You definitely want to have a paper trimmer to make it.  (I taught this side stair step card to my VIP Facebook group.)

I used the November stamp of the month, You Warm My Heart, paired with the Serenity paper collection.  I used the color of the year, Blue Belle, with Sapphire and Toffee inks and cardstock, plus gold shimmer trim, Blue Belle glitter paper, and a gold glitter gem.

Here's a side view so you can see the different angles and layers.

I'm adding this card to the Color My Heart Color Dare Challenge #422 Tic-Tac-Toe Serenity color palette, column 1.


Monday, November 23, 2020

Heart2Heart Challenges: Eat, Drink, and Be Merry!

This final November Heart2Heart Challenge, Eat, Drink, and Be Merry, can be interpreted in so many different ways!  I decided to showcase a few little treat holders for some fun little gift-giving inspiration.


My first project was totally CASEd from my talented DT member Katy Taylor's hot chocolate card/treat holder.  I used the Serenity paper pack with the November stamp of the month, You Warm My Heart, plus a little Cricut Blue Belle glitter snowflake.

I stamped the cup in Sapphire and the "hot cocoa" in Espresso.  I added a little gold shimmer trim (cut in half to make it skinny) and a gold glitter gem in the center of the snowflake to match the Serenity paper.

My second treat holder starts with a  6"x6" square that is folded into this fun little "cup."  (You can find more details/instructions HERE.)  I used the retired (but available while supplies last on my website) Comfort & Joy paper for the cups plus the candy cane stamp from the November stamp of the month.


Please check out all of the DT inspiration and consider joining us for any of our November challenges before the month ends at H2H Challenges!

Wednesday, November 18, 2020

November/December New Product Blog Hop

 Close To My Heart just gets better and better!  I've been a Maker now for 20 years, and I am so impressed with our November/December Idea Book!  For this hop, I am focusing on the Jingle Joy paper and scrapbooking stamp set (and Thin Cuts).  If you're already hopping, then you've probably arrived from Michelle's blog.  From here, you'll visit the talented Brandi next.


Hopefully this card looks like a Christmas tree complete with ornaments and lots of Stickles sparkles!  I even flicked Evergreen shimmer brush onto my Evergreen "tree."  I cut the tree pieces with the incredible Fancy Borders Thin Cuts.

Here are more cards that I've made to get a jump start on the holiday season:


I also had fun teaching this pretty layout:


Thanks for letting me share some Jingle Joy with you!  Please leave a comment before hopping on over to Brandi's blog.

{Click HERE for all the hop participants and their blogs.}


Monday, November 16, 2020

H2H Challenges: Card Creations

 This week we've got a challenge that most papercrafters should be able to make: cards!


These adorably pun-ny stamps are only available to CTMH Makers, and I am giving each of my new VIP customers one as a thank you.  (If you don't already have a Maker and would like to know more, please contact me.)  I used the same techniques as I did on yesterday's post, so click HERE if you'd like to learn a little more about the distress oxide ink technique I used.  The cards measure 3"x3".

I stamped the "romaine calm" stamp in black on my card front and then again on scrap of the Mowed Lawn oxide piece and then fussy cut that cute little guy.  I also added a little bit of shading with my Dull Green Spectrum Noir Tri-Blend marker.  I used my paper trimmer to trim down the gold shimmer trim to a sliver.

I used the same stamping/cutting technique for the radish leaves.  I also fussy cut the radish "face" and then added both Scarlett and Raspberry shimmer brush to color her.  I also added more Raspberry shimmer brush (little blobs that I painted on rather than flicked) to add more of the pink to the red panel.

Be sure to check out the H2H Design Team's inspiration and join us before the end of the month.  We would love to see your cards, too!

Sunday, November 15, 2020

Inky Fingers Technique Blog Hop

This month's technique blog hop is all about getting inky, which you know that I love, so I decided it was time to try the (new to CTMH) distress oxide inks.  They are really cool!  (If you're already hopping, then you've probably arrived from Michelle's blog.  From here, you'll visit Lauren next.)  Both card sets use the only two distress oxide inks that I have (for now), Candied Apple and Mowed Lawn, with a splattering technique.


Here's what you need to get started:
All-purpose craft mat, distressed oxide ink, mini sponging tool, cardstock, water spritzer, waterbrush, and shimmer brushes of choice (Candy Apple and Gold here).

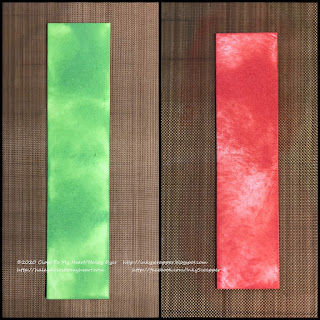
This ink is so creamy and sits so well on top of your cardstock!  I did not want my piece to be a smooth, solid green for my project (but for other projects you might want even coverage).  Here are both my Mowed Lawn and Candied Apple sponged strips.

 Next, I spritzed them both with water, let the ink react for a minute, and placed a paper towel on top to absorb the excess water droplets. 

Isn't that cool?  I splashed shimmer brushes on last and then heat set.

The first card features the November stamp of the month, You Warm My Heart, and lots of fussy cutting.


For my second card, the spritz of mister only made little droplets, so I used my waterbrush to drop water in bigger splatters, then flicked Scarlet, Charcoal, and Black shimmer brushes on the distressed oxide panel.
The textured effect and sparkle in real life turned our well (if I do say so myself!).

Here's another cool look I got with Candied Apple on black cardstock (above our selfie and to the right of the journaling).

Thanks for letting me share my first tries with the cool distressed oxide inks with you!  I'd love a comment before you continue the hop by clicking on her name to visit Lauren's blog next!

Monday, November 9, 2020

H2H Challenges: Blue Belle

 Have you seen Close To My Heart's new color of the year, Blue Belle?  It such a pretty blue!  This week's Heart2Heart Challenge is to use this pretty new color on your project.  


My card uses a Blue Belle cardstock base and then a piece of our gorgeous Woodgrain paper (from the Core Catalog so available all the way through August 2021!) that I sponged with Blue Belle ink.  I also flicked some Charcoal shimmer brush onto the corners to add more sparkle.  The snowflakes were cut on Blue Belle glitter paper with my CTMH/Cricut You Are Here collection.  (The large one is 2" and the smaller one is 1.25".  NOTE: Set "multi-cut" and cut those snowflakes twice!  Trust me!)  The sentiment, from the November stamp of the month, You Warm My Heart, was stamped onto a piece of Mink cardstock with Blue Bell ink, and I had to add a few Blue Belle glitter gems.

Thanks for letting me share my card with you!  You can watch my card class video where I taught this card plus three more on my Facebook page.  Join me if you don't already have a CTMH Maker (consultant). 

Please leave a comment, and be sure to check out all of the H2H Blue Belle DT projects and our participants' submissions.

Friday, November 6, 2020

Holiday Cards Blog Hop

 Are you ready for the festivities of the holiday season?  I for one am glad to have something to look forward to in this crazy year.  You'll get lots of holiday card ideas along this special blog hop.  (If you're already hopping you should have arrived from Michelle's blog, and from here you'll visit Brandi's blog next.)


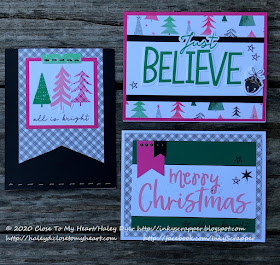
For my cards, I used the NEW Jingle Joy collection with the Jingle Joy Scrapbooking stamp set & coordinating Thin Cuts.  I used Clover, Raspberry, Black, and NEW Flamingo inks on my cards.

One of the many cool things about being a CTMH Maker (formerly known as consultant) is that you get products and workshops in advance, and these cards are all from the preview of this new collection.  CTMH makes it so easy now to make fabulous artwork.  Of course I always have to add my own little twist, but I have learned over the years that their ideas really work!

For this card, the center Flamingo tree was stamped on its Thin Cut and then added to the card front.  I trimmed down a piece of zip strip to mimic washi tape at the top, and then decided to add Black Liquid Pearl "stitches" to further enhance this simple card.

Do you love how the "Just Believe" stamped Thin Cut extends beyond the sentiment band as much as I do?  In the spirit of the Polar Express, I had to add the bell to this pretty card!

For my final card of this post (but not my final of the collection- more to come!), I added the "all is bright" to the original card idea.  As I was putting it together, I manged to smear some black onto the stamped focal panel.  Don't let a mistake ruin your project!  (I had already glued the piece down so I couldn't turn it over and try again.)  My CTMH's team t-shirt reads "It's not a mistake; it's an opportunity to embellish."  In that spirit, I just randomly smudged more black onto the sentiment panel.  It wasn't quite the look I was going for, but it no longer looked like a mistake. 

Also, in case you missed it, here is a sweet little treat that I made using the November stamp of the month.  (You can learn more HERE.)


Thanks for letting me share a little holiday cheer.  Please leave a comment before hopping on to visit the talented Brandi next to continue the Holiday Cards Blog Hop!

{Click HERE for all the hop participants and their blogs.}

Sunday, November 1, 2020

November Stamp of the Month Blog Hop: You Warm My Heart

Welcome to the November stamp of the month blog hop, featuring the cozy You Warm My Heart stamp set!  (If you're already hopping, then you've probably arrived from Pam's blog.  From here, you'll visit Michelle's blog next.)  I decided to create a little holiday gift card that I could tuck a tea bag into because I love a good cup of tea.

My card is a 3.5" square of Espresso cardstock (with dimensions and cutting guide to follow).  I used the Woodgrain paper collection from the core Idea Book along with Scarlet glitter paper and Lagoon cardstock/ink.  Don't you love the Turquoise gloss spray on the background?!?  After stamping the cup in Scarlet and the "tea" in Espresso and fussy-cutting, I cut a small tea bag paper on which I stamped the little dots in Lagoon.  I fussy cut the corresponding floral image after stamping in Scarlet.  I colored the sparkle with my Blue Turquoise Blend Spectrum Noir Triblend Marker.
I used my heart Thin Cuts to cut the heart and then stamped with Scarlet and sprayed with Turquoise gloss spray on the edges.  I fussy cut both the candy cane and the floral stamp.  (Next time I will add a strip of the woodgrain also to better balance the left and right sides of my card.)
Here's the center of my card with the tea bag tucked into the pocket.


Because I wanted a 3.5" square base, I multiplied by 3 to get the width of my card base (10.5").  I scored at 3.5" from both short ends, folded, and then cut the far left panel (on the inside; on the far right here) on the diagonal to create the pocket for my card.
Here's what I used (minus the Lagoon cardstock and ink and Blue Turquoise marker).
From top to bottom: two woodgrain 3"x3" squares; one die cut heart; three 3.25" squares of Scarlet glitter paper; and one 3.5"x10.5" piece of Espresso cardstock (plus extra White Daisy cardstock and Lagoon strips).

Won't you have fun playing with this festive stamp set?  VIPs can earn it for FREE, and regular customers can earn it for $5 (either with a $50 minimum purchase).
Thanks for letting me share my little gift card with you!  You could easily adjust the card base measurements to incorporate an actual gift card instead.  Please leave a comment before clicking on her name to continue on to Michelle's blog for more great ideas with the November stamp of the month, You Warm My Heart!
{Click HERE for all the hop participants and their blogs.}