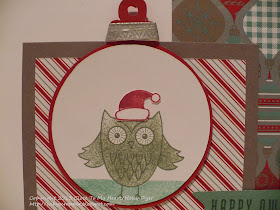
It's time for a technique/tool challenge over at Heart 2 Heart. Grab a sponge and get to work- crafting at least! (That sounds a lot more fun than housework, doesn't it?) To color this card, I used a wedge of a sponge and a sponge dauber, along with a few post-it notes.
1. Stamp your image onto a post-it note or onto printer paper. Cut out the part where you want to apply color. (This makes a "reverse mask" to color in the inside of the line drawn image.)
2. Carefully place your mask over your stamped image. (I used an office-supply hole punch to punch out the eyes, and they were a great fit!)
3. Sponge the desired color. Feel free to try to shade your image as you sponge.
4. Remove the mask.
5. Decide the piece is too plain. Create a mask to cover up the owl. Use another post-it to create a horizon across the focal image.
6. Sponge Juniper on the exposed piece.
7. Remove mask. Much better!
8. Use the same sponging/coloring technique to color in the Santa hat. Cut it out and place it on the owl's head.
This card sketch comes from the Make It From Your Heart, Vol. 2 how-to guide. It is one of 5 designs that we made at my 50 card workshop this weekend. I love how this little fellow turned out! (The ornament and circle were cut with the CTMH/Cricut Artbooking cartridge, and the banner was cut with Artiste.)
Now that you're suitably impressed (I hope), be sure to go check out what the rest of the H2H DT has created for you this week.


So cute! I did get some of my cards assembled, and I need to make at least one Owl card for an owl-loving friend, so I appreciate this inspiration. (that's a project for after Thanksgiving...)
ReplyDeleteAdorable card! Thanks for sharing how you did this.
ReplyDelete