Summer is probably our family's favorite season because the girls and I are out of school and have more time on our hands. I wanted to share my three final Studio J layouts from my recent "play time" to take advantage of the Studio J flash sale ($5/layout until the end of July).
First up is our older daughter's 17th birthday party. I ended up using a layout from the "Little Miss" Express Collection. (Express Collections are premade layouts with no additional artwork to add. You can add embellishments, change photo wells to text, and make some creative changes.)
We were able to have a dock built for our cove which we can see from the house (instead of always using my brother-in-law's dock on the other side of our point). I used the Seaside collection for the layout. Since most of the accents are very "beachy," I am going to add to it with stamped accents when the layout comes in.
Because I apparently have a habit of taking flower photos, I created a layout of various shots from this summer. Now I can enjoy summer whenever I want. This layout uses the Blossom collection.
Don't forget about the $5/layout Studio J flash sale going on until the end of the month! Let me know if I can help you get scrapping the Studio J way.
Stamping, scrapping, and paper crafting: create, craft, and connect at my classes and online!
Showing posts with label Scrap Our Stash Design Team. Show all posts
Wednesday, July 29, 2015
Monday, July 14, 2014
H2H Challenges: The Spice of Life
They say variety is the spice of life, but after 19 years of marriage, I cannot agree with that statement! This week's Heart 2 Heart Challenge is "the spice of life," which is wide open to interpretation! I decided to share the layout I made with photos from our 19th anniversary last week.
We decided to dine IN for our anniversary. Hubby grilled steak while I fixed the sides. (Can you believe that I forgot to sautee mushrooms and onions?!? LOL) I set the table with our wedding china and gave the girls a quick etiquette/table-setting lesson. We enjoyed our "spicy" night in!
The Ariana paper pack and the Artbooking CTMH/Cricut cartridge helped me create my layout. This paper pack seemed like a good match with my pictures, and the heart "collage" at left was a "reject" from another project. It fits well here, doesn't it? I had fun cutting images and designs from the A and S keys.
The bottom of both pages uses leftover zipstrips. I didn't want both sides to have the same sentiment, so I cut it out and piece together two identical zipstrips for the right page. Don't be afraid to try something new. It's only paper, and there's always more! ;)
Thanks for checking out my (not-so-) spicy layout! Be sure to see how my Heart 2 Heart Design Team inspires you this week. I hope you'll play along with us!
We decided to dine IN for our anniversary. Hubby grilled steak while I fixed the sides. (Can you believe that I forgot to sautee mushrooms and onions?!? LOL) I set the table with our wedding china and gave the girls a quick etiquette/table-setting lesson. We enjoyed our "spicy" night in!
The Ariana paper pack and the Artbooking CTMH/Cricut cartridge helped me create my layout. This paper pack seemed like a good match with my pictures, and the heart "collage" at left was a "reject" from another project. It fits well here, doesn't it? I had fun cutting images and designs from the A and S keys.
The bottom of both pages uses leftover zipstrips. I didn't want both sides to have the same sentiment, so I cut it out and piece together two identical zipstrips for the right page. Don't be afraid to try something new. It's only paper, and there's always more! ;)
Thanks for checking out my (not-so-) spicy layout! Be sure to see how my Heart 2 Heart Design Team inspires you this week. I hope you'll play along with us!
Labels:
challenge,
Cricut,
CTMH,
H2H Design Team,
Scrap Our Stash Design Team
Wednesday, June 26, 2013
Scrap Our Stash June Sketch Challenge
Not only does Scrap Our Stash Challenges have a great sketch for you to try this month, but there's the additional challenge of incorporating a premade tag or journaling card AND jute or twine on your layout!
I decided to use this sketch for the title page for my 2013 family album. (Each month I make a "highlights" layout.) I choose three pictures that represent the first half of this year, and then when I printed them, I decided that the For Always paper pack was a great match.
Since I had to use a premade tag, as I dug through my stash, I found a box of old bank ledger paper from my late father-in-law. It is perfect on the layout! (I love how patterned paper shows through.) The little rolodex card is also from my stash from a pack that I found for only $0.50. I used Whisper, Slate, and Ruby inks with the Family Love, A Journey, and Approved stamp sets. The cool glitter numbers are from the Glamour glitter alphabet set, and they tie in well with the (retired) glitter brads. Finally, I couldn't find my gray baker's twine, but the black hemp is close enough to jute or twine (I hope!). It's all about scrapping your stash, right?
I am sad to share that this will be my final post as a member of the SOS Design Team. (Notice that I didn't say that this is my final SOS post; I will still be playing along for fun as time allows!) Life is just so overwhelming right now with our home remodel that I needed to clear off my busy plate a bit. It has been a pleasure working with the entire SOS DT, and I know that the new group will continue to inspire and challenge us all! Be sure to visit the SOS blog often!
I decided to use this sketch for the title page for my 2013 family album. (Each month I make a "highlights" layout.) I choose three pictures that represent the first half of this year, and then when I printed them, I decided that the For Always paper pack was a great match.
Since I had to use a premade tag, as I dug through my stash, I found a box of old bank ledger paper from my late father-in-law. It is perfect on the layout! (I love how patterned paper shows through.) The little rolodex card is also from my stash from a pack that I found for only $0.50. I used Whisper, Slate, and Ruby inks with the Family Love, A Journey, and Approved stamp sets. The cool glitter numbers are from the Glamour glitter alphabet set, and they tie in well with the (retired) glitter brads. Finally, I couldn't find my gray baker's twine, but the black hemp is close enough to jute or twine (I hope!). It's all about scrapping your stash, right?
I am sad to share that this will be my final post as a member of the SOS Design Team. (Notice that I didn't say that this is my final SOS post; I will still be playing along for fun as time allows!) Life is just so overwhelming right now with our home remodel that I needed to clear off my busy plate a bit. It has been a pleasure working with the entire SOS DT, and I know that the new group will continue to inspire and challenge us all! Be sure to visit the SOS blog often!
Labels:
challenge,
CTMH,
Scrap Our Stash Design Team,
scrapbooking,
sketch,
stamping
Wednesday, June 12, 2013
SOS June Challenge #1: All About Guys + Brads
The first June Scrap Our Stash challenge is all about guys! Of course I had to make a layout for our favorite guy. He says that I never take his picture and put him in our scrapbooks, although since I am usually holding the camera, I beg to differ. He does often RUN though when he sees me coming with the camera! There is one other requirement for this month's challenge: you have to use at least five brads too.
My husband grew a beard and mustache this winter to mixed reviews from family and friends! He just shaved it off with the onset of warmer weather, so I couldn't resist immortalizing the beard in this layout all about him. On the left page, that is his brother in the photo with him.
All of my supplies are from Close To My Heart, and they're a mix of old and new. The layout sketch is from the Imagine how-to guide (retired). I used the new Surf's Up paper pack, but the brads, the metal embellishments, and the sassy strands are all retired. If you look closely, you can see that I distressed the edges of my photos and my Outdoor Denim card stock with a sanding block. I used Cashmere ink to distress the Colonial White card stock to give the layout more texture.
You have until 6/29 to dig into your stash and share a layout of your favorite guy(s), so link up at SOS! You just might be this month's prize winner too.
My husband grew a beard and mustache this winter to mixed reviews from family and friends! He just shaved it off with the onset of warmer weather, so I couldn't resist immortalizing the beard in this layout all about him. On the left page, that is his brother in the photo with him.
All of my supplies are from Close To My Heart, and they're a mix of old and new. The layout sketch is from the Imagine how-to guide (retired). I used the new Surf's Up paper pack, but the brads, the metal embellishments, and the sassy strands are all retired. If you look closely, you can see that I distressed the edges of my photos and my Outdoor Denim card stock with a sanding block. I used Cashmere ink to distress the Colonial White card stock to give the layout more texture.
You have until 6/29 to dig into your stash and share a layout of your favorite guy(s), so link up at SOS! You just might be this month's prize winner too.
Sunday, May 26, 2013
Scrap Our Stash May Sketch Challenge
This month's SOS sketch challenge is to use the following sketch along with at least 3 pre-made (not handmade) flowers.
Using a new paper pack is using your stash too, right? I could not believe how well Close To My Heart's Dream Pop paper pack matched my daughter's spring piano recital!
I cut down the program to use as one of the page elements of the sketch. My chipboard flowers are from Around the Block. I also used flower sequins & brads from Queen & Co. along with CTMH flower brads and flower gems (retired). The pearl flourishes and washi tape are current products. The peach ribbon was some that I had in my stash that may have been a Target Dollar Spot find.
I had fun designing the second page to coordinate with the sketch. Here's the pre-printed Dream Pop paper that I started with:
And the finished page (after):
Now, you've only got a few more days to Scrap (y)Our Stash! All May entries are due by the 29th, and you can play along with either- or both- challenges, but you cannot combine the two challenges. Click HERE to go to the SOS blog.
What are you waiting for? Go get scrappin'!
Using a new paper pack is using your stash too, right? I could not believe how well Close To My Heart's Dream Pop paper pack matched my daughter's spring piano recital!
I cut down the program to use as one of the page elements of the sketch. My chipboard flowers are from Around the Block. I also used flower sequins & brads from Queen & Co. along with CTMH flower brads and flower gems (retired). The pearl flourishes and washi tape are current products. The peach ribbon was some that I had in my stash that may have been a Target Dollar Spot find.
I had fun designing the second page to coordinate with the sketch. Here's the pre-printed Dream Pop paper that I started with:
And the finished page (after):
Now, you've only got a few more days to Scrap (y)Our Stash! All May entries are due by the 29th, and you can play along with either- or both- challenges, but you cannot combine the two challenges. Click HERE to go to the SOS blog.
What are you waiting for? Go get scrappin'!
Sunday, May 12, 2013
SOS May Challenge: Three Patterned Papers Plus Rub-Ons
Happy Mother's Day! Photos and projects will be coming soon. Meanwhile...
The May Scrap Our Stash challenge is to use at least three different patterned papers from different collections and some rub-ons! I dug deep into my stash for these photos from Spring Break 2009 when we took the girls ice skating for the first time. They found it was harder than they thought it would be!
My photos definitely determined my color choices. The green patterned paper came from Close To My Heart's retired Olivia paper pack, the purple from CTMH's Hooligans paper pack, and the blue from a Colorbok pack. The green letters came from a different Colorbok pack. For my embellishments, I used some Around the Block chipboard flowers (It was Spring Break, after all!), some Queen & Co. Sassy Sequins & brads, and some of CTMH's (retired) Nature's Ambiance rub-ons. It was super fun to mix & match!
Don't be afraid to try your hand at mixing & matching your patterned papers. It's a really great way to Scrap (y)Our Stash. Be sure to link up your layout HERE by May 29!
The May Scrap Our Stash challenge is to use at least three different patterned papers from different collections and some rub-ons! I dug deep into my stash for these photos from Spring Break 2009 when we took the girls ice skating for the first time. They found it was harder than they thought it would be!
My photos definitely determined my color choices. The green patterned paper came from Close To My Heart's retired Olivia paper pack, the purple from CTMH's Hooligans paper pack, and the blue from a Colorbok pack. The green letters came from a different Colorbok pack. For my embellishments, I used some Around the Block chipboard flowers (It was Spring Break, after all!), some Queen & Co. Sassy Sequins & brads, and some of CTMH's (retired) Nature's Ambiance rub-ons. It was super fun to mix & match!
Don't be afraid to try your hand at mixing & matching your patterned papers. It's a really great way to Scrap (y)Our Stash. Be sure to link up your layout HERE by May 29!
Friday, April 12, 2013
Disney Layout Share & Challenge Combo
Last week was spring break, and since our older daughter was going on a cruise with a friend, we took our younger daughter and a friend to Walt Disney World. I am loving Studio J because I was able to scrapbook our trip this week. It is so easy to use! The Giggles & Grins collection was the perfect match for our photos. I'm linking up my layouts to the Frosted Designs travel challenge and the Lasting Memories challenge #134, childhood memories.
If you have lots of digital photos and want to scrapbook, then you are going to love Studio J. All you do is upload your photos, select your collection (paper packs), the number of photos you plan to use on your layout, and begin creating. Can you believe that in less than a week's time (more like a few hours worth) I have the pictures from my trip scrapbooked?
The flower festival and all the topiaries were really cool!
We camped at Disney's Fort Wilderness campground:
I even made a layout for my daughter's album (all the above go in our travel series):
If you want to give Studio J a try, just click and go! You only pay for the layouts or JPGs that you buy.
If you have lots of digital photos and want to scrapbook, then you are going to love Studio J. All you do is upload your photos, select your collection (paper packs), the number of photos you plan to use on your layout, and begin creating. Can you believe that in less than a week's time (more like a few hours worth) I have the pictures from my trip scrapbooked?
We camped at Disney's Fort Wilderness campground:
I even made a layout for my daughter's album (all the above go in our travel series):
If you want to give Studio J a try, just click and go! You only pay for the layouts or JPGs that you buy.
Tuesday, March 26, 2013
SOS Challenges: Sketch for 3/15
One thing that I love about Scrap Our Stash is that you can use whatever supplies that you like! This fun blog is all about getting you motivated and scrapping. For the first half of the month, we offer a supply/product challenge, and for the second half we have a sketch for you to try. Here's this month's sketch:
And my interpretation:
This sketch came at the perfect time because I decided to move most of my Christmas layouts into a Christmas album, and I created the title page following the sketch. (The photos are from 2001, our youngest's 1st Christmas; '03 or '04; and this past 2012.) The papers are last year's Close To My Heart Christmas collection, Pear & Partridge. Don't you love double-sided paper? I flipped the pieces over a few times until I had a color scheme that I liked.
The ornaments were cut with the CTMH/Cricut Art Philosophy cartridge. I cheated a bit in my title and used a Rusty Pickle stamp set from my stash. If you are like me and haven't indulged in all the cool washi tape, just use patterned paper instead.
And my interpretation:
This sketch came at the perfect time because I decided to move most of my Christmas layouts into a Christmas album, and I created the title page following the sketch. (The photos are from 2001, our youngest's 1st Christmas; '03 or '04; and this past 2012.) The papers are last year's Close To My Heart Christmas collection, Pear & Partridge. Don't you love double-sided paper? I flipped the pieces over a few times until I had a color scheme that I liked.
The ornaments were cut with the CTMH/Cricut Art Philosophy cartridge. I cheated a bit in my title and used a Rusty Pickle stamp set from my stash. If you are like me and haven't indulged in all the cool washi tape, just use patterned paper instead.
Can you believe how big the girls have gotten? Christmas is still a wonderful time of year! Unfortunately it's feeling more like Christmas here than spring. If that's the case for you too, then stay inside and scrap with us. Give this sketch a try and link it up at the SOS Challenge blog by 3/29.
Stamp set: Rusty Pickle
All other supplies from Close To My Heart: Pear & Partridge Workshop on the Go collection (which included the ribbon and red gems); Cocoa and New England Ivy ink; Cricut Art Philosophy cartridge; red glitter glitz gel
Labels:
challenge,
Cricut,
CTMH,
family,
holiday,
Scrap Our Stash Design Team,
scrapbooking,
sketch
Tuesday, March 12, 2013
SOS 1st March Challenge: Get Krafty!
Scrap Our Stash will have two challenges each month, and you can play along with either one (or both) until the 29th of the month. The first challenge will be a supply challenge (posted on the first) encouraging you to use a particular category of your stash. The second challenge (revealed on the 15th) will be a sketch challenge. We want to help challenge and inspire you to scrap your stash. All products and skill levels are welcome!
The March supply challenge is to Kraft it up! Use Kraft products (paper, embellishments, etc.) on 50% (or more) of your layout AND add at least 3 metal embellishments. I'm not sure if I have enough Kraft on my layout, but I love how it turned out.
This is our firstborn fur baby (1994-2007) in the late '90s. He was such a good boy! I really dug into my boxes of old photos and my scrappy stash! I started with the "Personality Presence" sketch from Imagine. I used Black and White Daisy card stock, plus (retired) textured Desert Sand card stock and Mischief patterned paper. I also used some Milestone corrugated shapes and (retired) color ready Kraft borders. My metal pieces came from two different pewter embellishment collections. I stamped my title with the (retired) Rustic alphabet stamp set. (All supplies are from Close To My Heart.)
Thanks for taking a peek at my layout and letting me share my "baby" with you. RIP KoKo!
Now it's your turn to get Krafty at SOS!
The March supply challenge is to Kraft it up! Use Kraft products (paper, embellishments, etc.) on 50% (or more) of your layout AND add at least 3 metal embellishments. I'm not sure if I have enough Kraft on my layout, but I love how it turned out.
This is our firstborn fur baby (1994-2007) in the late '90s. He was such a good boy! I really dug into my boxes of old photos and my scrappy stash! I started with the "Personality Presence" sketch from Imagine. I used Black and White Daisy card stock, plus (retired) textured Desert Sand card stock and Mischief patterned paper. I also used some Milestone corrugated shapes and (retired) color ready Kraft borders. My metal pieces came from two different pewter embellishment collections. I stamped my title with the (retired) Rustic alphabet stamp set. (All supplies are from Close To My Heart.)
Thanks for taking a peek at my layout and letting me share my "baby" with you. RIP KoKo!
Now it's your turn to get Krafty at SOS!
Wednesday, February 27, 2013
New Format @ SOS!
Scrap Our Stash is launching a new format in March, and I couldn't be more excited about it! Scrap Our Stash will have two challenges each month, and you can play along with either one (or both) until the 29th of the month. The first challenge will be a supply challenge (posted on the first) encouraging you to use a particular category of your stash. The second challenge (revealed on the 15th) will be a sketch challenge. We want to help challenge and inspire you to scrap your stash! Visit the SOS blog HERE! All products and skill levels are welcome!
Monday, February 25, 2013
SOS Giveaways Start TODAY!
We have some exciting things going on at Scrap Our Stash challenge blog this week!
You do not want to miss it!

To celebrate the launch of the merge with If It's Groovy, a new look and a new challenge format, Scrap Our Stash is hosting a Giveaway A Day!
Please visit SOS each day starting TODAY, February 25th, for details on entering the daily drawings!
You do not want to miss it!

To celebrate the launch of the merge with If It's Groovy, a new look and a new challenge format, Scrap Our Stash is hosting a Giveaway A Day!
Please visit SOS each day starting TODAY, February 25th, for details on entering the daily drawings!
Monday, February 18, 2013
Scrap Our Stash Blog Candy/Giveaway Alert!
We have some exciting things going on at Scrap Our Stash challenge blog next week!
You do not want to miss it!

To celebrate the launch of the merge with If It's Groovy, a new look and a new challenge format, Scrap Our Stash is hosting a Giveaway A Day!
Please visit SOS each day starting February 25th for details on entering the daily drawings!
You do not want to miss it!

To celebrate the launch of the merge with If It's Groovy, a new look and a new challenge format, Scrap Our Stash is hosting a Giveaway A Day!
Please visit SOS each day starting February 25th for details on entering the daily drawings!
Tuesday, February 5, 2013
SOS Challenges: Fuzzy Wuzzy
Fuzzy Wuzzy was a bear.
Fuzzy Wuzzy had no hair.
Fuzzy Wuzzy wasn't very fuzzy,
Was he?
Who else remembers that poem from elementary school? This month's Scrap Our Stash challenge is to get fuzzy! For this challenge, I had to not only dig deeply into my stash, but also into my creativity! I couldn't think of anything fuzzy that I had on hand to use, but then inspiration struck when I remembered these photos of my daughter and her stuffed animals. (She's 14 now, so we are going way back!) I used the new Close To My Heart paper pack, Chantilly, along with some old "Sassy Strands." (Raise your hand if you remember those!)
The right page is a complete pagerization (Is that a real word?) of the Spring/Summer 2013 Close To My Heart Idea Book cover (see sidebar at right), and I LOVE how it turned out. To create the title (which is also her nickname), I cut out the letters on the Cotton Candy cardstock using my Cricut CTMH Art Philosphy cartridge. Then, I backed that piece with some Buttercup cardstock. I also glued on the letter centers. I love how the negative space looks in person!
Fuzzy Wuzzy had no hair.
Fuzzy Wuzzy wasn't very fuzzy,
Was he?
Who else remembers that poem from elementary school? This month's Scrap Our Stash challenge is to get fuzzy! For this challenge, I had to not only dig deeply into my stash, but also into my creativity! I couldn't think of anything fuzzy that I had on hand to use, but then inspiration struck when I remembered these photos of my daughter and her stuffed animals. (She's 14 now, so we are going way back!) I used the new Close To My Heart paper pack, Chantilly, along with some old "Sassy Strands." (Raise your hand if you remember those!)
The right page is a complete pagerization (Is that a real word?) of the Spring/Summer 2013 Close To My Heart Idea Book cover (see sidebar at right), and I LOVE how it turned out. To create the title (which is also her nickname), I cut out the letters on the Cotton Candy cardstock using my Cricut CTMH Art Philosphy cartridge. Then, I backed that piece with some Buttercup cardstock. I also glued on the letter centers. I love how the negative space looks in person!
For the left page, I found the lyrics for the Winnie-the-Pooh song and also added a little journaling. Though these photos are very similar to the focal photo on the other page, I love her expression in each one. Look closely to check out that tongue! LOL
Before you head off, I can't resist showing you a "then" and "now" comparison!
Now you should get fuzzy with us at Scrap Our Stash this month! We've got some really exciting changes in store, so be sure to scrap YOUR stash. We'd love to have you join us! All skill levels and products are welcome; just get scrappin'!
Saturday, January 5, 2013
Scrap Our Stash January Challenge: Tag, You're It!
This month's challenge at Scrap Our Stash is to use a tag on your scrapbook layout. Easy peasy, right? We're also challenging you to put YOU in your layout too, so that might make this month a little more challenging. You can do it! Who better to tell your story than you, right?
This year's school picture was the starting point for my layout. I pulled paper from my stash that I thought matched my shirt pretty well. That turned out to be more challenging than I anticipated! Since I'm a teacher, I thought the background (from Scholastic) was a nice fit. Instead of cutting off the zip strip at the top (the part that looks like spiral notebook paper), I cut off a half-inch off the bottom of the paper and left the strip attached.
The roses on the bottom right corner and stamped lightly on the tag are from the Close To My Heart January stamp of the month, Happy Valentine's. I stamped my title from the Old World Alphabet (which is retiring soon). The Colonial White rosette ribbon and purple sparkles are also current, but I think everything else is retired.
The dark blue stickers are from a collection I won several years ago, so it fell really good to actually use some of my stash!
Now it's your turn to scrap your stash! Create a layout with a tag, and then join us over at SOS. I hope to see your creations this month too! Come on! I showed you mine! Now you can show me yours. ;)
This year's school picture was the starting point for my layout. I pulled paper from my stash that I thought matched my shirt pretty well. That turned out to be more challenging than I anticipated! Since I'm a teacher, I thought the background (from Scholastic) was a nice fit. Instead of cutting off the zip strip at the top (the part that looks like spiral notebook paper), I cut off a half-inch off the bottom of the paper and left the strip attached.
The roses on the bottom right corner and stamped lightly on the tag are from the Close To My Heart January stamp of the month, Happy Valentine's. I stamped my title from the Old World Alphabet (which is retiring soon). The Colonial White rosette ribbon and purple sparkles are also current, but I think everything else is retired.
The dark blue stickers are from a collection I won several years ago, so it fell really good to actually use some of my stash!
Now it's your turn to scrap your stash! Create a layout with a tag, and then join us over at SOS. I hope to see your creations this month too! Come on! I showed you mine! Now you can show me yours. ;)
Friday, December 7, 2012
SOS Challenges: Circle Around
This month's Scrap Our Stash Challenge is "circle around." As St. Nick circles the world this month, we want you to incorporate circles on your layout!
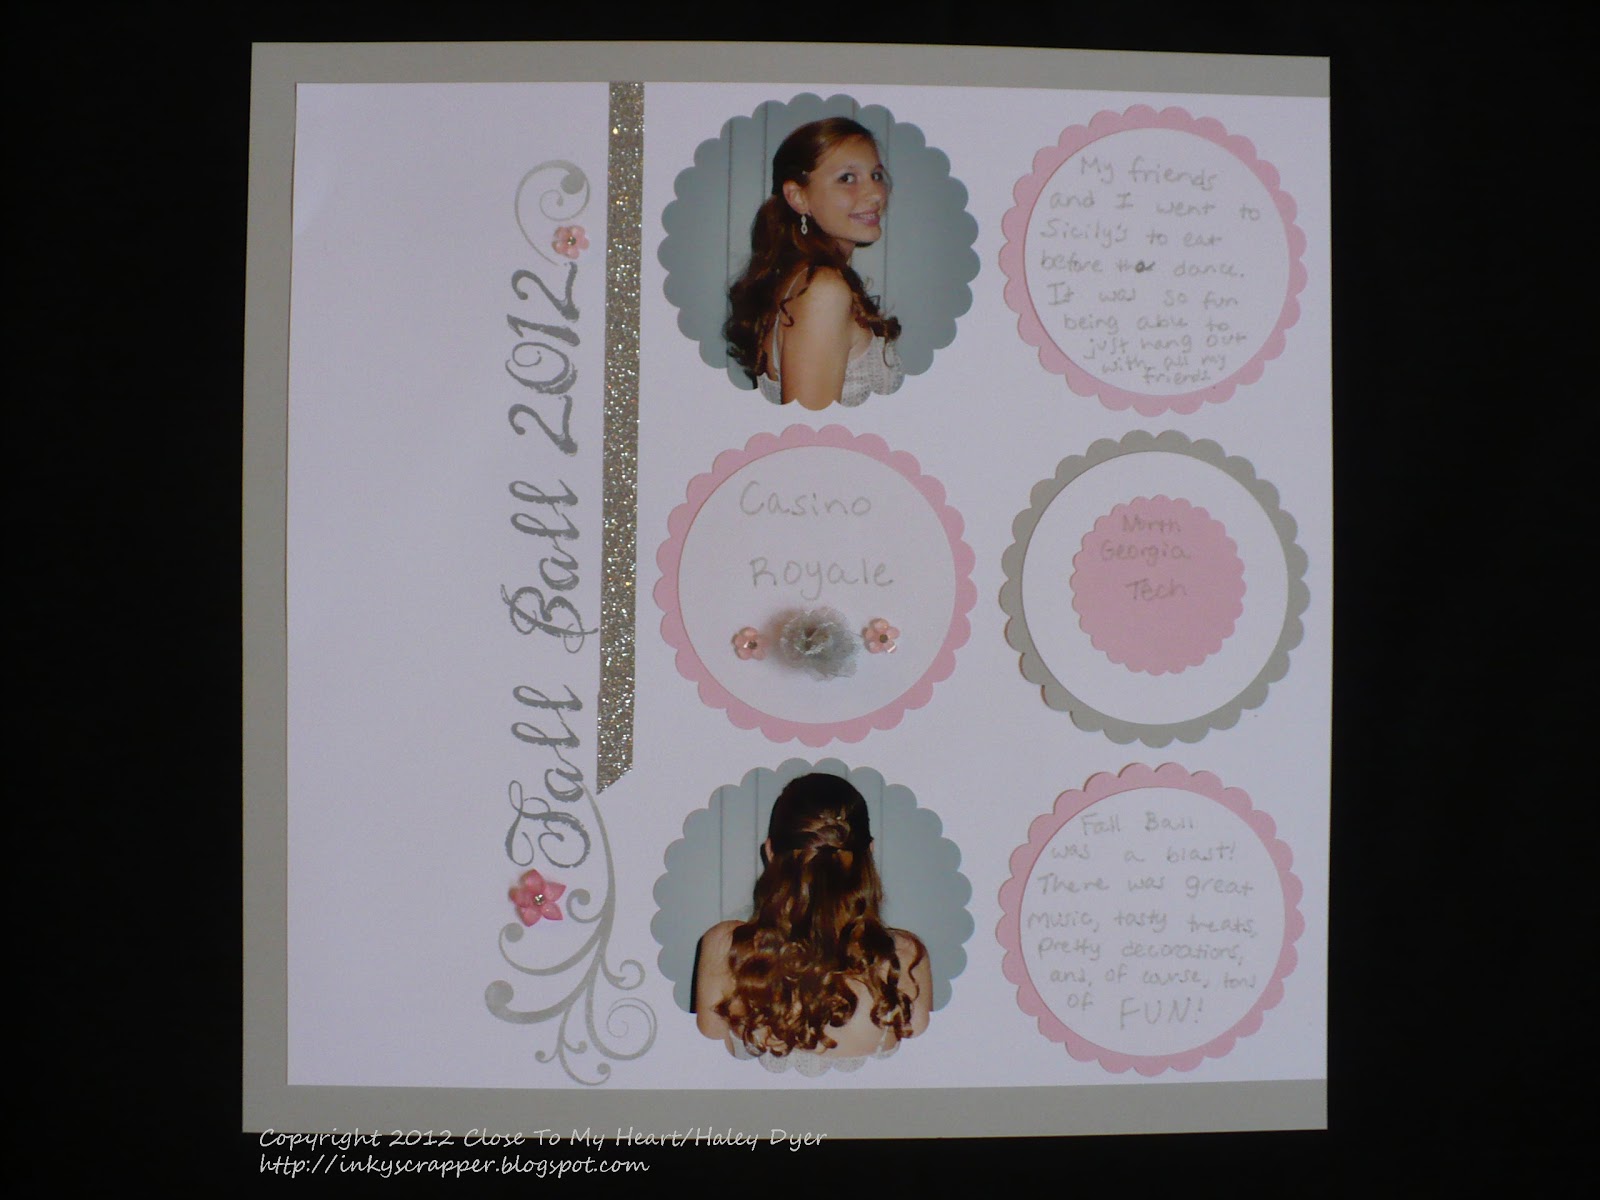
Now, my layout has nothing to do with good ol' St. Nick, but I did use lots of circles! Our older daughter is now a freshman in high school, so I recently scrapbooked the photos I took of her all dressed up and ready for Fall Ball, her first high schools dance. For the layout, I used a sketch from Close To My Heart's Make It From the Heart, Vol. 1 how-to guide, but modified it to fit my photos. I also dragged out my big Marvy circle and scalloped circle punches.
The retired Baby Pink and Grey Flannel cardstock and inks are a perfect match for her dress! I also accented this layout with the retired Bliss pink & grey flower assortment. Here's a close up of the title (Old World Alphabet) with that gorgeous silver shimmer trim self-adhesive tape:
Since it was her dance, I had her write the journaling for her layout. I love how it all came together!
Now it's your turn! Circle around with us at SOS! All styles, products, and skill levels are welcome. Scrap your stash and share with us!
Now, my layout has nothing to do with good ol' St. Nick, but I did use lots of circles! Our older daughter is now a freshman in high school, so I recently scrapbooked the photos I took of her all dressed up and ready for Fall Ball, her first high schools dance. For the layout, I used a sketch from Close To My Heart's Make It From the Heart, Vol. 1 how-to guide, but modified it to fit my photos. I also dragged out my big Marvy circle and scalloped circle punches.
The retired Baby Pink and Grey Flannel cardstock and inks are a perfect match for her dress! I also accented this layout with the retired Bliss pink & grey flower assortment. Here's a close up of the title (Old World Alphabet) with that gorgeous silver shimmer trim self-adhesive tape:
Since it was her dance, I had her write the journaling for her layout. I love how it all came together!
Now it's your turn! Circle around with us at SOS! All styles, products, and skill levels are welcome. Scrap your stash and share with us!
Wednesday, November 14, 2012
Scrap Our Stash November Challenge: Tear It Up!
This month's Scrap Our Challenge is to tear it up! Tear your paper to add texture and dimension to your layout without tons of bulk.
I love creating natural elements like mountains and waves with torn paper. Tearing can really soften straight edges. If your cardstock has a white core, when you tear the paper toward you, the white core will show. If you don't want the white core to show, either tear your paper away from you, or turn it over and tar it toward you on the back of the piece you plan to use. That is how I created my "mountains" for my layout of our trip to Chimney Rock State Park in North Carolina. To give the mountains further definition, I inked the torn edges in Twilight ink on the Twilight cardstock.
The photo collage was made through Walmart.com when I uploaded and purchased my photo prints.
This layout uses the Close To My Heart Clementine paper pack, the Old World Alphabet stamp set, and the Cottage Assorment of fabric and button flowers. I used Twilight, Creme Brulee, and Saddle inks too.
We'd love for you to tear it up this month and share your layout at Scrap Our Stash! All products and skill levels are welcome!
I love creating natural elements like mountains and waves with torn paper. Tearing can really soften straight edges. If your cardstock has a white core, when you tear the paper toward you, the white core will show. If you don't want the white core to show, either tear your paper away from you, or turn it over and tar it toward you on the back of the piece you plan to use. That is how I created my "mountains" for my layout of our trip to Chimney Rock State Park in North Carolina. To give the mountains further definition, I inked the torn edges in Twilight ink on the Twilight cardstock.
The photo collage was made through Walmart.com when I uploaded and purchased my photo prints.
This layout uses the Close To My Heart Clementine paper pack, the Old World Alphabet stamp set, and the Cottage Assorment of fabric and button flowers. I used Twilight, Creme Brulee, and Saddle inks too.
We'd love for you to tear it up this month and share your layout at Scrap Our Stash! All products and skill levels are welcome!
Labels:
challenge,
CTMH,
Scrap Our Stash Design Team,
scrapbooking,
stamping,
techniques
Subscribe to:
Posts (Atom)