 Welcome to the Close To My Heart Stamp of the Month Blog Hop! With February's set, Friendship, you can create gorgeous damask patterns. Today I have not one but two tutorials for you! (Wow, two for the price of one! LOL)
If you've arrived from Terrie's blog, then just keep on hopping. Whether this is your first stop or not, just click HERE to go to Wanda's blog next. That's how easy the hop is!
For my first card, I got crafty with the Jenny's Coat technique. It is very similar to Joseph's Coat (hence the name) but uses patterned paper as your base instead of ink-sponged card stock. Here's the Jenny's Coat tutorial. (If you'd like to skip the tute, leave me a comment and then head on over to Wanda's blog. Thanks for looking!)
1. Choose your patterned paper and cut it to fit your focal image (solids work best). This gorgeous paper is from the new Sweetheart paper collection. Ink up your stamp in VersaMark (or some other embossing) ink.
 2. Stamp your image onto pretty patterned paper.
 3. Sprinkle clear embossing powder onto your stamped image.
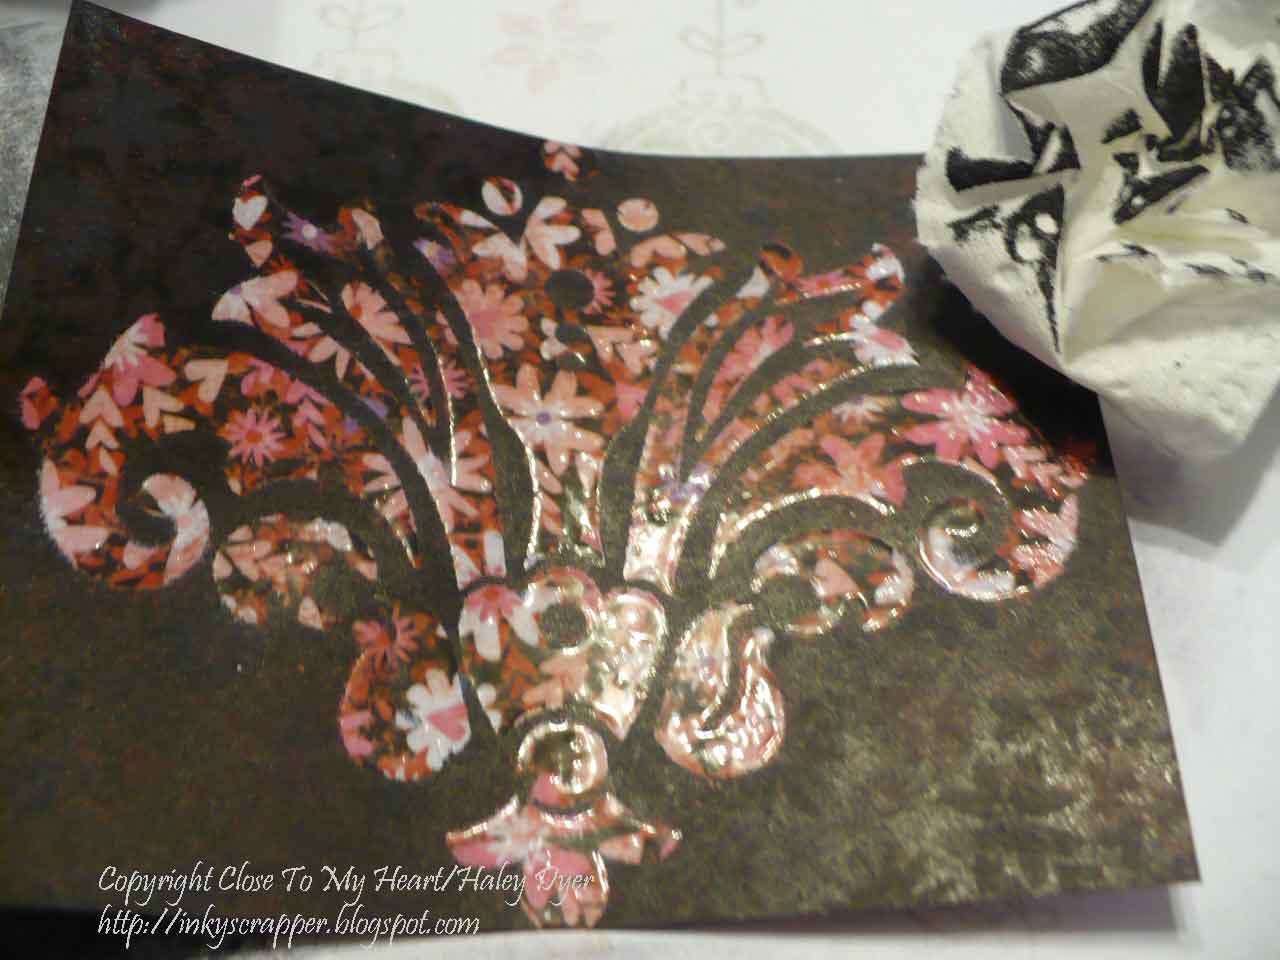
 4. Dump off the excess powder and return excess to jar. (You might want to take a small paint brush and brush off any excess powder on your paper.)
 5. Use a heat tool to melt and set the embossing powder.
 (Please ignore my humble embossing "helper." It's a scrap of a box and a clothespin to hold my paper in place. My old one had aluminum foil wrapped around the flat box strip which can really help you emboss quickly and evenly. This little helper can really save your fingers! That heat tool gets HOT!)
 6. Ink up a rubber brayer with black (or other dark) ink. (To ink up your brayer, roll it across your ink pad, pick it up, and roll many more times. Rolling back and forth will only add ink to the same spot, so pick it up and roll some more.)
 7. Starting off the edge of your patterned paper, roll the brayer across your piece all the way to the other side. Continue to ink up your brayer and roll, roll, roll. (This part can get pretty messy!) I like to start off each edge, so that I roll over my patterned piece from all four directions. You will have to roll the brayer over it many times to get dark coverage.
 8. Once you've covered your patterned piece (or get tired of brayering, whichever comes first), set the piece to the side to dry for a bit. (This step isn't entirely necessary, but I found it helped me NOT to transfer black ink to every single thing I touched or looked at in the process.)
9. Wad up a piece of toilet paper, paper towel, kleenex, etc. Buff your embossed image to remove the resisted ink. (Buff is a technical term for rubbing the image in a circular motion.) Removing the excess ink will really make your Jenny's Coat technique POP.
 You may want to set this piece aside again for a while to dry completely.

Here's a close-up of that lovely Jenny's Coat technique.
If you're with me so far, I also thought I would show you how I made this particular card. Can you stand another not-so-quick tutorial? For the sidefold card, I used the same focal image but stamped it in Baby Pink. Using Tulip ink, I stamped the lovely sentiment from the February Stamp of the Month right over the top. Guests at my Open House in February will be able to make either this card or the o ne at the bottom of this post.
 You may want to set this piece aside again for a while to dry completely.
Here's a close-up of that lovely Jenny's Coat technique.
If you're with me so far, I also thought I would show you how I made this particular card. Can you stand another not-so-quick tutorial? For the sidefold card, I used the same focal image but stamped it in Baby Pink. Using Tulip ink, I stamped the lovely sentiment from the February Stamp of the Month right over the top. Guests at my Open House in February will be able to make either this card or the o
 ne at the bottom of this post.
1. Line up the damask images to "cluster stamp" your background: place multiple stamps on your block to load them all up with ink and stamp at one time. (I had to stamp these five stamps/one block twice for each card.) I stamped them with Baby Pink ink onto Baby Pink cardstock.

2. Use our new 2" scalloped circle punch to cut out two circle. Cut each circle in half, using three halves on glued near the edge of the card as follows:


(I like to finish with the center piece, but you could work from right to left or left to right to overlap them.)

3. Cut a o.5"x5.5" strip of Black cardstock and adhere over the scalloped halves so that your card front now looks pretty instead of messy.

4. Mat your focal image (I used Cotton Candy cardstock on some and the Sweetheart floral B&T on others.) and then attach to the card front.

Now head to Wanda's blog for the next stop on the hop! Come back here soon for more artwork.
If you do not already have a Close To My Heart consultant and you're interested in getting this stamp set for yourself, contact me or go to my CTMH website.
Gorgeous cards! Love that first technique! :-)
ReplyDeleteLove your creations!
ReplyDeleteGreat techniques! I especially love the first one.
ReplyDeleteOh just blow me away! I thought my clear embossing was cool but yours has just blown me away!! Very cool idea!!
ReplyDeleteI love the card with the "A Friend is..." sentiment, it's my favorite - but the others are beautiful, too.
ReplyDeleteGreat tutorial and cards! Love them! Thanks for sharing.
ReplyDeleteLove the technique! Beautiful card!
ReplyDeleteTwo great ideas! Didn't think I'd learn something new - boy was I wrong! Gotta use these ideas!
ReplyDeleteI can't wait to try this!
ReplyDeleteGreat cards! Can't wait to put these ideas to use. TFS
ReplyDeleteWOW! That is so cool! Thanks for sharing your technique!
ReplyDeleteYour cards are gorgeous. Thanks for sharing the resist technique. I love how the patterned paper popped out.
ReplyDelete