Showing posts with label Workshop Your Way. Show all posts

Monday, April 3, 2023

Add a Video to Your Layout

Recently I was in a class by Stacy Julian (Google her if you don't know her!), and she showed how you could add videos to your photo layouts by adding QR codes.  GENIUS! 


I decided to give it a try on this layout featuring photos of our visit to Seville when Macey and I stumbled upon a group giving a flamenco performance!  (I was happy to tip them since we hadn't been able to get a flamenco dinner reservation.)  Such a fun, unexpected moment!

This layout was made with the Are We There Yet? Scrapbooking Workshop kit.  If you hurry, you may still be able to find it on my website!


To add your own videos via QR code, follow these steps:

  1. Upload your video(s) to YouTube.  You can make them private or public.
  2. Copy the YouTube link.
  3. Find a free QR code generator, and add the link there.
  4. I pasted my QR codes into a Google Doc so that I could measure their size to fit my space.
  5. Print the QR code on cardstock or photo paper.
That's it!  How easy peasy is that?  How fun would it be to listen to baby's first words, watch a dance recital clip, and so much more!  What do you want to try this with?

Wednesday, April 28, 2021

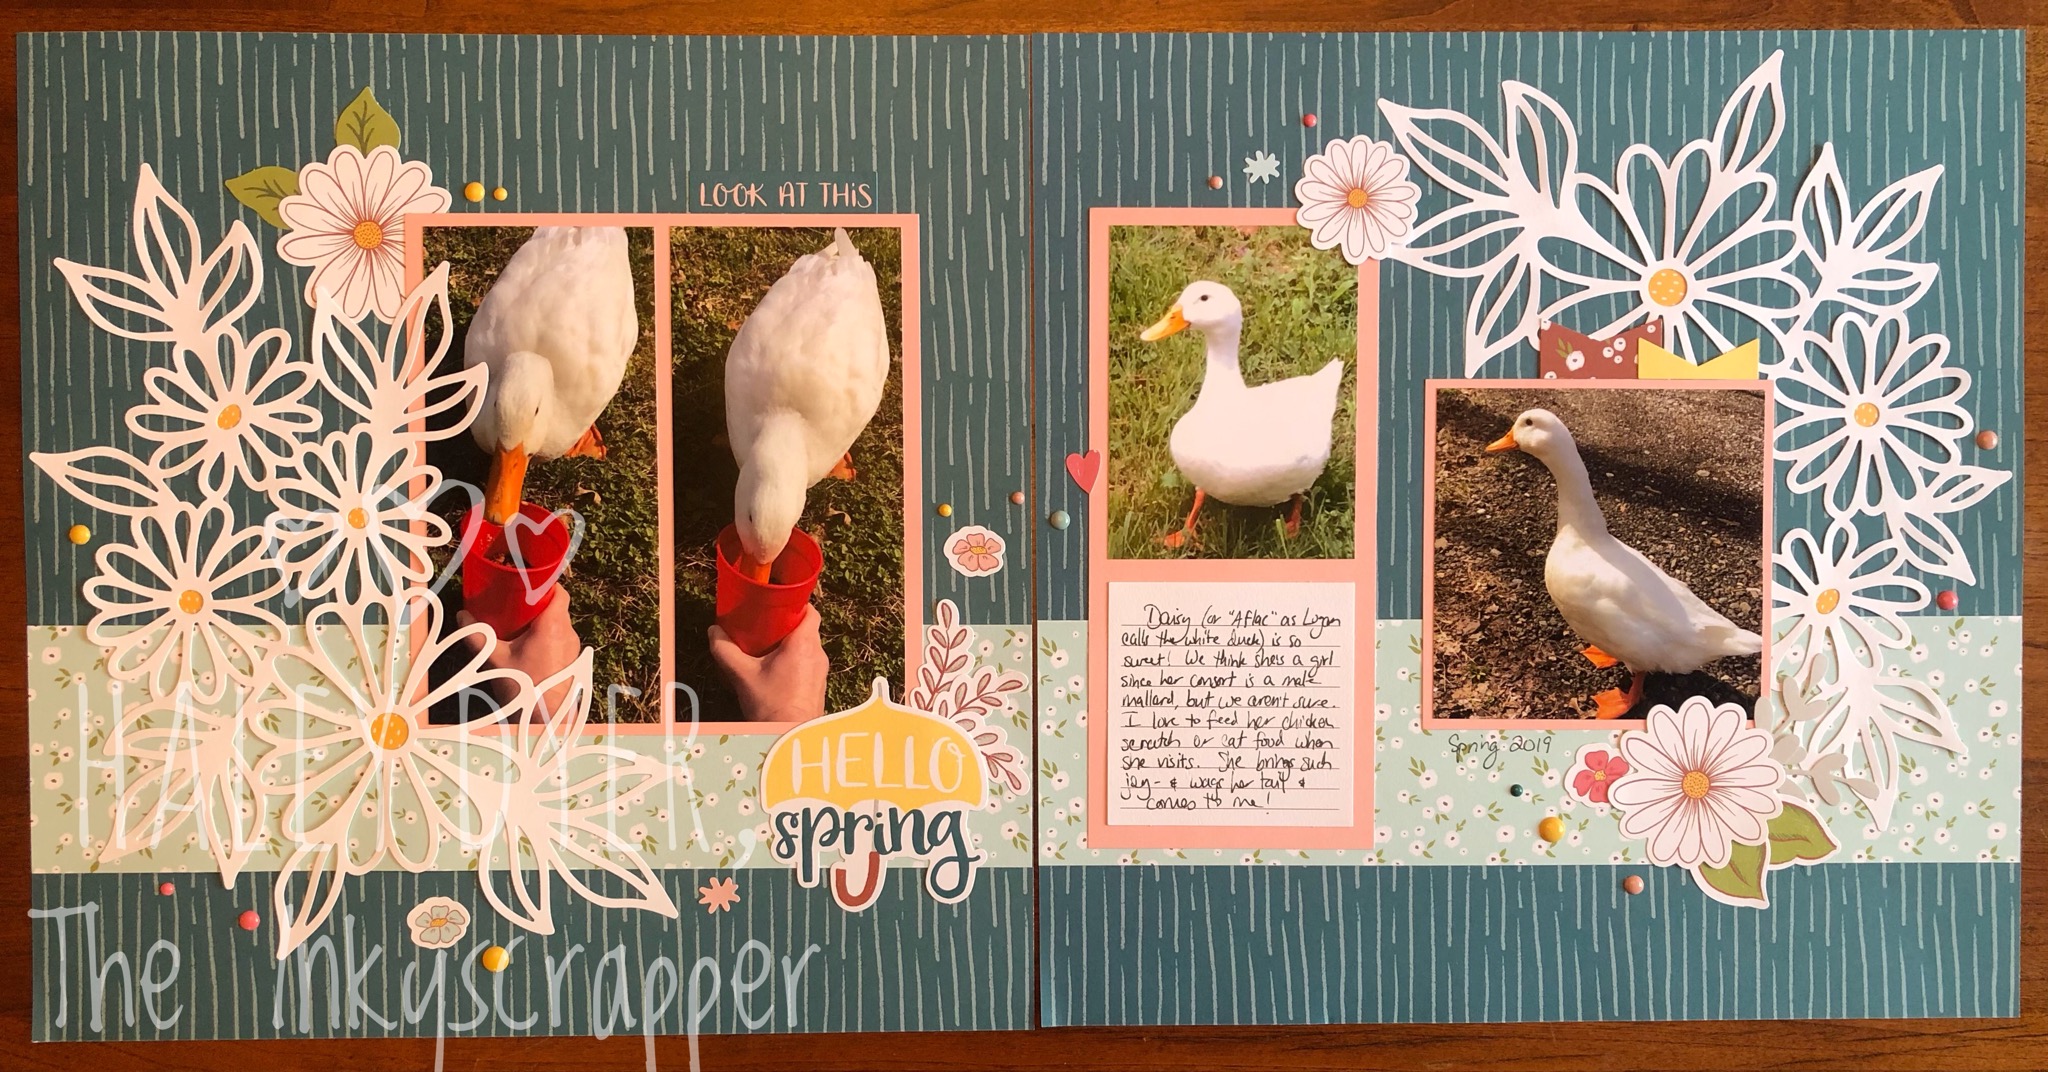
Daisy Meadows Scrapbooking Workshop Layout 2

The workshops in the March/April Close To My Heart Idea Book are only available for a few more days, so be sure to get yours before they are gone!  (You can order HERE if you aren't already affiliated with a CTMH Maker.)  Here is my version of the second layout of the Daisy Meadows scrapbooking workshop.


This sweet white Pekin duck must have been turned out by someone a few years ago (along with a mate who is no longer with her), and having affectionately nicknamed her Daisy, of course I had to pair some of my photos of her with the Daisy Meadows scrapbooking workshop!  When I cut these workshops, I do not usually cut the photo mat pieces until I have my actual photos, because I usually tweak the recommendations.


These pretty daisy die cuts are exclusive to the scrapbooking workshop, as is the pretty patterned paper band.  The sticker sheet is available in the workshop or with the Daisy Meadows paper pack.


If you're a scrapper (or want to be), be sure to grab the current scrapbooking workshops so that you can quickly create gorgeous layouts!  All you'll need is adhesive, a paper trimmer, scissors, and a journaling pen to create gorgeous layouts.

Thursday, March 18, 2021

March/April New Product Blog Hop

Close To My Heart continues to crank out amazing products every two months, so it is time for the March/April New Product blog hop. (If you're already hopping, then you've probably arrived from Krista's blog.  From here, you'll visit Darlys's blog next.)  I am showcasing the Daisy Meadows collection.


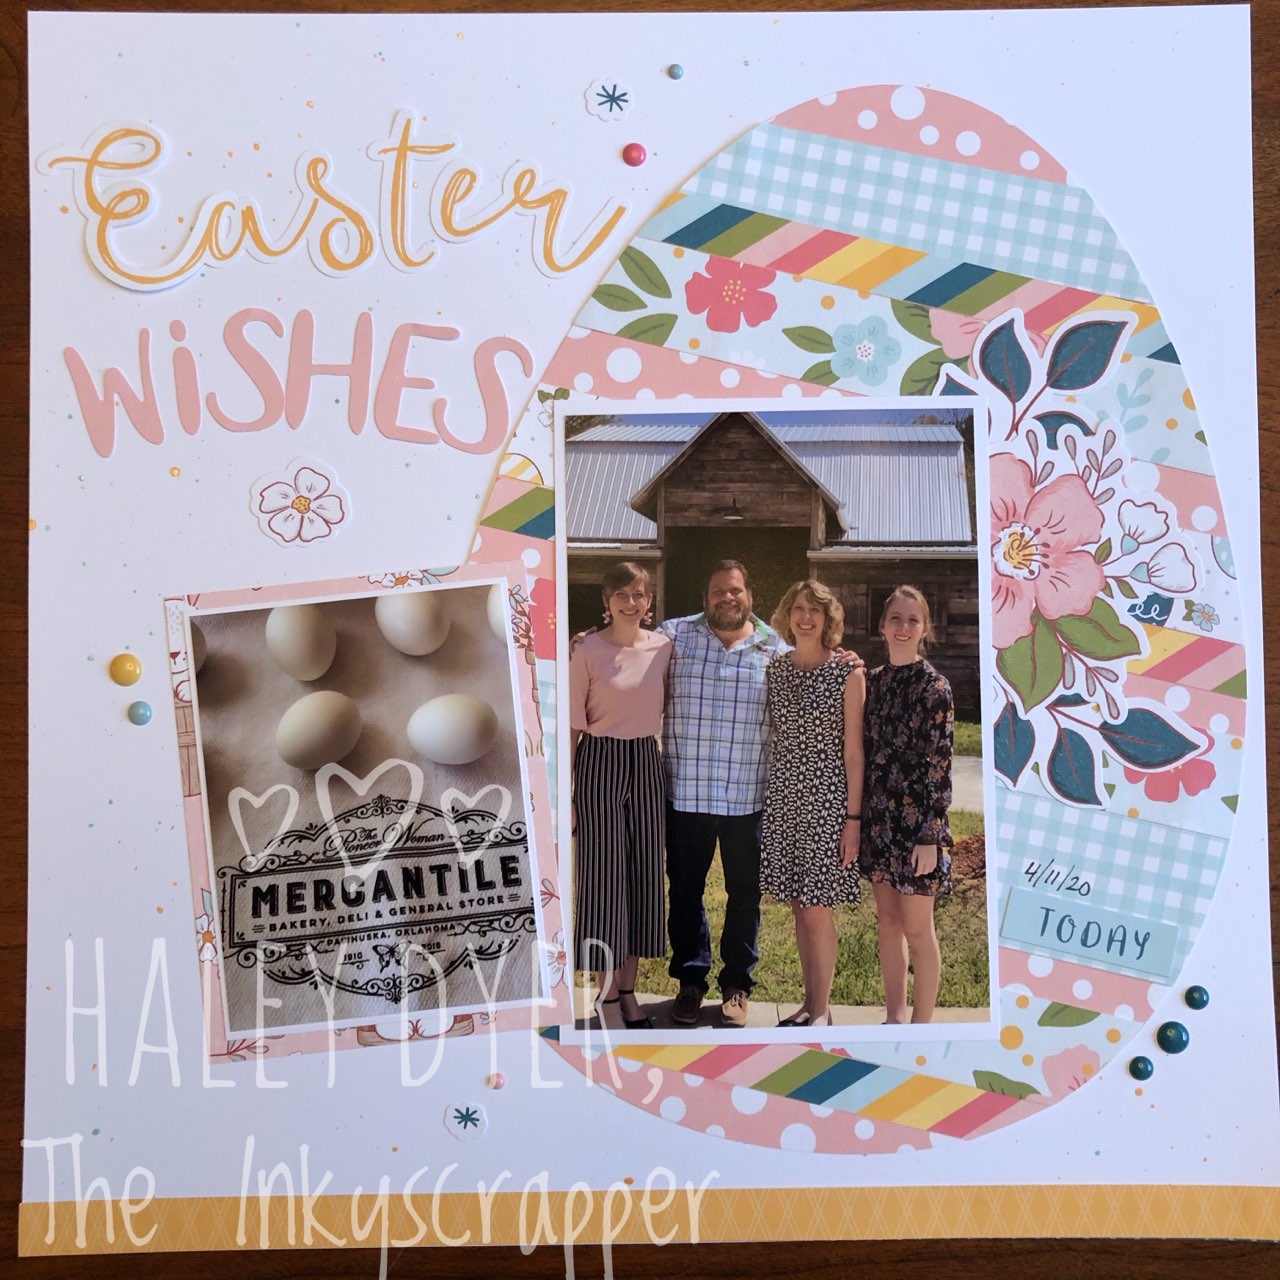
My first project is the first project in the Daisy Meadows scrapbooking workshop.  I used our Easter 2020 pictures, and I love how it turned out!  Instead of using watercolors to splatter my background, I grabbed my Sundance, Peach, and Mint shimmer brushes.

How much do you love that huge Easter egg?  The workshop kit makes is so easy to put together!
On the right page, I have added a 4"x4" flip flap to add more photos to my layout.

My second project is a layout using the Daisy Meadows paper pack to celebrate my aunt's 80th birthday last year.  (Sadly, this was the last day that I got to be with her, so these photos are especially precious to me.)  I cut out Easter eggs from the collection make the balloons, and added the presents from teh cute Winter Penguins stamp set.

Finally, here is a diagonal split front card that I made using the Daisy Meadows Scrapbooking stamp set and Thin Cuts.

I stamped the flower in Cinnamon and then added Peach and Desert Rose shimmer brush.  I stamped the leaves in Fern to match the paper.

Thanks for letting me share some Daisy Meadows projects with you!  I'd love for you to leave a comment before continuing on the hop at Darlys's blog.


Tuesday, April 7, 2020

CTMH Workshop Kits & Guides

In these strange times of physical distancing and staying at home, CTMH workshop kits make great projects that you can complete on your own!  On my Facebook business page (Click on the link to join me there!), I shared the contents of the adorable Seas the Day Cardmaking Workshop Kit.


Did you know that you can download the workshop guides without making a purchase?  Perhaps you like the style of the cards but aren't into the nautical theme?  Recreate them with your own paper and stamps!  I made a short video that you can watch HERE to show you how.  If I can help you with your crafty needs in any way, please reach out to me!

Wednesday, January 15, 2020

New Product Blog Hop: January-February 2020

Is your new year off to a great start?  I'm really excited about all of the possibilities of 2020!  If you haven't yet browsed the CTMH January-February Idea Book, what are you waiting for?  Some of my consultant friends and I have joined together to showcase some of our favorites from this special edition.  (If you're already hopping then you've probably arrived from Darlys's blog.  From here, you'll visit Danielle next.)
The Spruced Up collection captured my heart immediately!  Here are our pictures from selecting our Christmas tree this year (2019).
The instructions make the layouts come together so quickly! 


 I used Liquid Glass to adhere all of the wooden pieces.

All of these gorgeous wooden pieces are included in the collection.

 Because I wanted to include 5 instead of 3 photos, I added pictures with flip flaps.

Thank you for hopping by!  Please leave a comment before hopping off to Danielle's blog to continue the circle of new products and fabulous creations.
{Click HERE for all the hop participants and their blogs.}

Thursday, August 15, 2019

Sparkle and Shine Technique Blog Hop

Are you ready to sparkle and shine?  We have a great collection of sparkly projects to share with you along this hop.  (If you're already hopping, then you've probably arrived from Michelle's blog.  From here, you'll visit Danielle next.)
We were very fortunate to travel to Europe this summer, starting in Germany where our older daughter was studying abroad, and ending up in Paris.  Because we were there for a week, I plan on dedicating an entire album to Paris.  Here is my title page.  We actually saw the Eiffel Tower at night on our very last night there!
To make this layout really sparkle, I used gold glitter paper, black shimmer trim, and my gold shimmer brush. I started out "painting" gold shimmer behind my title (cut from the CTMH/Cricut Artbooking collection), but then decided to add more in basically all the white areas.  Unfortunately, that shimmer doesn't photograph well.
I used the Seasonal Mix-In paper pack and Saffron cardstock to match my photo.  The triangles were also cut from the Artbooking collection.  Can you tell where I got my layout idea?  Look through the current Seasonal Expressions...

Look on page 43...

I used the Into the Wild Deluxe Scrapbooking Workshop instructions to create my layout!  Don't be afraid to CASE (copy and steal exactly) something you like (while giving credit to the original) or add your own twist.  I think this black, white, and gold layout is very sophisticated yet the original was quite rustic.  The bones, however, are pretty much identical.

Thank you for visiting and sharing a few more of my travels with me.  (There will be lots more to come!)  I'd love a comment before you hop on over to Danielle's blog next!

Saturday, December 15, 2018

Featured Paper Collection Blog Hop: Oh What Fun

As much as I love traditional holiday color combos, there is something so, well, FUN, about the Oh What Fun collection!  Maybe being the mom of two girls (now almost grown women) plays into my love of a pink and green Christmas?  You are going to get some spectacular ideas with the Oh What Fun collection on this blog hop. (If you're already hopping then you've arrived from Carol's blog.  From here, you'll visit Shirley's blog next.)
Do you need a quick gift?  I'm not sure where I got these plastic bags, but I stuffed them with a little hand sanitizer and a yummy truffle.  Creating the topper was easy!  I just measured how wide the bag was, how long the topper needed to be, and then doubled the length.  I kept this easy peasy with the adorable Merry Christmas stamp in Raspberry.  The tree is one of the stickers in the Oh What Fun collection.  The Raspberry twine comes with the Workshop Your Way (and is available separately).

Here is a card I made using the December stamp of the month, Candy Cane Alphabet.  I was trying to extend this pack beyond the Christmas season.
You can read more about this card HERE if you'd like.
Finally, I'm sharing another project I've featured here on the blog, an Oh What Fun holiday layout.  You can learn more about it HERE if interested.

Hopefully you've been inspired to get crafty with the Oh What Fun collection. I'd love a comment before you hop on over to the sensation Shirley's rockin' blog.  Thanks for stopping by!

Saturday, November 17, 2018

Featured Paper Collection Blog Hop: 'Tis the Season

Although I'm partial to celebrating one holiday at a time, in the crafting world you have to work ahead of the season.  'Tis the Season is a wonderful, traditional collection to celebrate your holidays! (If you're already hopping then you've arrived from Carol's blog.  From here, you'll visit Shirley's blog next.)
My layout is very simple.  It came directly from the 'Tis the Season Workshop Your Way, which made it super fast to create.
Don't you love the gold foil in the Complements?
Now to decide if I'm going to put last year's or this year's pictures on my layout...

Be sure to continue along this blog hop to see some pretty creations with the 'Tis the Season collection.  Visit SHIRLEY next!

Saturday, November 18, 2017

Featured Paper Blog Hop: Silver & Gold

This month's featured paper collection is the beautifully elegant and festive Silver & Gold paper pack, just in time for making gorgeous holiday projects!  (If you're already hopping then you've probably arrived from my friend Shirley's blog, and you will head to Cheryl's blog next.)
I am in the process of modifying the recently released 64-card Basics Fundamentals workshop to use with the Silver & Gold Workshop Your Way collection plus Cranberry card stock.  These are the second set of three cards from the 8-card workshop (8 each of 8 designs).
After stamping my image from the Prince of Peace set, I used my gold marker to accent the guiding star and a few of the star "dots."  A few gold glitter gems finished this one off.
For this simple card, I stamped the tree from the Beary Christmas Cardmaking set in Pewter then the banner in Cranberry.  Gold shimmer trim & a gold glitter gem from the Silver & Gold Workshop Your Way added some sparkle.  (Next time I may place the gold on top of the Cranberry so that you can see all of the tree.)
Look closely to see how I stamped the sentiment after inking it Cranberry then rolling the edges in Black.  Finally, I colored in the leaves with my gold marker and added the gold shimmer trimmer "ribbon."

Now here are the first three cards that I made.  (You can read more about them HERE.)
Two more to go and I will have all 8 designs finished, cut, and ready to glue and stamp.  (If you would like a copy of the card workshop instructions, contact your CTMH consultant!  If you don't have one yet, feel free to email me at inkyscrapper @ gmail.com.)

Thanks for hopping by!  I'd love for you to leave a comment before you go on to see Cheryl's Silver & Gold project!

Saturday, October 21, 2017

Beary Christmas Blog Hop

This month's featured CTMH paper collection is Beary Christmas!  We've got some great ideas to share with you! (If you're already hopping then you've probably arrived from my friend Shirley Ross's blog.  From here, you'll visit Kathleen's blog next.)
This card uses the Beary Christmas Cardmaking stamp set along with the paper, Beary Christmas dots, and silver shimmer trim.  The Workshop Your Way collection includes the paper, dots, shimmer trim, and Complements for one great low price (or you can order the pieces separately.)  I stamped the wreath in New England Ivy and then the holly berries in Cranberry.  I love the glittery dots with the silver shimmer trim.
This card set uses the images from the October stamp of the month, Christmas Tunes, with the Beary Christmas collection.  You can read more about this set HERE.

Thanks for hopping by!  Make this year a Beary Christmas!  Now visit Kathleen's blog next!

Sunday, October 15, 2017

CTMH Technique Blog Hop: Terrific Tags

This month's Technique Blog Hop is focusing on the terrific tags that Close To My Heart offers.   (If you're already hopping then you've probably arrived from Annemarie's blog.  From here, you'll visit Judy Faye next.)  We currently have two tag kits available, plus it is really easy to make your own if you don't have a kit.  That's what I chose to do today!
My tag is actually a wall hanging!  I was inspired by wooden door tags that I saw on Pinterest.  For mine, I used the CTMH/Cricut Artbooking cartridge and the Falling for You Workshop Your Way (with a few additional materials).  To begin, I cut a photo mat that looks like a tag to me.  Be sure to set this cartridge on "real dial size" before you cut!  Mine is 9-3/4". 
Then I cut the "give thanks" sentiment twice: once on the Fern B&T (at 3") and again on the Goldrush B&T.  I carefully cut the "thanks" portion out of the Goldrush piece to layer on top of the Fern piece.  Next I painted over the "thanks" with my gold shimmer pen twice to make it sparkle.  (That shimmer pen is really difficult to photograph, but hopefully you can see a bit of its sparkle.)
The pretty pumpkin patch image is from one of the Picture My Life cards from the Falling for You collection that I fussy cut and added to the bottom of the tag.  All of the kraft pieces are from that collection.  (I added one of the kraft leaves into the pumpkin patch.)  I also only glued the pumpkin/acorn portion of that piece and curled the outside leaves up off the project a bit.  It adds some dimension that was very difficult to photograph.  Finally, I did add the gold shimmer trim behind the kraft border piece, the gold glitter dots, and the pretty gold ribbon (from the Basics ribbon collection).  I love how this turned out, and it is going to stay on our coat closet door in our entryway through Thanksgiving.

I hope you like my twist on a traditional tag project.  Please leave a comment before you go!  I really appreciate your feedback. Now go see what Terrific Tag project Judy Faye has!  (Just click on her name to visit her blog.)  Be sure to give thanks always!

LinkWithin

Related Posts with Thumbnails