Monday, October 30, 2017

H2H Challenges: Signs of the Season

This week's Heart2Heart challenge is "signs of the season," and this 3"x6" card fits the bill for November.  It's a lovely size and such fun to use.  The actual sketch comes from the Wishes how-to guide.  I used the Falling for You collection and the Inspired Words stamp set (on the center panel).  The left panel uses one of the Complements (stickers) from the collection, and the right one is a piece of the patterned paper in the kit.
I used my waterbrush to color the center image and accidentally dropped a dot of color onto the bottom of my card.  That mistake turned into a serendipitous border! I just continued to add dots all the way across the bottom and top of my card.  It actually turned out cute.  My CTMH team's motto is "It's not a mistake; it's an opportunity to embellish!"  All my customers know this one too!
Can you see how I added gold shimmer with the shimmer pen to all of the Saffron and Goldrush images?  It sparkles in real life.

In all things, give thanks!  Please leave a comment with something/someone for which you're thankful.  Be sure to visit the H2H blog!

Saturday, October 21, 2017

Beary Christmas Blog Hop

This month's featured CTMH paper collection is Beary Christmas!  We've got some great ideas to share with you! (If you're already hopping then you've probably arrived from my friend Shirley Ross's blog.  From here, you'll visit Kathleen's blog next.)
This card uses the Beary Christmas Cardmaking stamp set along with the paper, Beary Christmas dots, and silver shimmer trim.  The Workshop Your Way collection includes the paper, dots, shimmer trim, and Complements for one great low price (or you can order the pieces separately.)  I stamped the wreath in New England Ivy and then the holly berries in Cranberry.  I love the glittery dots with the silver shimmer trim.
This card set uses the images from the October stamp of the month, Christmas Tunes, with the Beary Christmas collection.  You can read more about this set HERE.

Thanks for hopping by!  Make this year a Beary Christmas!  Now visit Kathleen's blog next!

Monday, October 16, 2017

Share a Smile Blog Hop

Close To My Heart has a wonderful promotion this month!  Did you know that CTMH is a great supporter of the Operation Smile charity?  (Feel free to read more HERE.)  This year, we have the adorable Punny Pals stamp set to support OS: $7 from every purchase goes to this wonderful charity.  To help Operation Smile even more, this month only CTMH is offering an adorable card kit to go along with this set: card stock, card bases and envelopes, and THIN CUTS to make cutting them out super easy!  Join me and my fellow blog hop consultants in sharing this set and special offer with you.  (If you're already hopping then you've probably arrived from Jean's blog.  From here you'll visit my talented Heart2Heart Challenges teammate Alyson Mayo next.)
I have two 3"x3" cards for you using the Punny Pals stamp set.
The first uses pieces of the Basics and Whimsy Fundamentals to create this monkey card.  I colored this cute fellow with colored pencils.  To create the sentiment, I first inked it up in Canary and then re-inked the I'm and about you with Nutmeg ink prior to stamping.  A little white & gold ribbon finished it off.

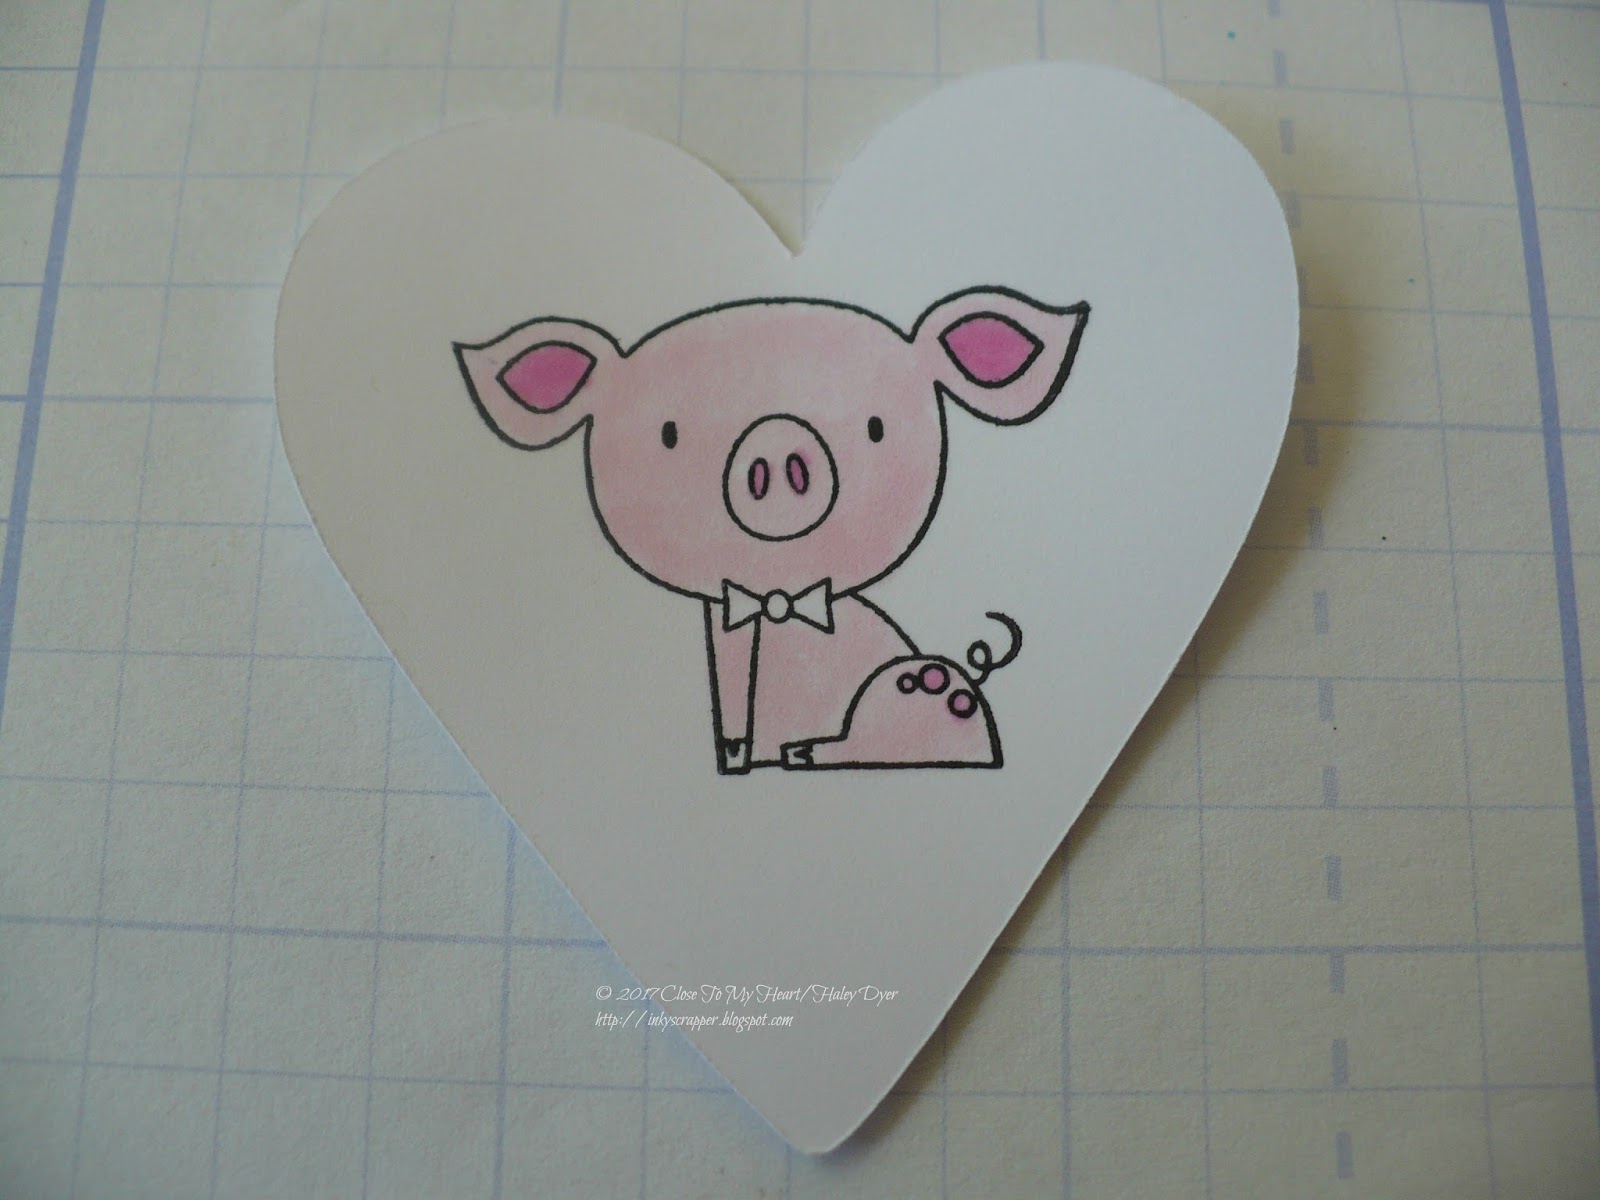
My second card uses the Adventure Fundamentals and card stock (Blossom & Willow).  All of the shapes were cut with the CTMH/Cricut Flower Market cartridge. Here's a quick tutorial on how I waterbrushed the cute pig.
First stamp the pig with Archival Black ink onto the White Daisy card stock heart.
Then squeeze your closed ink pad lid & base to transfer ink to the inside of the lid.  Use your waterbrush to pick up color.  Then color the top half of the pig.  (I actually turned him upside down so that his chin would be darker than his head, trying to have a little perspective and realistic light.)
Then I turned him right side up to color from the neck down.
I used Raspberry with my waterbrush to color the inside of his ears and snout plus his little spots.
Finally I colored his bow tie with Willow ink and my waterbrush.  (Clean your waterbrush by wiping it on a paper towel and squeezing more water through the brush tip until it runs clean.

Thank you for hopping through! I hope my cards have shared a smile or two!  After leaving me a comment, go visit ALYSON next.
{Click HERE for all the hop participants and their blogs.}

H2H Challenges: Under the Weather

All of the Heart2Heart Challenges are open for the entire month once they are issued (so all the October challenges are open through 10/31) and this one, Under the Weather, especially touches my heart right now.  My principal announced a few short weeks ago that she has been diagnosed with breast cancer.  She is having a lumpectomy today and then will start radiation soon.  I made this card for her.  She is such a fighter and is in excellent spirits!
I used the hurricane relief stamp set, Stronger Together, for the sentiment, and my CTMH/Cricut Flower Market cartridge for the banner.  The background is a gorgeous piece of Raspberry B&T that I paired with Emerald B&T (both from the Adventure Fundamentals), Emerald card stock, and Adventure ribbon.  To achieve the two-toned sentiment, I inked up most of the stamp with Raspberry ink and the very bottom with Emerald.  (Our clear My Acrylix makes it easy!)  A pair of White Dots finished off this card.

If you're of the praying sort, please keep my principal in your prayers!  She has a great attitude and plans to kick cancer to the curb!  Thank you so much! Be sure to visit the H2H blog to see what our Design Team came up with for the Under the Weather challenge and all the October challenges.  Won't you join us?

Sunday, October 15, 2017

Hey, Pumpkin! Card

It is hard to believe that Halloween is right around the corner!  The leaves here are starting to change, but it's been unseasonably warm (not that I'm complaining).  I wanted to make a card that could be used for fall or Halloween.
I grabbed the Cats & Bats paper collection and found this pretty pumpkin on my CTMH/Cricut Artistry cartridge.  (There's also a cute jack o'lantern if you wanted more of a Halloween card.)  Can you tell that the pumpkin stem uses the lighter side of the Willow card stock?  I love that our card stock is now two-toned: the original shade and a lighter version on the back!  This sketch is from Make It From Your Heart, Vol. 1.  Only the center panel screams Halloween.  To finish off the card, I used black & gold ribbon and black dots.

I'm linking this card up to both the Three Amigos challenge 4, Cats & Bats, and the Fantabulous Cricut Challenge #311, Pumpkins.

CTMH Technique Blog Hop: Terrific Tags

This month's Technique Blog Hop is focusing on the terrific tags that Close To My Heart offers.   (If you're already hopping then you've probably arrived from Annemarie's blog.  From here, you'll visit Judy Faye next.)  We currently have two tag kits available, plus it is really easy to make your own if you don't have a kit.  That's what I chose to do today!
My tag is actually a wall hanging!  I was inspired by wooden door tags that I saw on Pinterest.  For mine, I used the CTMH/Cricut Artbooking cartridge and the Falling for You Workshop Your Way (with a few additional materials).  To begin, I cut a photo mat that looks like a tag to me.  Be sure to set this cartridge on "real dial size" before you cut!  Mine is 9-3/4". 
Then I cut the "give thanks" sentiment twice: once on the Fern B&T (at 3") and again on the Goldrush B&T.  I carefully cut the "thanks" portion out of the Goldrush piece to layer on top of the Fern piece.  Next I painted over the "thanks" with my gold shimmer pen twice to make it sparkle.  (That shimmer pen is really difficult to photograph, but hopefully you can see a bit of its sparkle.)
The pretty pumpkin patch image is from one of the Picture My Life cards from the Falling for You collection that I fussy cut and added to the bottom of the tag.  All of the kraft pieces are from that collection.  (I added one of the kraft leaves into the pumpkin patch.)  I also only glued the pumpkin/acorn portion of that piece and curled the outside leaves up off the project a bit.  It adds some dimension that was very difficult to photograph.  Finally, I did add the gold shimmer trim behind the kraft border piece, the gold glitter dots, and the pretty gold ribbon (from the Basics ribbon collection).  I love how this turned out, and it is going to stay on our coat closet door in our entryway through Thanksgiving.

I hope you like my twist on a traditional tag project.  Please leave a comment before you go!  I really appreciate your feedback. Now go see what Terrific Tag project Judy Faye has!  (Just click on her name to visit her blog.)  Be sure to give thanks always!

Sunday, October 1, 2017

October Stamp of the Month Blog Hop: Christmas Tunes

Yes, the calendar only says October 1, but in the crafting world, you have to work ahead of the holidays.  For that reason especially, you are going to love the October stamp of the month, Christmas Tunes.  I can't wait for all the great ideas along this blog hop!  (If you're already hopping then you've probably arrived from Jean's blog.  From here, you'll visit Michelle next.)
Because this set is perfect for Christmas, I decided to make a card with each of the four main images.  I used the Beary Christmas paper pack and dots, waterbrush, and White Daisy cards and envelopes for each of my cards.
 This first one is almost exactly like the "stample" in the Holiday Expressions.  I stamped the image with Archival Black ink onto the White Daisy panel and onto a piece of scrap Glacier cardstock to make the base.  If you look closely, you can see how I used the waterbrush with Glacier ink to add a little shading to the snow globe and then went back over the inside of the globe with the shimmer brush.  I added a piece of Whimsy Glacier ribbon to complete this card.
The second card uses the beautiful wreath stamped in New England Ivy with the banner in Cranberry.  Coloring the holly berries and leaves goes very quickly!
 My third card was a little more challenging.  The colors aren't as vibrant as I would have liked, but it was quick to make.  (I added Tangerine to this card.)
 The fourth card is very similar to the card in the Holiday Expressions.  One thing that was difficult to photograph is how I added sparkle to the white stripes with my shimmer brush.
It was my goal to make a set of cards that could easily be replicated and "mass produced" for the holidays.   After leaving a comment, hop on to Michelle's blog to continue!  Thanks for stopping by!
{Click HERE for all the hop participants and their blogs.}

LinkWithin

Related Posts with Thumbnails