Saturday, August 19, 2017

Jack Blog Hop

Jack is Close To My Heart's featured collection this month, and you're going to get some great ideas with this blog hop!  (If you're already hopping then you've probably arrived from Carol's blog.  From here, visit Erica's blog next.)  I have two very different projects to share with you.
For more details about this card, click HERE.
Here's a different look at Jack with TWO layouts from our European adventure last year.  We visited Kronborg castle.  It may be most famous for being the home of Shakespeare's Hamlet.  I took a million pictures while we were there. so my first layout uses one of our pocket pages (Design 2) to hold five photos on the left, plus a Pocket Plus Memory Protector Design 2 for more photos in the middle.
The Jack color combo was a great compliment to my pictures, so I used elements of the Workshop Your Way to embellish this layout.
Here is the right page and the back side of the Pocket Plus Protector.
For my second layout, I realized that the axes in the Jack collection look a lot like medieval maces or other weapons.
Because it was the 400th anniversary of Hamlet, live actors were reenacting scenes from the play in the castle.  That was so incredibly cool!  We even bumped into the actor playing Hamlet on his break and got a picture together.
Here's a scrapbooking tip: If you're visiting historical places, take pictures of the historical markers and use those photos for journaling.
These pictures are from the pretty, ornate chapel.  (I'm linking my layouts to the Three Amigos Jack challenge.)

Thanks for letting me show you a different side to Jack.  This collection is only available until the end of the month.  I'd love a comment before you leave.  To continue the hop, go visit ERICA'S BLOG next!

Wednesday, August 16, 2017

Annual Inspirations New Product Blog Hop

The 2017-18 Close To My Heart Annual Inspirations because available at the beginning of the month.   (Surely you've seen it by now?!?  If not check it out online HERE.) What is your favorite new product or collection?  You are going to be so inspired by all of the great ideas that you find along this blog hop!  (If you're already hopping then you've probably arrived from Darlys's blog.  From here, you'll visit my Heart2Heart teammate Alyson's blog next.)
When I first saw the Thoughtful Bird stamp set, I knew I would be ordering it ASAP!  My card was inspired by the card featured in the Annual Inspirations Idea Book on p. 76.  This page also explains how to use our new three-step images, so I won't go into too much detail here.  I began by stamping the bird base (the solid bird) in Glacier near the bottom left of a 3.5"x4.75" panel of White Daisy card stock.  Next, I stamped the middle bird layer/image in Lagoon.  The next step is to stamp the beak and feet (in Saffron).  The final step is to stamp the top bird layer/image in Peacock.  Our clear blocks make this pretty painless, but I'm not going to lie and say that it didn't take a little practice to get the images just right (or even "just right enough" LOL).

After completing the bird, I stamped the branch in new Toffee ink and the leaves in first and second generation fern.  I stamped the sentiment in Peacock.  To finish making the card, I layered the stamped panel onto our new two-toned cardstock (Lagoon in this case), with the lighter side cut at 3.75"x5" and the regular/darker side at 4"x5.25".  A strip of Peacock ribbon across the top was the final touch.  (This particular ribbon is retired, but the new Peacock ribbon is even prettier!)

Since I love this bird set so much, I couldn't leave well enough alone!  I stamped it again and again in different color combos following the same basic recipe.  The first color is the bird base, the second color is the middle image, the third color is the beak/feet, and the fourth color is the top image & sentiment.  All the cards have a Toffee branch and Fern leaves.
Canary, Canary, Saffron, and Nutmeg (NEW!) with Canary B&T (Whimsy Fundamentals), gold sequins, and white & gold ribbon
Canary, Saffron, Goldrush, Black with Saffron B&T (Enchanted Fundamentals), pearls (NEW!), and black & gold ribbon
Poppy, Cranberry, Saffron, and Black with Cranberry B&T (Adventure Fundamentals) and red shimmer trim
Pebble (NEW!), Pewter (NEW!), Saffron, and Charcoal (NEW!) with Charcoal B&T (Basics Fundamentals, silver sequins, and Whisper twine.

If you're not tired of this bird yet, I have another one that I made for a challenge/blog hop.  It features the same colors as the first card.  If you'd like to know more, you can learn more HERE.

Thanks for flying by!  I would love to know which color combo you prefer and would love suggestions for future attempts.  Be sure to go see the awesome NEW creation Alyson has made!
{Click HERE for all the hop participants and their blogs.}

Tuesday, August 15, 2017

CTMH Technique Blog Hop: Crazy About Cardstock

Close To My Heart has update our cardstock so that it is two toned!  I am really loving the versatility this provides!  This technique blog hop is showcasing this gorgeous new cardstock.  (If you're already hopping then you've arrived from Melissa's blog.  From here, you'll visit Jana next.)
The Thoughtful Bird stamp set was the first one on my wish list when I saw the new 2017-18 Annual Inspirations catalog and idea book!  To create the bird, I stamped the base in Glacier, the middle stamp in Lagoon, then the beak and legs in Saffron, and finished with the top layer in Peacock.
 On top of my White Daisy card base, I layered a 4"x5.25" panel of Glacier cardstock.  Then I cut 1/4" strips of Lagoon (the lighter shade is the back side and the darker shade is the actual color) and Peacock card stock.  I knew that I wanted to include some shimmer trim, but unfortunately Teal was retired.  What to do? Grab some white and a ShinHan Twin Touch alcohol marker!
 First, I cut the shimmer trim in (sort of) half lengthwise to get a skinnier piece.  I had to tape it to my cutter base to secure it in place with a small piece of clear tape.
 After slicing it to the width I wanted, I used the Peacock Green marker (the best match to Lagoon, in my opinion).  Set it aside for a while to dry.
I colored my clear bitty sparkles the same way!
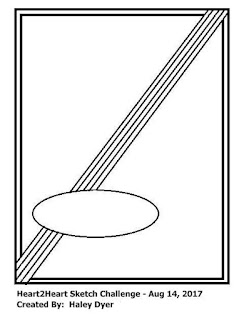
My card is based on the current Heart2Heart Challenges August sketch (turned and rotate a bit).
Thank you for visiting my blog!  I'd love a comment before you leave.  Just click to go on to Janna's blog next!

Sunday, August 13, 2017

Jack Bear Card

The Jack collection will expire at the end of the month, so today I got to play with the Jack Workshop Your Way and the Jack - Cardmaking stamp set.
This card sketch is from Originals on a White Daisy card stock base.  After stamping the cute bear and his arms, I cut him out to attach to my card front.  I also stamped and cut out the sweet heart.  The embellishments are part of the Jack Workshop Your Way collection plus black shimmer trim.  The inside of this sweet card uses the sentiment "I love you more than I can BEAR."

I'm linking this card to the Three Amigos Jack challenge, the Color My Heart Color Dare #256, and the Heart2Heart Challenges Camp Out.

Tuesday, August 1, 2017

August Stamp of the Month Blog Hop: School Years

Our daughter begins her junior year of high school this Friday (and I started back to work yesterday as a teacher in our school system), so the August stamp of the month, School Years, couldn't be more timely.  Now, even if you're thinking that you don't "need" a school-themed stamp set, this blog hop might convince you otherwise!  (If you're already hopping then you've probably arrived from Priscilla's blog.  From here, you'll visit Jean's Stampin Maui blog next.)
Since we do start back this Friday, I went ahead and made a layout to document this special day.  (Usually I scrapbook after the fact, but this time I am working ahead!)  I have so many ALL NEW and EXCITING products to share with you!  First up of course is the School Years stamp of the month.  Next is the cool new patterns in the Enchantment Fundamentals.  Since our school colors are purple and gold, I chose to use Eggplant and Goldrush with the addition of Peacock, Black, and White Daisy.
On this page, I stamped the speech bubble and "first day" directly onto the base page.  The "School is...", arrow, and slate were all stamped, cut out, and then adhered to the layout.  For the arrow, I cut along the inner arrow design rather than the outer for a smaller arrow than the one on the right page. I
For the title, I inked up my "first day" stamp in Goldrush, Eggplant, and Black then stamped onto the White Daisy base.  (I made sure that the eraser of the pencil was Eggplant but that the tip was black.)  I also stamped the pencil on a piece of Goldrush B&T and then paper pieced it onto the stamped base.  For the slate, I stamped it onto the same Goldrush B&T as the pencil, cut it out, and adhered a black rectangle to the center.  (I used the Chalkboard marker for my date.)
For the journaling block, I masked off the "teacher" part since there was no way that I could fit all of my high schooler's teachers in that block.  I had to stamp the image twice, masking off the parts that I didn't want, to create the journaling box.

Also, how do you like this layout sketch?  We have a brand new layout how-to guide, Make It From Your Heart, Volume 3!  This sketch is Pattern 5.

I'll update this layout with photos and repost after Friday.  Please leave a comment before you head off to Jean's blog.
{Click HERE for all the hop participants and their blogs.}

LinkWithin

Related Posts with Thumbnails