 Heart 2 Heart Challenges is issuing another great challenge this week: use metal on your project. I have been wanting to make myself some new jewelry, so this challenge was the motivation I needed to get going. At right, you'll see the necklace and bracelet set that I made.
If you'd like to read through my tutorial, continue on; otherwise, head to H2H challenges to see how our fabulous design team members interpreted the challenge and to link up your project. Remember, you must use some Close To My Heart products for this challenge blog.
I'm also linking this project up to You Had Me at Craft: Make It Yourself Mondays.

First,
 gather your supplies. Of course mine are all from CTMH except for the Offray 1/4" black ribbon and the cereal box tab. I used:
- the "zebra" patterned paper from the Roxie paper pack
- Z1487 Mini-Medley Pewter (frame, brad, and charms/slides)
- Z1612 Foundry Pin Clips
- Z1635 Heirloom Assortment (ivory flower)
- Liquid Glass
1.
Begin by measuring the frame opening and then
cut your base from an empty cereal box. (Mine is slightly larger than 1"x1.5".) Cut two pieces of patterned paper to cover each side of the cardboard and adhere with your favorite adhesive.
2.
After lining your work space with waxed paper, apply Liquid Glass (slowly and carefully) to the front of your cardboard piece. Be sure the LG goes all the way to the edges. Then, place the frame on top of this piece. Push the edges down to adhere firmly, and then move this piece so that it doesn't stick to the waxed paper (in case some of the LG oozed out).
3. While this is drying, measure 1 yard of ribbon. Run it through the two slides. To keep them from sliding, loop the ribbon back through each one again. Set aside.
4. Once the front is dry (or nearly dry), arrange the embellishments and
adhere with LG. Please remember that it dries clear and shiny, so if you get
some where you don't want it, try to scrape it off quickly.
5. Once everything is completely dry, turn the pendant over. (I added a brad to fill in the top hole of the frame; the bottom hole was covered by my charms.) This brad also helped to secure my ribbon. Apply LG to the back, especially including the ribbon to attach the pendant to the necklace.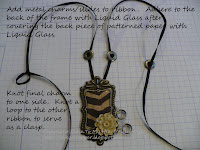
6. Once the back is completely dry, attach the final slide to serve as the fastener. Make a loop in the other end. Trim ribbon. Apply LG to the knots so that the ribbon doesn't slip. Let dry.
7. Once dry, your necklace is ready to wear!
If you'd like to make a matching bracelet, cut two pieces of the same ribbon at least 1' long. String them through the slides and knot in place. Use the final washer as a fastener and make a loop of ribbon at the other end. Again, trim and use LG to keep the ribbon from slipping or fraying.


Thanks for sticking with me! Let me know if you have any questions. I'd love for you to give this a try! If you leave a link to your finished jewelry, I'd love to stop by and look at it.

What an awesome way to use our metal embellishments! LOVE IT!
ReplyDeleteLove your project. Thanks for sharing how you made it.
ReplyDeletehttp://lorisartsyobsession.blogspot.com/
This is absolutely adorable!!! It would make a great Hostess Gift idea :-) Thank you for sharing this project and the instructions. Hugs!
ReplyDeleteHaley,
ReplyDeleteHow beautiful! You are one talented lady!
Thank you for sharing the instructions for this darling set of jewelry!
ReplyDelete