
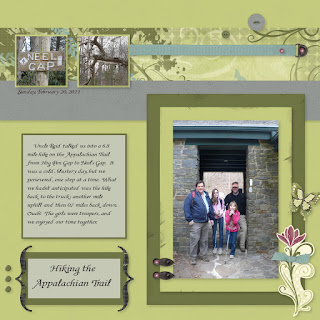
As much as I love classic (paper, ink, and adhesive) scrapbooking, my life has been a little hectic lately (plus I'm trying to move my craft room, one item at a time) and my craft time has been severely limited. One thing I have been able to do is spend time with my husband watching TV and scrapbooking the Studio J way, on my laptop with my digital photos! There is absolutely no mess to clean up- just hit save and close the laptop! Wow, that's not too hard! If you haven't given Studio J a try yet, visit your CTMH consultant's website (or MINE) to get started for free. These pictures were taken on a recent (grueling) hike where we hiked over 8 miles on the Appalachian Trail. I love that I was able to scrapbook them almost immediately after I took the photos! (Not to mention, I was too sore to do much of anything else.) While I didn't originally think of the Wings collection, I love how these colors work with my photos! Here are a few of the things I was able to do in Studio J: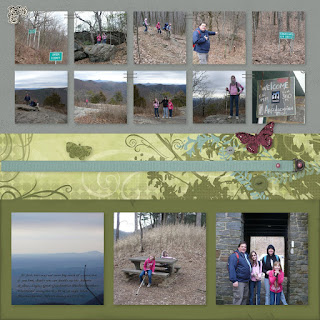
*Sponging/distressing: You can "sponge" color onto pieces of Studio J "paper." Maybe you can tell that I sponged Grey Wool onto the Sweet Leaf background of the right page. Then, I only distressed the edges of the photo mat so that it would "pop" a bit more. Studio J is very user-friendly, and I'm finding it great fun to use! Give it a try. If you don't like what you do, just click "undo." I love that feature!!! Feel free to email me directly (email on sidebar) if you have questions, or leave them in the comments section. 
*Text directly on a photo: Create a text box from the pull-down text tool window, place it directly over a photo you've already inserted, and type away!
*Using My Stickease to cover up parts of the patterned paper that you don't like: Do you see the green butterfly in the middle left of the left page? It is covering a butterfly on the patterned paper background that was upside down. You can rotate the paper orientation in Studio J and I loved how the patterned paper looked except for the upside down butterfly. I slapped a My Stickease butterfly over the renegade critter and then loved how it looked. (You can also rotate the layout pages!)

*Layering My Stickease: You can layer the My Stickease on top of your photos, journaling, and each other!
Thanks for stopping by! Head over to Jill's blog for some more scrapbook inspiration!
{Layout 2011 #17}
These look great...and easy? Wow, great results. That rocks!
ReplyDeleteAmazing layouts! I just love how Studio J looks so "real".
ReplyDeleteWendy K.
www.MyScrapbookingBlog.com
Great layouts. Need to do some Studio J layouts because have like 400 pictures to scrap and just sent to print 700...
ReplyDeletePretty, practical and sharable!
beautiful layouts. I love how studio j takes the CTMh philosophy of faster.simplier.easier to a whole new level! thanks for sharing.
ReplyDeleteFabulous layouts!!! You have inspired me to frequent Studio J more often.
ReplyDeleteLove your layout. I've done all those things with Studio J. It's awesome!
ReplyDeleteBeautiful layout! The wings paper is perfect for your pictures. I also really like the journaling on the photo. Hiking the Appalachian Trail is on my bucket list. :)
ReplyDelete