Saturday, February 5, 2011

A Visit with the Easter Bunny

Here's a little taste of spring to remind you that it WILL come one day!


This layout is another walk down memory lane: my nephew's first visit to the Easter Bunny. I really appreciated my sister taking the girls along too!


Sketch: "Staccato" from Imagine

All supplies from Close To My Heart: Sweet Pea paper pack (retired); Old World Alphabet, Comments, and Eastertime stamp sets; Spring Iris, Lilac Mist, Baby Pink, Key Lime, Sunkiss Yellow, and Breeze (retired) inks; Baby Pink, Lilac Mist, and Heavenly Blue markers; Cottage edge anchors; Just Blooms White Daisy paper flowers; spring brads


{Layout 2011 #6}

Friday, February 4, 2011

Wear Red TODAY!

Today is the American Heart Association's "Go Red for Women" day. Did you know that heart disease is still the #1 killer of women in America? Get your red on, show your support, adopt a heathier lifestyle, and spread the word!

Thursday, February 3, 2011

A Game Stamp Set

Have you had a chance to look at the new Close To My Heart Spring/Summer Idea Book, unveiled on 2/1? If so, I'd love to know what you can't wait to get!

I love the little "A Game" stamp set. At only $7.95, it is an afforadable stamp set for any budget. My project actually uses products featured in the January Inspirations brochure, so some of it might already look familiar to you. I created a tic-tac-toe board using the A Game stamp set and the Wings paper pack. It measures just under 6"x4" so that it could easily slip into a 4"x6" zipper-close clear plastic bag that I have (source unknown).

These adorable buttons to use as game markers are from the new Green button collection. Aren't they pretty? I can't wait to get all of the new button collections: Red, Pink, Green, Blue, Basic (Chocolate, Cocoa, Colonial White, and White Daisy) and Clear. Best of all, they're only $5.95 for 72 buttons.
My girls are already having fun playing this game. I may have to slip it into my purse for when we're waiting somewhere.

Monday, January 31, 2011

February Stamp of the Month Blog Hop & Jenny's Coat Tutorial

Welcome to the Close To My Heart Stamp of the Month Blog Hop! With February's set, Friendship, you can create gorgeous damask patterns. Today I have not one but two tutorials for you! (Wow, two for the price of one! LOL)

If you've arrived from Terrie's blog, then just keep on hopping. Whether this is your first stop or not, just click HERE to go to Wanda's blog next. That's how easy the hop is!

For my first card, I got crafty with the Jenny's Coat technique. It is very similar to Joseph's Coat (hence the name) but uses patterned paper as your base instead of ink-sponged card stock. Here's the Jenny's Coat tutorial. (If you'd like to skip the tute, leave me a comment and then head on over to Wanda's blog. Thanks for looking!)

1. Choose your patterned paper and cut it to fit your focal image (solids work best). This gorgeous paper is from the new Sweetheart paper collection. Ink up your stamp in VersaMark (or some other embossing) ink.
2. Stamp your image onto pretty patterned paper.
3. Sprinkle clear embossing powder onto your stamped image.
4. Dump off the excess powder and return excess to jar. (You might want to take a small paint brush and brush off any excess powder on your paper.)
5. Use a heat tool to melt and set the embossing powder.
(Please ignore my humble embossing "helper." It's a scrap of a box and a clothespin to hold my paper in place. My old one had aluminum foil wrapped around the flat box strip which can really help you emboss quickly and evenly. This little helper can really save your fingers! That heat tool gets HOT!)
6. Ink up a rubber brayer with black (or other dark) ink. (To ink up your brayer, roll it across your ink pad, pick it up, and roll many more times. Rolling back and forth will only add ink to the same spot, so pick it up and roll some more.)
7. Starting off the edge of your patterned paper, roll the brayer across your piece all the way to the other side. Continue to ink up your brayer and roll, roll, roll. (This part can get pretty messy!) I like to start off each edge, so that I roll over my patterned piece from all four directions. You will have to roll the brayer over it many times to get dark coverage.
8. Once you've covered your patterned piece (or get tired of brayering, whichever comes first), set the piece to the side to dry for a bit. (This step isn't entirely necessary, but I found it helped me NOT to transfer black ink to every single thing I touched or looked at in the process.)
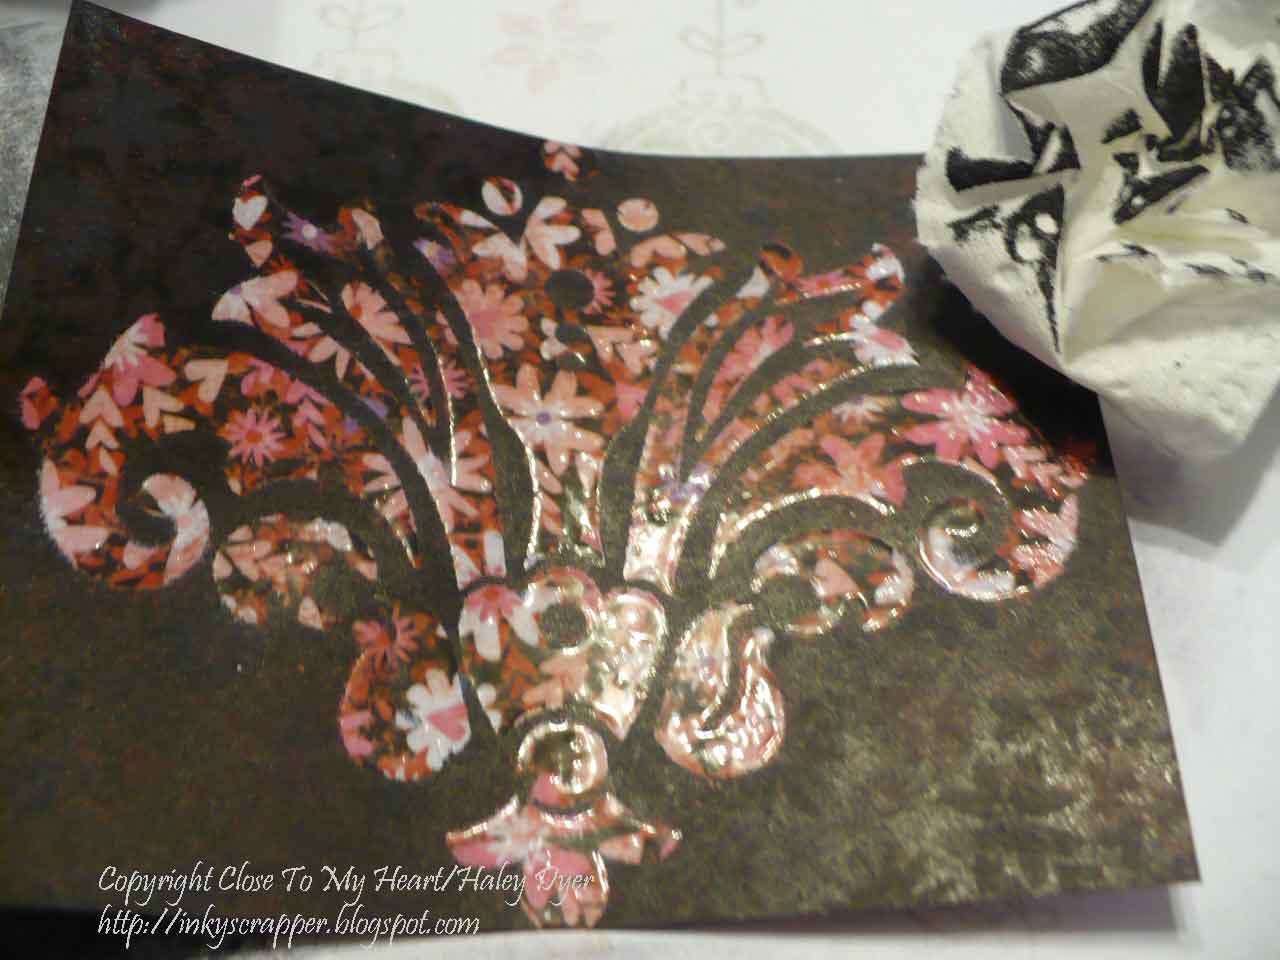
9. Wad up a piece of toilet paper, paper towel, kleenex, etc. Buff your embossed image to remove the resisted ink. (Buff is a technical term for rubbing the image in a circular motion.) Removing the excess ink will really make your Jenny's Coat technique POP.
You may want to set this piece aside again for a while to dry completely.


Here's a close-up of that lovely Jenny's Coat technique.

If you're with me so far, I also thought I would show you how I made this particular card. Can you stand another not-so-quick tutorial? For the sidefold card, I used the same focal image but stamped it in Baby Pink. Using Tulip ink, I stamped the lovely sentiment from the February Stamp of the Month right over the top. Guests at my Open House in February will be able to make either this card or the one at the bottom of this post.

1. Line up the damask images to "cluster stamp" your background: place multiple stamps on your block to load them all up with ink and stamp at one time. (I had to stamp these five stamps/one block twice for each card.) I stamped them with Baby Pink ink onto Baby Pink cardstock.

2. Use our new 2" scalloped circle punch to cut out two circle. Cut each circle in half, using three halves on glued near the edge of the card as follows:


(I like to finish with the center piece, but you could work from right to left or left to right to overlap them.)

3. Cut a o.5"x5.5" strip of Black cardstock and adhere over the scalloped halves so that your card front now looks pretty instead of messy.

4. Mat your focal image (I used Cotton Candy cardstock on some and the Sweetheart floral B&T on others.) and then attach to the card front.

Now head to Wanda's blog for the next stop on the hop! Come back here soon for more artwork.

If you do not already have a Close To My Heart consultant and you're interested in getting this stamp set for yourself, contact me or go to my CTMH website.

Sunday, January 30, 2011

Embrace Imperfection (New Class @ BPC)

Big Picture ClassesHere's another free class for you! Are you familiar with Big Picture Classes? (It used to be known as Big Picture Scrapbooking.) I go there often to nurture my creative soul, and most of the classes I've taken have been excellent. I'm signed up for "Embrace Imperfection," a FREE class starting next month. Who doesn't love free? Why don't you give it a try? Click on the class name to go check it out. Be sure to use my referral code or registration code: 730328C8 if you decide to sign up. Thanks!

Join Me for a Free Class

Just click HERE to check it out!

Thursday, January 27, 2011

New CTMH Spring/Summer Idea Book Blog Hop


If you love Close To My Heart, then you are going to love the new Spring/Summer Idea Book that will be released February 1! If you'd like to see lots of ideas with many of the new products, check out this Linky Blog Hop. It's really easy to do! You can find all the thumbnails of projects here. Click on the photo thumbnail to go to the blog to see and read about the different projects. Keep coming back here because more and more projects will be added. My project is in the post below, so please sneak a peek. Happy hopping!


New CTMH Spring/Summer Product Preview: Sophia

The new Sophia papers from Close To My Heart are oh-so-girly and oh-so-pretty! I splurged on the Workshop on the Go kit that includes the adorable stamp set I used, the pink buttons, and the Waxy Flax. The Sophia papers were the perfect match to Ansley's spring portraits last year.

This sketch is based on the "Hat Trick" sketch from Magic. I didn't follow it exactly because my pictures weren't the same size as those recommended in the guide, but the design worked well (in my opinion). That is one the great things about our how-to books: you can use them exactly as is or you can modify them to suit your taste.
To create her name, I used the new 2" scallop circle punch and the 1-1/4" circle punch. (I also snuck in another layer with my "contraband" 1-1/2" scallop circle punch.) I have found that it is easier to stamp first and then punch out the stamped image (versus punching out a shape first and then trying to stamp on the shape). The alphabet set I used is the new Bohemian alphabet, which also includes a set of numbers and punctuation.

All the little details are from the Workshop on the Go kit, plus some extra bling and some of the new pink ribbon collection.

The best part is that Ansley loves her layout!

Supplies from Close To My Heart: Sophia Workshop Kit; Hollyhock, Blush, Pear, and Goldrush inks; Pear marker; Pink sparkles; Pearl Opaques; Clear Bitty Sparkles; Pink ribbon collection; 2" scallop circle and 1-1/4" circle punches; Magic how-to-guide
Other: 1-1/2" scallop circle punch
{Layout 2011 #5}

Tuesday, January 25, 2011

Cross Country 2010 Layouts

The girls absolutely loved running cross country this fall. (Ansley wanted to try it because her friends were doing it, Macey ended up tagging along, and they both loved it.)

These layouts showcase just a few of their photos from the season. Because of their purple and white outfits, I started with White Daisy cardstock and Gypsy cardstock and B&T paper.

With Ansley's layout, she and I chose to accent with Topiary. She wrote her own journaling. Can you see my "banner" journaling strips? I just made a swallowtail cut at one end to make them look a bit more festive. A few Sparkles added some bling to finish it off.

For Macey's layout, we went with the bold combo of Gypsy and Holiday Red. She almost always wore her Stephanie Grace Dance Center t-shirt with her jersey!

Macey also wrote most of her own journaling. The far right top photo will actually be a photo flap with a picture and my journaling underneath.

I have to extend a big thanks to Coach Lisa for her great coaching and to her husband for all the pictures. I ended up just scrapping the ones that he gave us. (I have tons more that I took, but they will stay on our family archive photo CD. You don't have to scrapbook every single photo you take!)

Both layouts are my own simple design. The photos really helped me build the blocks.

All supplies from Close To My Heart: Be Yourself and Playful Caps (retired) stamp sets; White Daisy and Gypsy cardstock; Hooligans paper pack (Gypsy B&T); Splendor paper pack (Topiary B&T); Gypsy and Holiday Red ink; Gypsy, Holiday Red, and Topiary markers; Purple & Green Sparkles; Red Sparkles; Holiday Red brads
{Layouts 2011 #3 & 4}

Monday, January 24, 2011

H2H Challenge: Animals

This week's Heart 2 Heart challenge is to use animals (or birds) on your project. As one of this month's prize sponsors, I was invited (in advance) to play along.

I love, love, love the January stamp of the month, Find Your Style, and its pretty bird. I really have a thing for birds, and will probably one day be the crazy old lady in the park feeding the pigeons.

To make this circle card, I began with a piece of Lagoon cardstock from the Magnifique paper pack that I cut into a 4.5" circle card. Next, I cut a piece of the damask pattern with my large scalloped circle punch (approx. 3.5"). The center circle is another Magnifique pattern that I first & second generation stamped with Lagoon and Pacifica.

To create the bird, I first inked it up with Lagoon and then rolled the edges in Pacifica. After stamping on a scrap of Colonial White cardstock, I cut it out close to the edge, attached it to the top left of the card, and added a Mocha pearl for the eye. (I only glued the center/body of the bird so that the wings and tail curl up a bit.)

The flower was fun (and easy!) to make. Using vintage book pages is really popular right now. Since I'm an elementary school teacher, I have access to lots of paperbacks, and I've been saving the ones that can no longer be repaired to use in my crafting projects. You can also find books at yard sales and thrift stores. The great thing about using children's books is that you're probably not going to have anything inappropriate written on your flower!

To make the flower, I punched out six scalloped circle with my new CTMH 2" scalloped circle punch (available 2/1!). Next, I inked the edges in Pacifica ink to give them some dimension and to look more like an actual flower. I stacked yp the six flowers, one on top of the other, and then pierced a hole in the center for a Shimmer Designer brad. Go ahead and fasten the brad (splaying the little "legs" flat). Then, starting with the top layer, crumple up the flowers, one layer at a time, until you like how it looks. You may have to crumple and fluff more than once. Finally, use a glue dot or two to attach the flower to your project. A scrap of Chocolate designer ribbon finished it off.

If you have any questions, ask away. When I asked my husband what he thought of this card, he said, "You can't even mail that!" True, but not really the point. Oh well! Thanks for flying by! Give this week's H2H challenge a try.

Supplies from Close To My Heart: Find Your Style stamp set (available though 1/31/11); Magnifique paper pack; Lagoon, Pacifica, and Chocolate inks; Shimmer Designer Brads; Chocolate Designer Ribbon Rounds (retired); Mocha Opaques Pearls; 2" scallop circle punch

Other supplies: Marvy circle punch; vintage children's book

Friday, January 21, 2011

The Technique Trail: Blogger's Challenge: Designer Paper

This challenge couldn't be easier! Go check it out at The Technique Trail: Blogger's Challenge: Designer Paper

(Scroll down for this weekend's scrapbook challenge.)

Thursday, January 20, 2011

Magic: "Performance" Layout Sketch/Sweet Baby

Whenever I scrapbook, I love to use a sketch to help guide my work. Did you know that Close To My Heart has four fabulous scrapbooking how-to/sketch books? The newest one, Magic, is what I will be featuring all year with my scrapbook club. (Want to know more? Email me! )

This layout of my darling nephew (the same cutie-patootie from earlier this week, from the same photo shoot) is based on the "Performance" sketch. Why don't you give it a try? It really is easier than it looks! Just click on the link below to download your own copy of this layout sketch. Then upload you photo(s) of your layout to join a little Linky party!

Click HERE for the sketch with instructions. Happy scrapping!

All supplies from Close To My Heart: Wings Workshop and Old World alphabet stamp sets; Silhouette paper pack (retired); Black ink and marker; Black mini-medley accents; Just Blooms paper flowers
Sketch: "Performance" from Magic
{Layout 2011 #2}

LinkWithin

Related Posts with Thumbnails