Friday, December 31, 2021

Goodbye 2021!

It is really hard to believe that today is the final day of 2021!  What a year it's been for the entire world!  I am definitely choosing to focus on the positives.  Today is the final day to take advantage of all of the awesome CTMH December specials: the stamp of the month, Owl Love You Forever; Deck the Palms scrapbooking and cardmaking; Merry Making wooden ornament kits; VIP Flower Shop card kit; and the VIP Hip Hip Hooray workshop.

I made two of the layouts from the VIP Hip Hip Hooray workshop (and look forward to creating the rest of the projects soon).  My first layout features some fun we had tubing in Wyoming.  I didn't have enough pictures so I turned the left page's picture into a title.
Did you know that you can curve our My Acrylix stamps?  That arrow border is normally straight, but I bent it for the pennants.
Here's a close up of the fun, playful elements of the layout.

The second layout is a really fun pattern to make.  You need two 12"x12" cardstock bases.  (I swapped out Wildberry as provided for Sundance that better matched my photos.)  Add one piece of 12"x12" patterned paper cut on the diagonal (you will need a long ruler, a pencil, and scissors to accomplish this step) and another 9.5" square also cut on the diagonal.

My family and I wish you all the best in the upcoming year.  Goodbye, 2021, and HELLO, 2022!!!


Thursday, December 30, 2021

Stitched Lattice Thin Cut Wedding Card

One of our daughter's dear friends got married last month, and we all had a wonderful time celebrating their wedding!  I made this card for the bride & groom.

I cut the white glitter panel with the Stitched Lattice Thin Cut die, but then I cut it so that I could mount it onto a 5"x7" card.

To hide the cut, I added a strip of Evergreen cardstock with pleated vellum behind the White Daisy strip.  I used my Sentiments by Melissa Esplin stamp set.  I cut the hearts with my Heart Shaker Thin Cut die.
If you look closely, you'll notice that I used the light side of Evergreen cardstock for the card front, but then I sponged Evergreen ink to give it an ombre effect.

I used the same stamp set for the inside sentiment and also added some die cut hearts to make confetti.  (Hopefully they didn't hate that part of their card!)

We happily send best wishes to the new Mr. and Mrs. Peney!


Wednesday, December 29, 2021

Map Your Journey- USA: North Dakota 6"x8" Layout

While I am making my family American Adventure album, I am also making 6"x8" albums for our daughters.  I gave them their albums for Christmas on the condition that I get to keep them until I finish them! 

I am keeping their layouts really simple and leaving room for their journaling (not mine) because of course their perspectives may be somewhat different than mine!

Did you make any gifts this year?  If so, what did you make?


Tuesday, December 28, 2021

Map Your Journey- USA: North Dakota Layout

Our family had a great time on our awesome American adventure this summer!  One highlight was going to North Dakota and hiking its highest peak, White Butte.

I used the As You Grow collection along with the Map Your Journey- USA stamp set.
I love using flip flaps to add more photos to my layouts.
Here's a close up of the Map Your Journey stamped accent.  I fussy cut both South and North Dakota from coordinating cardstock and then popped up ND with 3D foam tape.
I also used a few wooden arrows to accent the layout.

Thanks for letting me share part of our adventure with you!

Wednesday, December 15, 2021

December Technique Blog Hop: Accents of White

The December 2021 Technique Blog Hop is featuring our white gel pens and accents of white.  (If you're already hopping, then you've probably arrived from Cat's blog.  From here, you'll visit ScrappinKaty's blog next.)

For my card, I Thin Cut the deer on Pewter cardstock, stamped in black, and then colored with white gel pen and three Spectrum Noir markers.  I added "stitching" on the Glacier strips with the white gel pen.  I embellished the deer with Mint Stickles.
If you look closely, I added a little dot of white gel pen to the corner of the deer's eye, which really brought it to life.

Here's another card I made with the Wonderland collection and the Deck the Palms Cardmaking stamp set.  (You can learn more HERE.)  I used the white gel pen to color the white parts of the hat and beak.

Please leave a comment before hopping on to ScrappinKaty's blog next!


Wednesday, December 1, 2021

December Stamp of the Month Blog Hop: Owl Love You Forever

Welcome to December!  (Where has this year gone?!?)  Close To My Heart has an adorable stamp of the month, Owl Love You Forever.  (If you're already hopping, then you've probably arrived from Melinda's blog.  From here, you'l visit Gina's Little Corner of StampinHeaven next.)

I wanted to pair our new Mocha and Capri together, so I began by stamping the owl in Mocha then coloring with my Gold Brown and True Blue Spectrum Noir markers.  (I added a little Yellow Gold for the beak.)  I played around with several distress oxide inks to create my background, including water splatters plus Sapphire, Lagoon, and Clear shimmer brush splatters.  I stamped my sentiment in Mocha, added some True Blue color, then finished off my card with Capri shimmer trim and Mocha glitter paper (plus a little wooden heart button).


I'm really looking forward to playing with this set all month long.  Please leave a comment before you hop on over to Gina's blog next!  Happy December!


Monday, November 29, 2021

Deck the Palms Blog Hop

The CTMH Deck the Palms collection is so fun-- one part Christmas and two parts tropical!  You get to decide if you'd like to use this collection for some tropical fun or for a tropical Christmas!  This blog hop features all things Deck the Palms.  (If you're already hopping, then you've probably arrived from Melinda's blog.  From here, you'll visit ScrappinKaty next.)

My order arrived later than I anticipated, so I haven't cut into my paper pack yet but instead paired the Deck the Palms Cardmaking stamp set and Thin Cuts with the Wonderland collection.  (That hat paper has been calling to me!)  I used a fun Make It From Your Heart, Vol. 2 sketch, so it came together pretty quickly.  Rather that use the Thin Cuts, I fussy cut the flamingo stamped twice onto light and regular Mullberry cardstock and on White Daisy, then colored with a few markers.

My second card uses scraps from the Deck the Palms Cardmaking Workshop.  I stamped the flamingo and present on the center of my White Daisy card front.  I also stamped the flamingo on the light side of Ballerina cardstock, fussy cut, then colored with my Coral marker and white gel pen.  I added Coral and Jade stripes to the present, then adhered pieces of the fun tropical present print and Clover cardstock.  "Christmas" is stamped on the inside of the card, but I forgot to snap a picture.

The versatility of the fun Deck the Palms product suite will leave you dreaming of a tropical vacation- Christmas or otherwise!  If you don't already have a CTMH Maker and would like to learn more about the Deck the Palms collections, click HERE.  Before continuing on the Deck the Palms blog hop, please leave a comment, then continue by visiting ScrappinKaty's blog next!


Thursday, November 18, 2021

November/December New Product Blog Hop

Close To My Heart has knocked it out of the park again with the November-December 2021 Idea Book!  I love both Wonderland and Candid Moments!  Hop along for lots of great ideas with the latest and greatest from CTMH.  (If you're already hopping, you've probably arrived from amazingly talented ScrappinKaty's blog.  From here, you'll visit beautiful Becca-Exppressions next.)

I am using the Candid Moments collection to scrapbook our day at Custer State Park, SD, this summer.  We made the (somewhat last minute) decision to hike Black Elk Peak, the highest point in South Dakota, the day after we had hiked the highest peak in North Dakota. 

I used my Daisy Alphabet stamp set to stamp my title in Sapphire ink.  On a piece of Carolina card stock, I stamped S. Dakota in Sapphire with my tiny Prairie Alphabet.  The Sundance book plate was cut with the Thin Cuts from the Candid Moments Cardmaking stamp set and Thin Cuts.  I used a few Candid Moments chipboard die cut elements too.  (I will add my journaling before I put this layout in my album.)

On the right page, I stamped the elevation with the Daisy Alphabet stamp set, again in Sapphire ink.  I added a few more die cuts and a pair of stickers from the collection.

Thanks for letting my share my layout of our amazing hike!  Please leave a comment before hopping on over to Becca-Expression's blog next.


Monday, November 15, 2021

November Technique Blog Hop: Silver and Gold

This month's technique blog hop is featuring the very festive colors of silver and/or gold, and Close To My Heart has gorgeous products to choose from.  (If you're already hopping then you've probably arrived from Melissa's blog.  From here, you'll visit Cat's blog next to continue along the hop.)

I decided to create two simple cards featuring some of our silver products.

This card uses 1.25" squares of silver foil paper and patterns from Wonderland paired with the Pumpkin Spice Scrapbooking stamp set and Thin Cuts (still available online).  The silver foil squares look dark gray thanks to the lighting, but hopefully you can image how "icy" this card is in person!  I also used silver glitter gems as added embelishments.

This card is an attempt to make a fast and easy (but still pretty) holiday card.  I used the Holly & Ivy Scrapbooking stamp set, stamped in Charcoal, with silver shimmer trim (you could use silver glitter paper), silver foil paper, and silver embroidery thread.  I might go back and add some silver glitter gems also.

Thanks for stopping by on the Silver and Gold Technique Blog Hop!  Please leave a comment before hopping on to Cat's blog next.


Heart2Heart Challenges: Rose Gold

 Rose Gold is definitely hot in so many different markets!  At Heart2Heart Challenges this week (and through the end of the month) we are celebrating all things rose gold!


My card pairs the Rose Gold Foil Patterns paper pack with Desert Rose cardstock, shimmer trim, and ink.  I splattered the Desert Rose cardstock with Desert Rose shimmer brush.  I stamped the sentiment from the For All Occasions stamp set in Desert Rose on a piece of White Daisy cardstock cut with the Stitched Simple Brackets Thin Cuts.

Hopefully you like the shine on this card as much as I do!  Please be sure to leave a comment and then visit the Heart2Heart Challenges blog.  Join us for our November challenges!

Friday, November 5, 2021

Holiday Cards Blog Hop

The holiday season is fast approaching, so let's get holiday card ideas going!  Hop along to see many great ideas with favorites from the core, the September/October, and/or the November/December idea books.  (If you're already hopping, you've probably arrived from Darlys's blog.  From here, you'll visit Becca next.)

I wanted to create a fast and simple (yet cute) card because making many holiday cards should be enjoyable and not a chore.  If you're making a lot of cards, it's nice to have a simple design to recreate many times.  I used the Holly & Ivy Scrapbooking Stamp Set and coordinating Thin Cuts paired with the new Wonderland paper suite.  I stamped both images with Charcoal ink and then colored the fawn with two of my TriBlend markers.  I added Icicle stickles to embellish the festive crown.  Another thing that I love to do is the cut the shimmer trim down the middle to have a thinner piece.  I placed silver embossing thread behind the stamped images and added a few silver glitter gems.

Please leave a comment before continuing the hop by visiting Becca's Expressions blog next!


Monday, November 1, 2021

November Stamp of the Month Blog Hop: Created to Shine

Welcome to the November stamp of the month, Created to Shine, blog hop!  Please click on each maker's name to continue through the hop for a collection of bright ideas (pun intended)!  (If you're already hopping, then you've probably arrived from Wendy's blog.  From here, you'l visit ScrappinKaty's blog next.)

To create my card, I cut the Sunburst Thin Cut metal die out of Lemonade cardstock, which I layered onto my White Daisy card stock.  It took a few tries to get it right, but I masked the light bulb on the far left of the lights cluster and stamped it directly on the center medallion and my card front.  I stamped the bulb again onto White Daisy scrap, fussy cut, and adhered on top of the original stamped image.  I stamped the center of the light with Lemonade ink.  
I used my Lemonade shimmer brush to accent the light bulb and to color in the hearts along the stamped border.  I cut black shimmer trim in half to embellish the top and bottom of the heart strip.
On the inside, I stamped the sentiment and the light bulbs with black ink.  The wash behind "light" was stamped with the Perfectly Imperfect Patterns stamp set.

Here's a close look at the November stamp of the month:


Thanks for letting me share my first Created to Shine card with you.  Please leave a comment before hopping next to ScrappinKaty's blog to continue the November stamp of the month blog hop!


Heart2Heart Challenges: Oh, Deer!

The Heart2Heart Design Team is bring a fun challenge to kick off November, Oh, Deer!  (You might decide to interpret it as Oh, Dear!)  I love the sweet deer in the Holly & Ivy Scrapbooking stamp set, so I used them with the NEW Wonderland paper collection to create this card.

I used a sketch from Make It From Your Heart, Vol. 4 turned upside down.  I stamped "holidays" with Glacier and "Happy" with Wisteria on a scrap of White Daisy and then fussy cut.  I colored the deer and added red Stickles.  Next time, I will use White or Waterfall to match the wintry feel of the Wonderland collection.  A few silver glitter gems finished off this card.

Be sure to join us at Heart2Heart with your Oh, Deer! creations!


Thursday, October 28, 2021

Booh-la-la Halloween Cards

Happy Halloween and Booh la la!  I had so much fun making two almost identical cards for my daughters for Halloween.  They both used the Ooh La La Macarons stamp set, the border from the Pumpkin Spice Scrapbooking stamp set, the Shoelace Alphabet stamp set, and the For All Occasions stamp set, plus the Buildable Tags Thin Cuts.

(Sorry for the poor quality photo- I forgot to take a picture before I sent the cards to my girls, so this is what I got from one of them.) 

My first card's color inspiration is from Boo Crew: Ballerina, Nectarine, Wild Berry, and Black.  I stamped the macaron stack on each of the respective cardstock colors.  I colored them with my Tri-Blend Spectrum Noir markers (Pale Pink Blend, Burnt Orange Blend, and Bright Pink Blend).  After stamping ooh la la in black on the bottom right corner, I added the B from the Shoelace Alphabet set.

For my second card (which I unfortunately don't have a picture of),  the top band is Avocado instead of using Ballerina for a little more traditional Halloween color scheme.  I colored with my Citrus Green Blend marker.  Both cards were finished with some black shimmer trimmer and a black burst.  On the inside of each I stamped happy in Nectarine and Halloween in black (which you will just have to imagine).

Wish YOU a very happy Halloween!

Wednesday, October 20, 2021

Thin Cuts Blog Hop

Close To My Heart offers amazing Thin Cuts, or dies that you can cut with a cutting machine.  This blog hop is featuring our "stand alone" Thin Cuts, the ones that don't necessarily pair with a particular stamp set.  (Lots of our stamp sets also have the option of purchasing a coordinating Thin Cut set, making it soooo easy to cut out awesome images.)  Be sure to visit all of the Makers' blogs along this hop for so many great ideas! (If you're already hopping, then you've probably arrived from Melinda's blog.  From here, you'll visit the creative Katy's blog next.)

For both of my cards, I used the Buildable Tags Thin Cuts.  I love the tag accent with the Merry sentiment on this card!  Tags just seem extra festive for the holidays!  I used the Holly & Ivy paper suite plus the Holly & Ivy Scrapbooking stamp set and coordinating Thin Cuts with Candy Apple shimmer trim and exclusive ink.  I colored that sweet fawn with several Spectrum Noir Tri-Blend markers that I finished off with some Christmas Red Stickles glitter glue.

My second card uses more pieces of the Buildable Tags Thin Cuts: the Glacier tag, the Mulberry pocket, and the Papaya glitter paper tag element.  I chose the As You Grow paper suite to pair with the fox from the October stamp of the month, Wildflower Friendship, which I colored with Desert Rose shimmer brush and various TriBlend markers.  I finished my card off with a few Autumn loose sequins.

I hope that you can see some of the possibilities of the Buildable Tags Thin Cuts!  Please leave a comment before clicking on her name to visit Katy's blog next to continue the hop.
{Click HERE for all the hop participants and their blogs.}


Monday, October 18, 2021

H2H Challenges: Sweet Treats

Heart2Heart Challenge's second October challenge is "sweet treats."  I have so many ideas for this one with all of the upcoming holidays!  I've decided to share a Christmas card with you right now.


I paired the Ooh La La Macarons stamp set and Thin Cuts with the Holly & Ivy Scrapbooking Stamp Set and paper suite to create this card.  After cutting the macaron stack out of Candy Apple cardstock, I stamped the corresponding image with black ink.  I used my Coral Shades Tri-Blend marker to add depth and dimension to the macarons.  I cut a 1.5" circle with my circle Thin Cuts and then stamped the sentiment from the Holly & Ivy Scrapbooking stamp set.  The "Believe in Magic" sentiment is also from that stamp set. 

My card sketch is from Make It From Your Heart, Vol. 2.  I embellished my card with some Candy Apple shimmer trim to finish it off.

Here's another sweet treat featuring Ooh La La Macarons and Pumpkin Spice for a fall take on the goodies.  (Click HERE to learn more if you're interested.)


Now it's your turn!  Share your sweet treats with us at Heart2Heart challenges before the end of the month!

Friday, October 15, 2021

October Technique Blog Hop: Stamping on Cardstock

Stamping on cardstock is something that I do ALL the time, so I'm very excited to share so many fun ways you can stamp on cardstock along this month's technique blog hop!  (If you're already hopping then you've probably arrived from Cat's blog.  From here, you'll visit Michelle Loncar's blog next.)

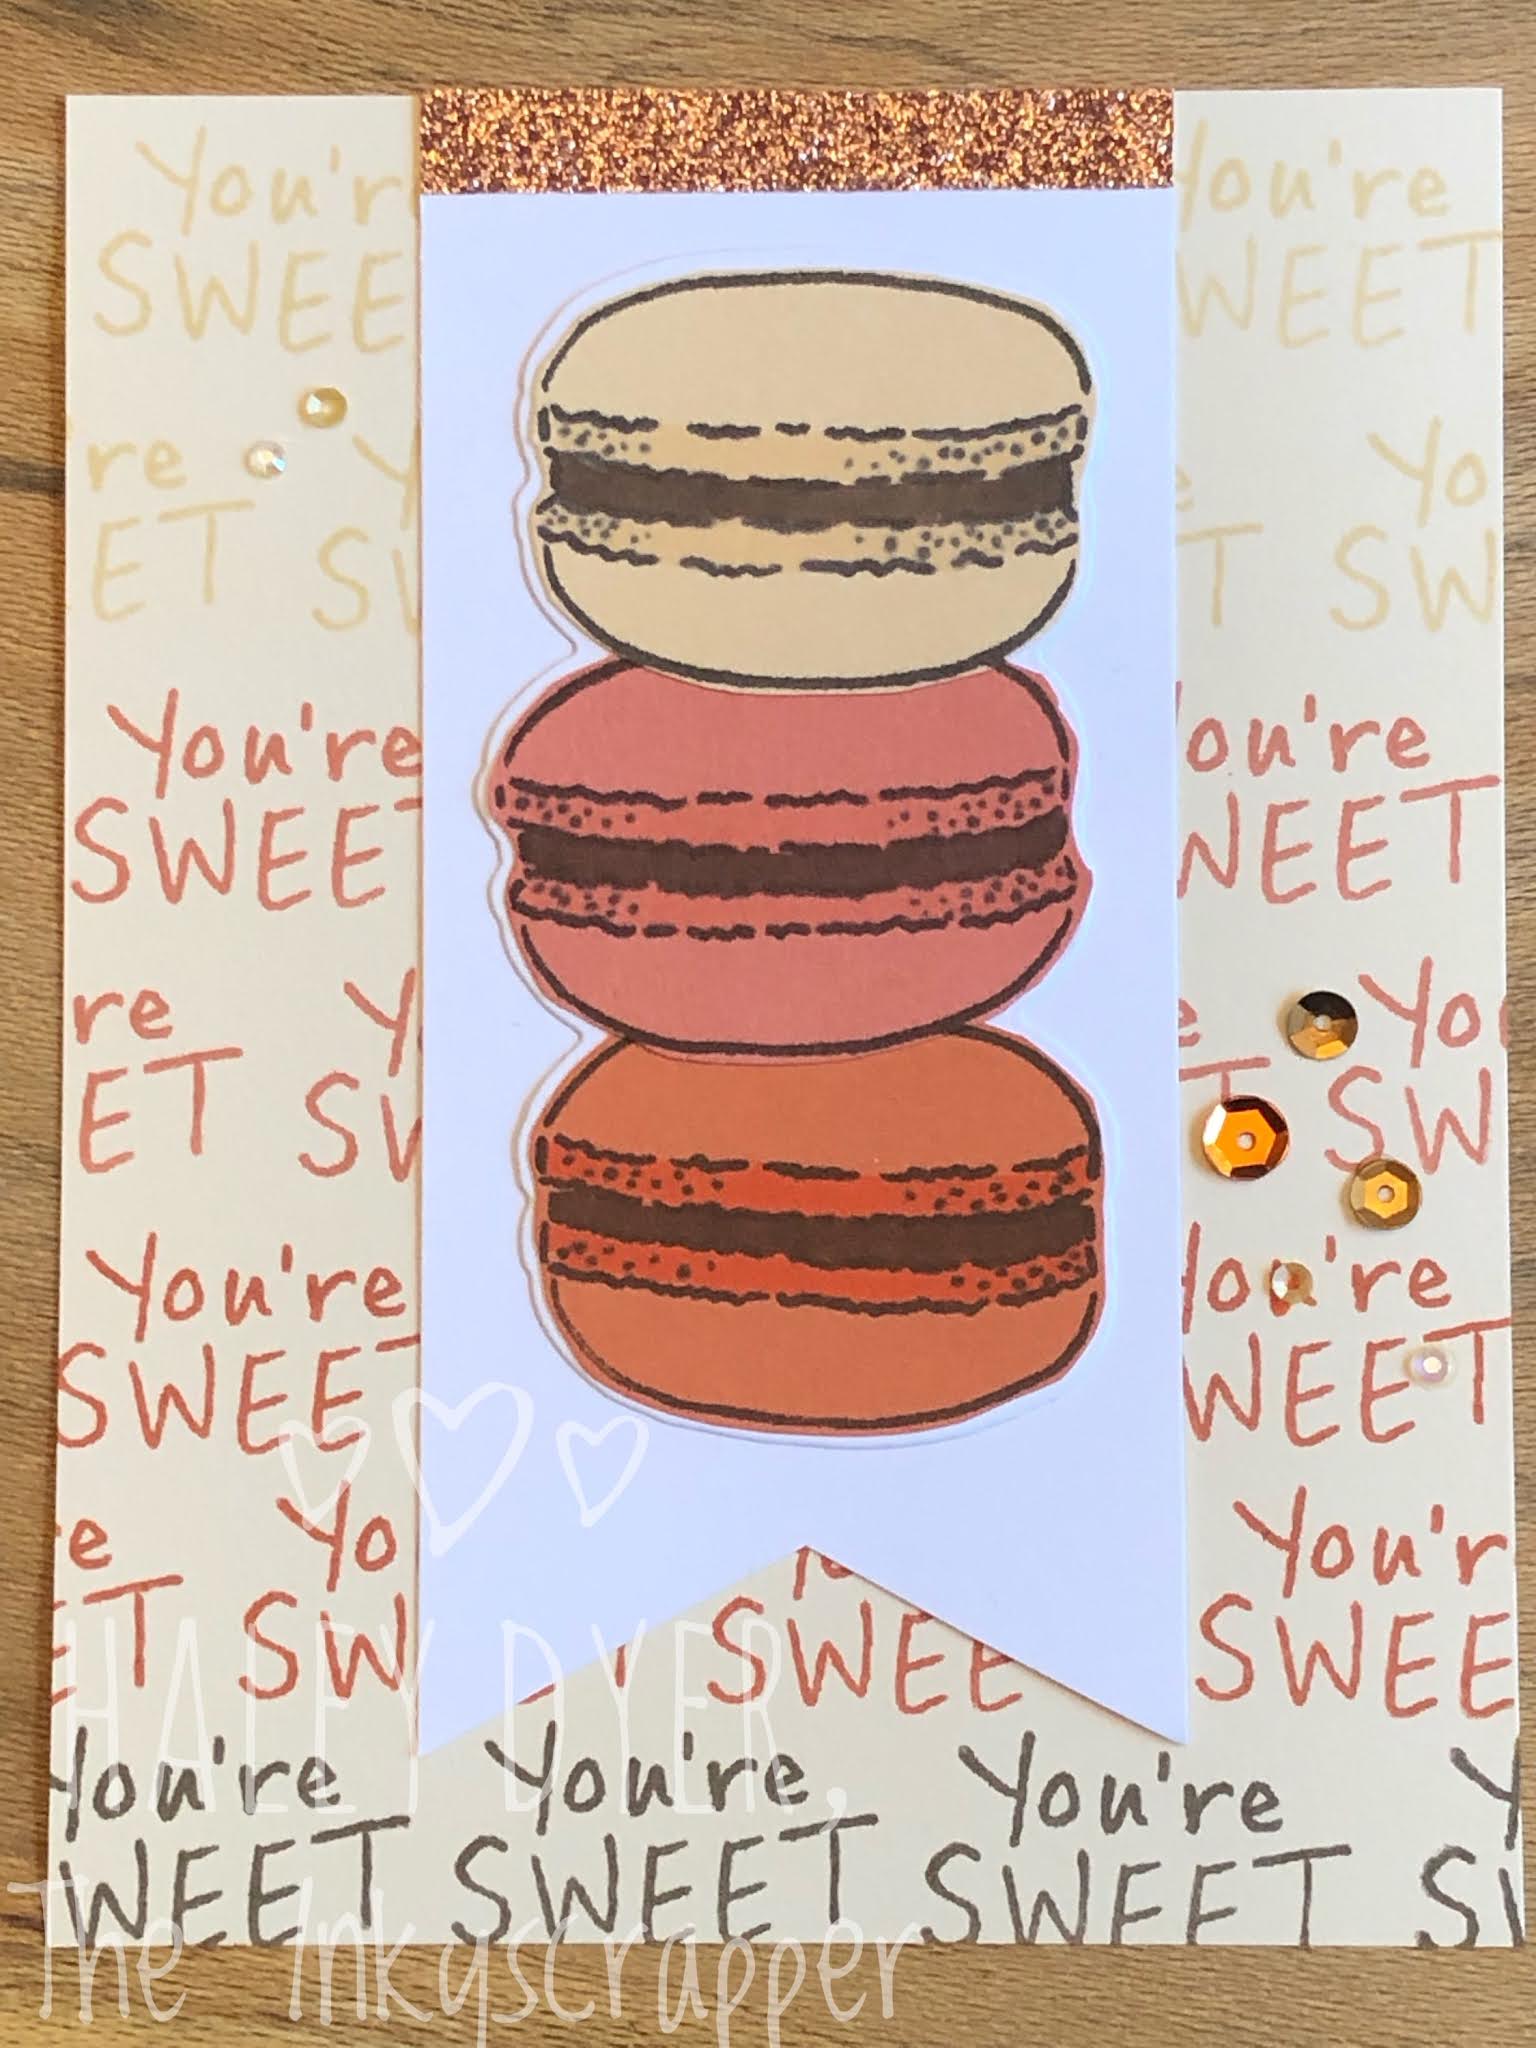
My first card features the OohLaLa Macrons stamp set and Thin Cuts.  I stamped the images with black ink on three different pieces of cardstock: Shortbread, Papaya, and Paprika.  I then fussy cut each one to adhere to a Thin Cut stack.  I used my TriBlend markers to color in little details, especially the "chocolate" filling. 

For the background, I used the light side of the Shortbread cardstock, then stamped You're Sweet in two rows with Shortbread, two rows with Papaya, two rows with Paprika, and one final row with Espresso.  (Next time I would start with the Espresso at the bottom and work my way up.)  A little Rose Gold shimmer trim and Autumn loose sequins finish off the card nicely.


My second card uses several different stamping techniques.  I started by random stamping the different gourds from the Pumpkin Spice Scrapbooking stamp set onto White Daisy cardstock.  To create the two-toned effect, I inked up the gourds in Papaya or Paprika, stamped them on scrap paper, and then rolled them back in the same color.  I also stamped the border stamp in Paprika on Paprika cardstock.

For the adorable sentiment (called "Eat, Drink, & Give Thanks"), I inked it first in Shortbread, then inked the top only in Papaya and the bottom only in Paprika, then stamped it on the 2" square.  I added some gold Stickles to the sentiment, Gold shimmer trim to the cardstock band, and a few more Autumn loose sequins (adhered with Liquid Glass on both cards).

Thanks for letting me share some fun techniques to stamp on cardstock.  Please leave a comment before you continue the hop by click on her name to visit Michelle Loncar's blog next.  


LinkWithin

Related Posts with Thumbnails