Wednesday, August 31, 2011

Stamp of the Month Blog Hop: Limited Edition (September 2011)

Welcome to the Close To My Heart Stamp of the Month blog hop featuring September's Limited Edition stamp set! (If you've already started the hop, then you should be coming from my friend Pamela O'Connor's blog and heading next to Judy Burger's blog, after you stay here a moment or two.) This set of 21 stamps is only available for a limited time, so be sure to contact your CTMH consultant to get yours!

The vintage images inspired me to create two different cards with the Sonoma paper pack. The first (8"x3.5") uses a glove template that you can find HERE (and that I modified for my card). I used up some of my stash of retired Passages paper for the Cocoa "leather." Isn't that Heirloom Assortment "button" divine? I can just picture a fancy lady in her fancy gloves!


The addition of the Colonial White "lace" (from a Martha Steward punch) also added a lovely finishing touch.


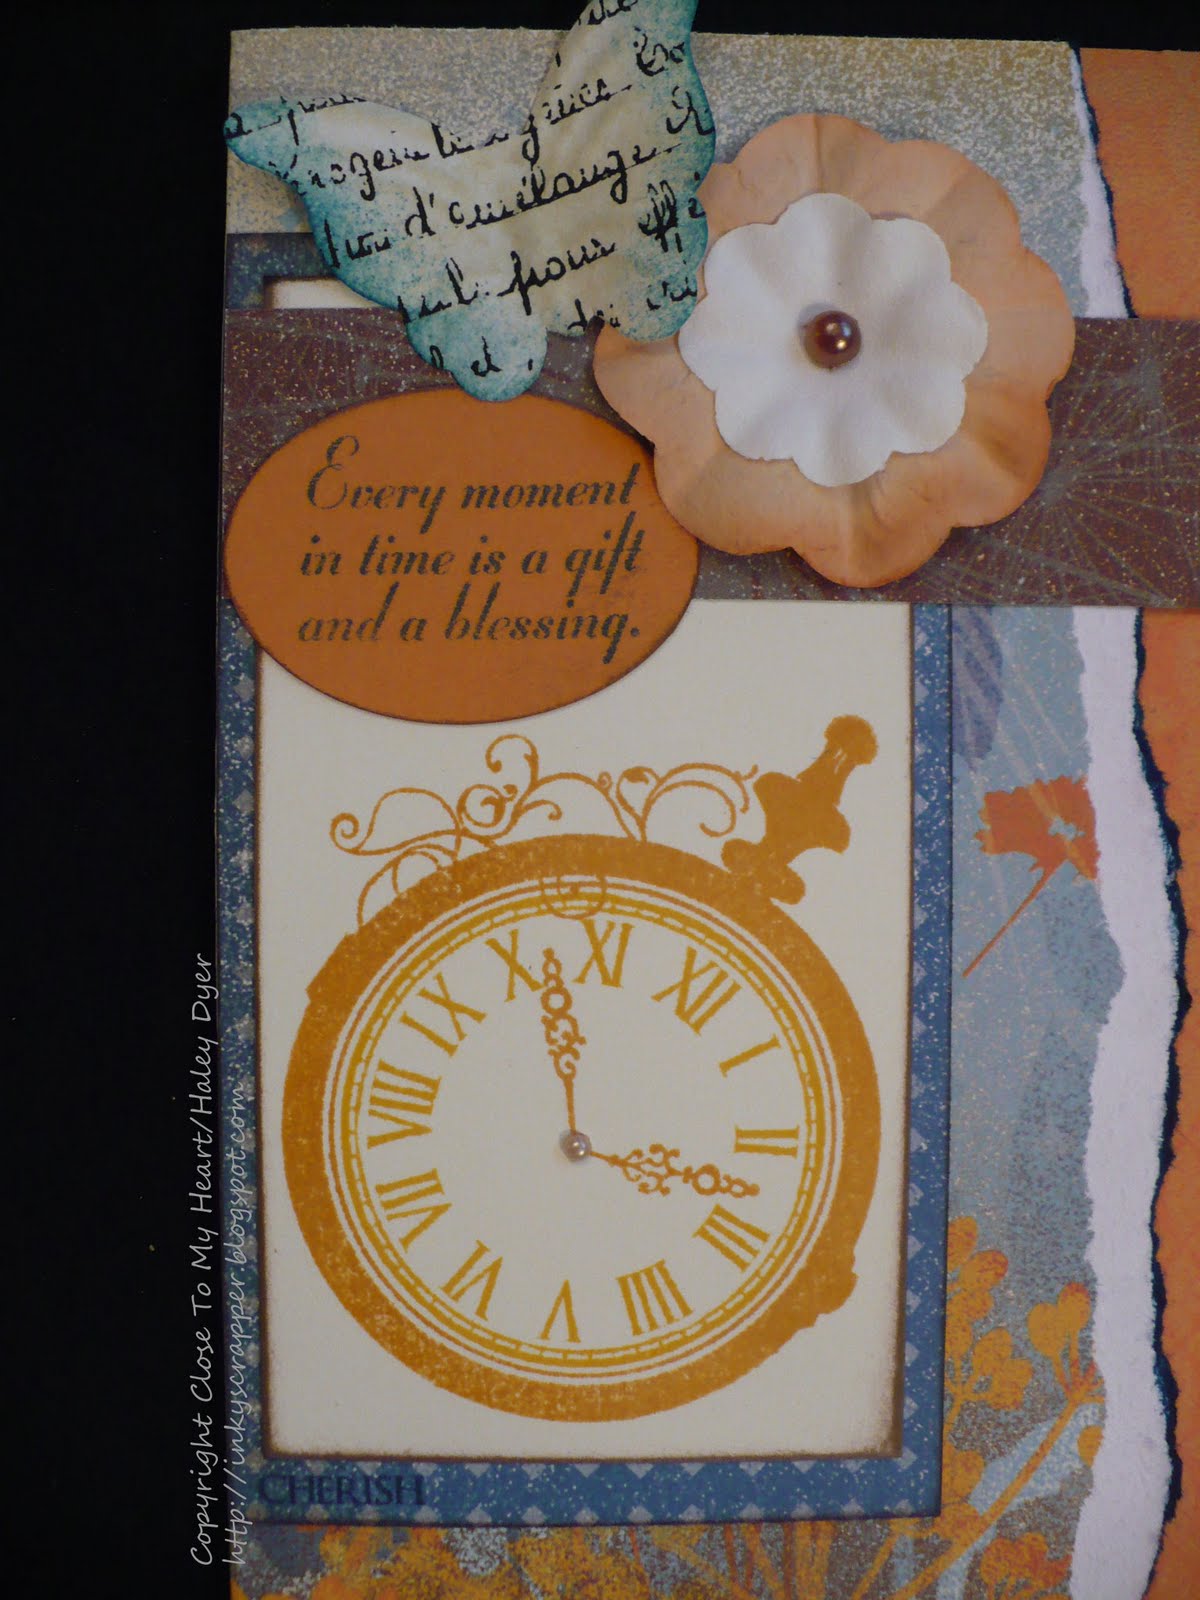
For my second card, I wanted to try a masculine look using the same papers and stamp set. I chose the "Far-Sided Focus" 6"x6" card sketch from Wishes because I really like the tag element. The only "bad" think about this sketch was that the tag needed to be much longer than the actual stamp. Never fear, CTMH clear stamps are here! I inked up the entire stamp except the end (or bottom) of the tag. I stamped it on the strip of Colonial White card stock, cleaned the stamp, and inked up the end and sides of the stamp (not inking the triangle end). Then I lined up the stamp and stamped it again, making a long tag.


Even though the Foundry Pin Clips can be jazzed up, leaving it plain with a wooden button seemed pretty manly to me.

Thanks for hopping by! If you have any questions about my creations, leave me a comment and I'll get back to you ASAP. Now, be sure to visit Judy's blog next!

Guest Design Team Member

This month, I'm a guest design team member over at Scrap Our Stash. You can find me there today!:)

Monday, August 29, 2011

H2H Color Challenge: Pear, Sorbet, and Cocoa

This week's H2H challenge is a great color combo for you! We can't wait to see how you use Pear, Sorbet, and Cocoa. (Don't these colors sound yummy?)

Are you starting to feel a touch of fall in the weather where you are? It's still hot during the day here, but we're starting to feel a nip of fall in the mornings and evenings. This delicious color combo made me think fall too. For my card, I followed the "pint-quart-gallon rule" of color theory: use a little bit of one color (Cocoa), a bit more of the second color (Pear) and lots of the main color (Sorbet). Using the "Done Right" sketch from Wishes and the National Stamping Month Pair-A-Phrase stamp set, this card came together quickly.


After using both markers and my waterbrush to color the adorable owl (with a touch of Desert Sand ink thrown in to lighten her up a bit), I decided that she needed a little something. I stamped the swirl stamp around the edges in Pear, which reminded me a bit of leaves in the trees. Finally, I distressed all of my papers with Cocoa ink to age them a bit. Not only does this distressing define each piece, but I think it helps tie them all together. I purposely did not stamp a sentiment onto this card. When I decide how I want to use it, it will be easy to stamp an appropriate sentiment on the Pear portion of the front.


The finishing touches were the piece of Colonial White grosgrain ribbon across the bottom (that also helps draw attention to the tone-on-tone Sorbet stamped swirls across the bottom), and scrunched up piece of Sorbet ribbon, and Mocha Opaques to accent the owl's eyes.


Now, you have to go visit the H2H Challenge blog to see all the fabulous creations the Design Team members came up with! You are going to love all the variety you'll find, from over-the-top amazing to clean-and-simple creations. We at H2H welcome all skill levels to play along! This week we're playing for fun, but prizes will begin with our first September challenge next month. At the end of the month, not only will we recognize our Top 10 and a Guest Designer, but we'll also recognize the crafters who complete every challenge. Won't you join us? All you need is a little Close To My Heart products to get you going. Happy crafting!

Friday, August 26, 2011

Another Wicked Card

Rather than make the hat card from my open house earlier this month, my sister created this pretty card instead. I love how sweet and stylish it is. She can use it for most anything girly!

The stamped flourished stripe is from Wicked, the August stamp of the month, and the papers are from the Sophia paper pack. The Tulip and White Just Blooms are such a pretty centerpiece!


Wednesday, August 24, 2011

Embossed Card

This card design is a CASE of the card that I made HERE (that was also a CASE), and I taught it at my recent card class. We heat embossed images from the Treasure Life stamp set and white embossing powder. Each of the ladies had a different color background, and they all turned out so beautifully (IMHO). My card uses a Smoothie background, while my friend Joy's card has a Sky base. Both colors look great on white with a pop of black. Which do you prefer? (I can't decide! I really like them both.)


Don't you love those paper butterflies? You get 68 in the package of Just Blooms Flutter Paper Shapes for only $5.95. They are all dry embossed, and some are plain while others have a pattern, a script, or music printed on them.


This card fits the CAS-ual Friday challenge, embossing. Go check out all the great creations over there!

Monday, August 22, 2011

Back to School with H2H!

This week at Heart 2 Heart challenges, it's back to school! (I've been back to school for almost two weeks, so that's ALL I've got on the brain right now!)

I thought that I would create something quick, easy, and cute (my crafty motto?). These items will probably go to my student teacher at the end of her term, although my DD is already telling me that I need to make some for her teachers.

Can you guess which *new* paper pack I used? I'll share at the end of the post!

The first item is a simple paper lunch sack. While you can definitely stamp on these, I took the easy way out and basically created a card front that I glued to the bag. Fill it with goodies (think chapstick, Advil, paper clips, pens, pencils, etc.). Fold the top down, punch two holes, and thread in some pretty ribbon (or jute or hemp or leather strips...). Tie in a bow or knot and voila! Instant gift bag.

The next project is a 4"x4" card that can be tucked into the gift bag. You may be able to tell on the B&T paper that I added Sunny Yellow stripes with a marker since this is actually Christmas paper and not back-to-school paper. Believe me when I say that it's Christmas paper transformed! I used my "In the Month of August" stamp set, which is now retired. One image per color was an easy way to make sure that my card was well balanced. Do you see the hint of glitter on the A+? It's our new RED Glitter Glitz Gel!

Finally, the note pad: it is a simple mini legal pad that measures approximately 5"x8". I cut amd stamped paper to decorate the ugly factory strip at the top and then stamped on random pages throughout the notepad. Easy peasy!

So, have you guessed which paper pack it is? The colors are Sweet Leaf, Holiday Red, and Sky with a touch of Topiary. To keep the BELIEVE paper pack from looking so Christmas-y, I added Sunny Yellow. Perfect school colors now!


Let's see your back-to-school colors! Join us at H2H- it's easy to play along. You'll move to the head of the class if you join us before AUGUST 27! (That is the deadline for ALL of the August challenges.) We're giving away prizes and ten talented participants will be chosen as our Top 10 of the month. Go check out our fabulous guests this week and all the Design Team's creations, then link your back-to-school projects up at H2H.

Friday, August 19, 2011

It's About Time!


The release of the new CTMH Idea Book always brings fabulous new papers and stamp sets. One of my favorites is the new Key Moments, which I paired with the gorgeous new Dreamin' paper pack. (You can see another card with this combo right HERE.)


An older Mojo Monday sketch (#189) seemed like the perfect design for this stamp set.


Since I am participating in a new idea book swap with other consultants, I made 24 of these babies! I think my favorite part is actually the little butterfly. Each one was originally white, but I sponged them all with Bamboo ink and then sponged the edges with Pacifica ink. I think they turned out so pretty, and really represent to me how time flies!


Don't you think this card is perfect for the Frosted Design's Friday Challenge, to use clocks or time? I do too!


TGIF! Today's our 7th day of school, so I think we have survived (and possibly even thrived) this week!

Monday, August 15, 2011

H2H Challenges: From Our Heart to Yours CASE Challenge

This week's Heart 2 Heart challenge is a monthly feature we like to call "From Our Heart to Yours." This week, we're sharing our style for you to CASE. What's a CASE? Why, copy and steal exactly, of course! (Usually, however, it's a CASE with a twist of your own style.)

So, which H2H Design Team Member's style is most like yours? We'd love to see who inspires you. Imitation is the sincerest form of flattery, right?

As for "my" style, I really struggled with this challenge! Since I love to use sketches, I decided to make a card using the Wishes "Top Band" pattern. You can find a PDF with instructions for this card sketch right HERE if you'd like to use this sketch too.

It is probably easier for me to define who I'm not as a crafter rather than who I am. I think that I'm generally a simple gal, but that doesn't mean that I won't glam it up when the occasion calls for it. I like to stamp, but I don't like to color. I love to get inky with a little distressing or stamp rolling. Tearing is another fun, simple technique that I like.

While this card is probably busier than my usual style, it's thanks to this gorgeous CTMH Dreamin' paper. All those beautiful flowers on the front are part of the paper, not anything that I did! (The butterfly was white with the black text, but I colored it by sponging first with Bamboo to antique the white and then with a bit of Pacifica to give it dimension and to match the project better.) The Dreamin' paper pack may not be my first choice of colors (I'm not much of a yellow girl unless it's 14 karat.) but there's just something that I love about this paper. Maybe it's the hints of cool that we're starting to feel underneath all this hot Southern heat.

We hope that you'll join us once again this week at H2H for another fun challenge! You have until the end of the month to play along with any of August's challenges and to be eligible for our Top 10 and/or the prize packs. Get your game on and CASE away!

Sunday, August 14, 2011

National Stamping Month "Pair-A-Phrase" Special Offer (& a Blog Hop)

Close To My Heart has two special offers this month! You've probably already heard about the Extra! Extra! free stamp set with an August stamp of the month purchase, but have you heard about the Pair-A-Phrase double stamp set offer? (You can find a link below for complete details, but with a minimum $75 purchase, you get this amazing double stamp set free!)

Several of my consultant friends decided to create a blog hop for this great stamp set. You may have arrived here from Angie's blog, and to continue the hop, head to Shannon's blog next. Continue along the blog hop if you'd like to see some creative uses with this cool double stamp set.

I have created two very different cards using the same bicycle image. The first is "pretty in pink" with the Sophia paper pack and colored pencils to fill in the lined image. Of course no girly card would be complete without a little bling! (This sketch is the "Lucky Layers" pattern from Wishes. If you come back in a few days, you'll see another card with this same set and design.)

This second card is what I made to celebrate my brother's recent birthday. He's a cyclist and certainly isn't into frou-frou and flowers, so I masked off the basket of posies to create a more masculine card. (I'm sharing a quick photo tutorial below if you'd like to learn how.) I used my circle punch to cut a window into the front that shows a peek to the inside with the decorative strip of presents. All of the images on this card are from the Pair-A-Phrase set except for the Happy Birthday sentiment (from Party Pennants).

I have some other fun Pair-a-Phrase cards to share with you, so come back often or even become a follower.


If you'd like to skip the masking tutorial, hop along to Shannon's blog!

To remove the flowers from the bicycle, grab some clear tape and tape over the parts you don't want on your final project.


Then, ink up your image.


Next, carefully remove the (inky) tape and set it aside. (You can reuse this tape a few times if you want to stamp this same image more than once, but be careful!) "Huff" (blow gently to reactivate the ink) on your inked image and then stamp it onto your project.


Finish your project as you desire.


Click HERE for a PDF with complete details on CTMH's National Stamping Month special offer, available 8/15-9/30, while supplies last.


Now, ride or hop on over to Shannon's blog for more Pair-A-Phrase ideas!

Wednesday, August 10, 2011

Disney Layouts

We love Disney World! It truly is one of the happiest places on Earth! While there last summer, we were also able to visit family in the area (and then toodle up to St. Augustine to vist more family).

I made these layouts using highlight photos of our trip. Some are from the (retired) Workshop on the Go, some are from the (retired) Level 1 kit, and some are from the Imagine how-to guide.


You'll have to scroll down to see what I did with the other pictures from our trip (and a few previous ones to Disney).


Did we wear the girls out or what?


Here is what I did with the extra photos:


I think I found this photo cube at Hobby Lobby, but I'm not sure. I filled the outside with photos from various Disney trips. (Can you see our little one in the stroller?!?) One panel I used for a title. I couldn't add any layers or frou-frou because it was a really tight fit! That's okay though!

The inside has four mini albums. Three are filled with photos from our three trips with the girls. It is fun to be able to relieve some of the memories in our scrapbook or by pulling out the mini albums that now reside in our living room.


May you make magical memories and preserve them creatively!


{Layouts 2011 #58-62}

Monday, August 8, 2011

The Most Amazing Scrapbook EVER!

My CTMH friend/fellow consultant Tresa Black has posted the absolutely, most amazing album that she created on her Fabulously Artsy blog. Please click on the link to read her post and watch her amazing You Tube video of her "Make a Wish" album. You will love it!

H2H Challenge: Hot!


Is it HOT enough for you?!? I'm (almost) looking forward to starting work tomorrow (as a teacher) to be in the AC! This week's Heart 2 Heart challenge is to interpret the theme "HOT!" Whatever that might mean to you, show us what you've got. As always, there are two fabulous prizes being offered this month to two lucky participants. The only requirements are that you link your creations to H2H by the end of the month and that you use some wonderful Close To My Heart products.


Every time I think of the word "HOT," I can't help but think of ways to cool down. Our camping trip to the beach a few weeks ago was HOT, so I began looking at my photos from our trip for some inspiration. Our younger daughter really wanted to see a sunrise over the ocean, so she and I got up (way) early on the last day of our vacation and witnessed a gorgeous sunrise. It was definitely HOT, but the water and the breeze helped cool us off.

I took my color scheme right from nature: Smoothie (pretty sunrise pink), Sunset (could be Sunrise too), Tulip (for a punch of deep heat), and Sky (to cool things off a bit). I eneded up mirroring my layout on the two pages, and I kept it very simple to let the photos speak for themselves.


Now it's your turn to turn up the heat and show us what "HOT" means to you. Join us at H2H during the "HOT" month of August! We've got some HOT prize packs to offer, thanks to our two generous sponsors.


All supplies from CTMH: Old World Alphabet and Post Card- Travel Series stamp sets; Sunset, Sunrise, Sky, and Colonial White card stock; Perfect Day paper pack (Tulip pattern, retired); Sunset, Sunrise, Tulip, and Sky inks; Shimmer Brads; journaling pens


{Layout 2011 #57}

Saturday, August 6, 2011

Journaling Tips

While getting my morning online craft fix, I ran across these journaling tips and free journaling cards. Journaling can be difficult when you scrapbook, but I believe that it is so, so , so important. Long ago, I sat with a lady looking at her scrapbook, and she told me about all of her pages. None of her stories were written down! It made me sad to think of what would happen to these wonderful stories when she won't be there to tell them. Will her children know them? Will theirs? I'm sure her album will be around for a long, long time.

Don't let that happen to your memories! Journaling can be as simple as the 5Ws. You know, you remember them: who, what, when, where, and why. All five aren't always important, but at least some of them always are.

Friday, August 5, 2011

Open House TODAY!


This evening, I'm hosting an Open House/Idea Book Unveiling! See the sidebar for complete details, and contact me ASAP if you need directions. It is going to be fun!

For those who can't attend, you might be interested in my list of Idea Book highlights at the top of the page. Just click to read about my faves and some wonderful improvements CTMH has made.

Finally, since you're reading this online you obviously have a vested interest in computers or some type of techie device. You might like to read my review of Carbonite, an online back up service, HERE, at my friend Mary's "Are You on the Fence?" blog.

Have a fabulous Friday, y'all!

Wednesday, August 3, 2011

New (& Improved) CTMH Mission Statement

We show you how to celebrate relationships through discovering your creativity, to preserve and share the moments that matter most.

Tuesday, August 2, 2011

Lasting Memories Winner

Sorry to hog my own blog, but I was excited to see that I was chosen to be in the Top 3 at Lasting Memories for my "all about the title" Dance layouts. Thank you!

Lasting Memories

Scrap Our Stash July Winner

While recently stalking, I mean, browsing at Scrap Our Stash, I was so surprised and honored to find that I have been chosen as one of the two July Red, White, and Blue challenge winners for my telescoping card! Thank you so much! I am going to be a Guest Designer in September, so I will let you know about that next month.

Monday, August 1, 2011

Heart 2 Heart Challenge: Birthday Fun


First, I have to wish happy birthday to a kid at heart (in a good way), my brother Brian! (You'll get to see his birthday card later this week.)

{If you're looking for the August stamp of the month Blog Hop, then scroll on down!}

For our first August Heart 2 Heart challenge, we are sharing ideas for kids' birthdays. I decided to share my favorite kid idea, the "birthday number candle." (When I was a kid, I so wanted those big huge number candles on my cake, but alas, I never do remember them appearing. I did, however, have a big huge column candle that you were supposed to burn down to the next year. Anyone else remember those? I think at one point we cut a big chunk of years off of it and then burned it down to the correct year.)
Anyway, back to stamping, the real reason you're here! As I said, this focal image is one of my favorites to make for a kid's birthday. Begin with the Rustic Numbers and Friendship Blessings stamp sets and the colors of your choice. (When I made my card, I had no idea that the Friendship Blessings stamp set was being retired! I'm sure you can find a similar small leaf type of stamp in your stash.) I also decided to do a little "stamp kissing" for this one. (It's okay for kids; it's a G-rated technique! You'll find a quick tutorial below.)

This card is also a matchbook-style card so that you can slip a little gifty inside, such as cold hard cash or a gift card. Who doesn't love that? (By the way, I decided to make this card for my nephew who will be five in October. He loves the color yellow, so I had to incorporate some sunshine on his card.)

If you already know how to kiss- stampingly speaking of course- then go check out the H2H blog to see what our fabulous Design Team and our Guest Designer, Melinda, has in store for you. There is definitely a party going on over there! Otherwise, here's a little tutorial for you.

For stamp kissing, you can either add color to a stamp or you can take away color to the stamp. I chose to add color to my number candle because the take-away version was too washed out.

1. Begin with two images, your main, base image, and a smaller image for the kissing. (My main image is the number, my smaller detail is the polka dots.)

2. Ink up the large stamp in the color of your choice and place it face up on your work space.

2b. If you are ADDING color to the stamp, ink up the smaller stamp now.


3. Press the smaller stamp onto the larger stamp. It will be slippery! Pull straight up. (Stamp kissing with a Twist would have you twisting the stamps at this point, but that's not today's technique!).


4. Clean the smaller stamp and repeat as needed to fill in the entire larger image. Remember to clean between kisses each time!


5. It's a good idea to "huff" (breathe) onto your main stamp to reactivate any drying ink. Then press your main image onto your project piece. (Sorry I forgot to take a photo of the 5 without the flame first.) That's it! You've just done some serious kissing with a little heavy breathing thrown in for good measure. ;)


Make your Monday a great one! Since this is our first challenge of August, you have the entire month to play along. Make something for a kid's birthday, post it online, and then link it up to H2H. We've got some great prizes again this month! Happy crafty birthdays!

LinkWithin

Related Posts with Thumbnails