Thursday, October 31, 2013

November Stamp of the Month Blog Hop: Illuminate

We're going to light a crafty fire under you with the November stamp of the month, ILLUMINATE, blog hop!  If you're already getting inspired, then you probably have arrived from Lori Brown and will head to Vicki Price next.)
My card uses the fab & funky Sarita paper pack.  The strand of lights reminded me of camping (which we love!), so I made an "awning" out of the coordinating Sarita fabric.  I just laid down a strip of Tombow adhesive, pleated my fabric across the top, and then with another strip of Tombow acrosss the back, I folded down the excess fabric.  I really wish that you could see it in person!

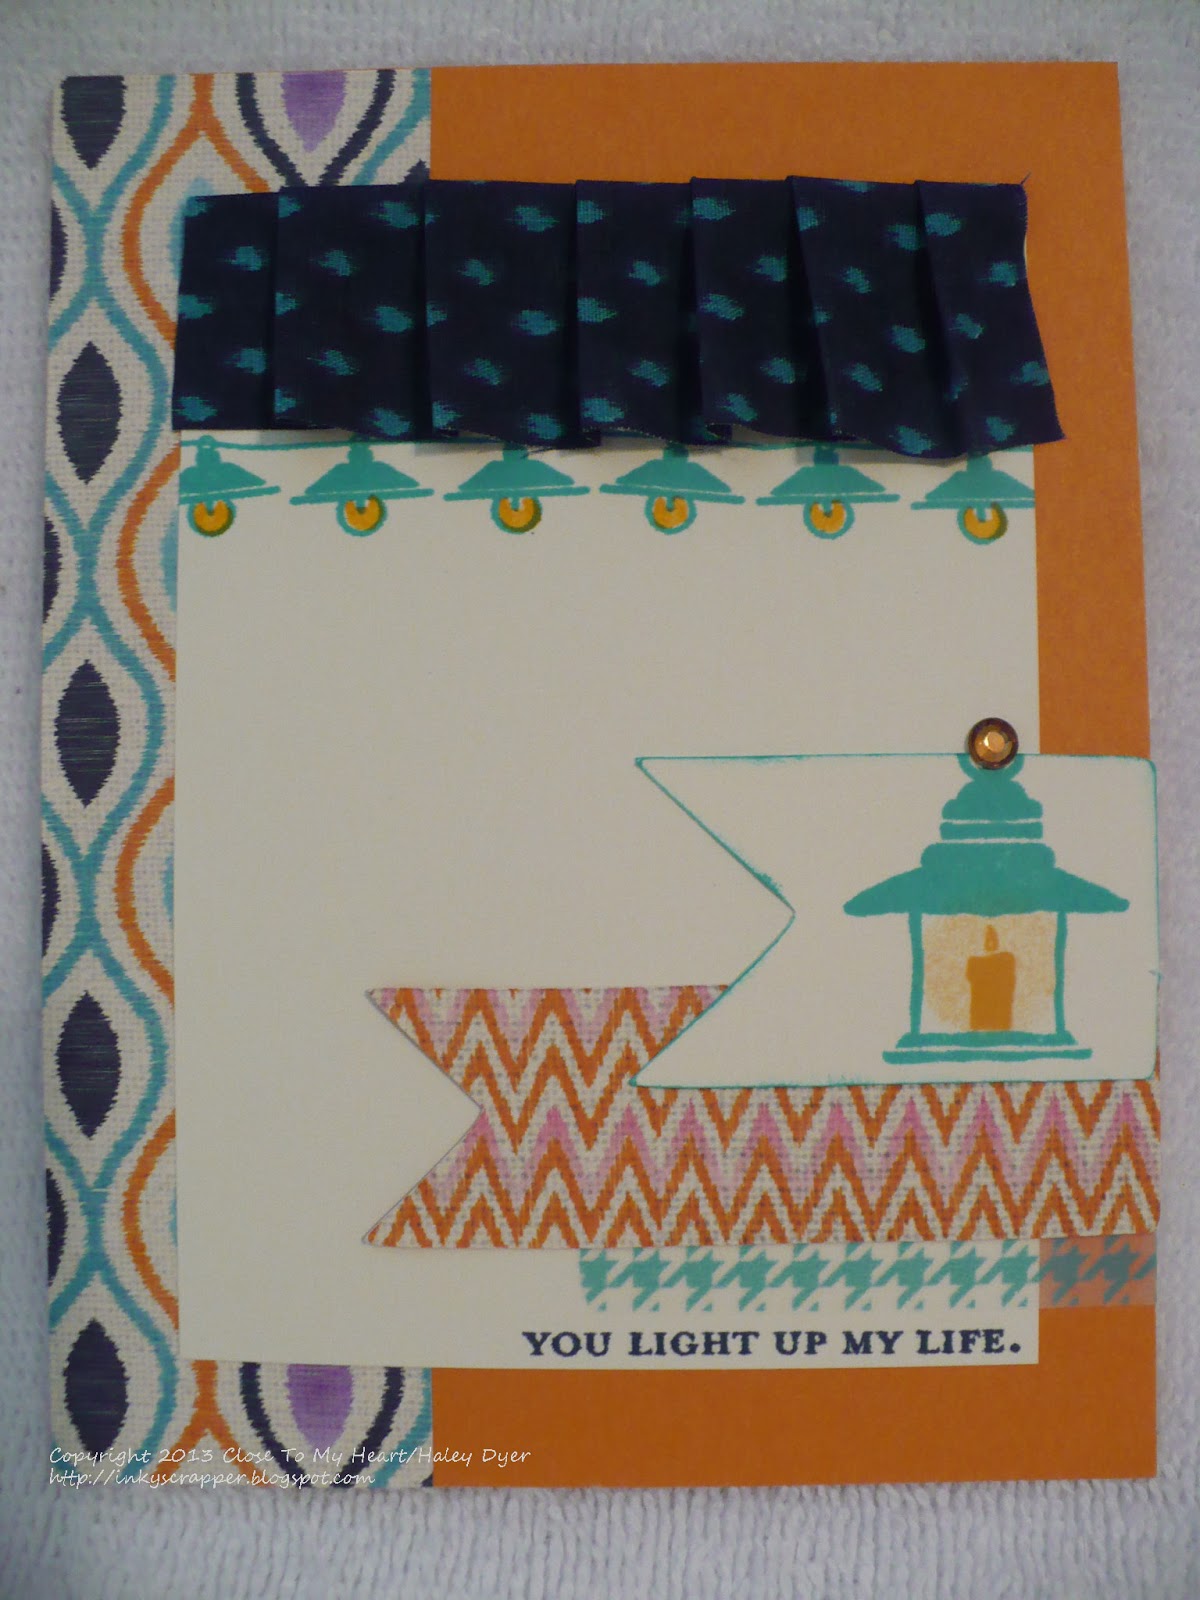
Now here are the rest of the details, if you're interested: the banners were both cut with the CTMH/Cricut Art Philosophy cartridge, and I stamped the lanterns with Lagoon ink.  I had to use that great houndstooth Lagoon washi tape on the card too!  The candle uses Goldrush ink, and the sentiment is stamped in Outdoor Denim.  To make my lights shine, I colored in the "bulbs" with my Creme Brulee marker, and I used a sponge dauber dipped in Creme Brulee to make that pretty candlelight glow.  I also had to stick on a tan sparkle on the lantern.

I can't wait to play more with ILLUMINATE!  I have tons of ideas rolling around in my head, so be sure to come back by later this month to see how I incorporate this great set in my scrapbooking and paper crafting.  I'd love it if you'd leave a comment before heading off to Vicki's creation next!

P.S.  If you get lost along the hop or a link doesn't work, come back here for a COMPLETE LIST OF HOPPERS!  Thanks!

Monday, October 28, 2013

H2H Challenges: Lots of Layers

Has the weather gotten cold where you are?  It was 33 degrees Friday night at the end of our football game, and 27 Saturday morning!  YUCK!  I am NOT ready for these frigid temperatures!  Heart 2 Heart Challenges is challenging us to end October with lots of layers.  That's right, pile it on!  We want to see your creations with lots and lots of layers (at least 5- but you could pile on more).
My card uses the October stamp of the month, Scandinavian Wishes, and the Frosted paper pack with Cranberry accents, using one of the card patterns from the Make It From Your Heart, Vol. 2 how-to guide.  The ladies at my card class yesterday got to choose which Cricut die cut they wanted to use to personalize their card.  They could also choose to accent the Frosted paper pack with either Blush or Cranberry.

To add some panache to my stamped image, I first stamped it in Cashmere.  Then I colored select areas to highlight them: the deer with Desert Sand and the heart with Cranberry.  Doesn't the red glitter glitz add something special?  

Here's the house image stamped in Cashmere and colored with Desert Sand, Blush, Cranberry, Crystal Blue, Olive, and New England Ivy.  Don't you love how the marker pops?  Try coloring your stamped images sometime!  You can even try this technique with colored pencils.

Now go check out what the H2H DT has in store for you as they pile on the layers.  You have until Saturday to play along with any of the October challenges.  I hope to see you there!

Wednesday, October 23, 2013

More Layouts from My Brother's Wedding Album

If you follow my blog or visited earlier this week, then you'll know that my brother got married on Saturday.  Here are the rest of the pages of the album that I've made for him and his beautiful bride.  (Click HERE if you'd like to see the first few pages.)
This particular layout is from the Huntington Workshop on the Go...
...except that I added the doily stamp from one of the CTMH/Cricut Artbooking stamp sets...

...plus the bicycle, balloons, and heart trail to coordinate with their wedding invitation.

This layout uses the stamp set from the Workshop on the Go kit, some of the WOTG embellishments, and the Huntington My Stickease Assortment.


The My Stickease Family pennant totally inspired this layout: There were so many family pictures, so I created a layout to hold them all with simple 4"x6" rectangles.
These pages are embellished with the My Stickease, some gems, and of course the gorgeous bronze shimmer trim.

This layout uses some of the My Stickease plus the Artbooking stamp set and bronze shimmer trim.


This particular layout also uses the Huntington assortment of canvas self-adhesive art.

I forgot to mention that I also used a Rosewood Mini Medley collection to accent the layouts in the album.  I hope my brother and his bride enjoy the layouts!  I've promised to help them add their pictures when they're ready.  Thanks for stopping by!

Monday, October 21, 2013

My Brother's Wedding & H2H Lace Challenge

My brother got married Saturday, and we couldn't be happier for him and his bride!  I am still in the process of making a scrapbook for them so that they can just add their photos when they return from their "mini moon" honeymoon this week.  Here are a few of the pages.  Don't they coordinate well with the Heart 2 Heart Challenges lace challenge this week?  First up is the title page:
 Notice the braiding on the banner.  My brother, his wife (I love saying that!), and her daughter braided a cord in a shadow box in lieu of a unity candle.  I was glad that I hadn't finished the album so that I could add a braided piece to it.


 Here is the closing page, but I'll be back in a few days with more pages of their album and more info on how I made them.

Here are a few of my favorite pictures from the wedding:


 The four of us:
Can you believe that Ansley caught the bouquet?  I'm not ready for her to grow up, but this is a great picture anyway!
Hopefully the professional photos of the entire family have turned out well so that I can have some to scrap and share.

Thanks for sharing this special moment with my family and me!

Friday, October 18, 2013

Lifting Spirits Birthday Card

Today is my oldest nephew's 7th birthday!  I cannot believe how big he's getting!  I made him this cute card to include with his Teenage Mutant Ninja Turtles Lego set, and of course I had to give him $7 too.
This card measures 3"x6" and I used the Proplayer paper pack.  The cute stamp set is the Lifting Spirits set from the new Holidays from the Heart gift guide.  I paper pieced the airplane and banner.  (This particular sentiment is from the Card Word Puzzle stamp set.)  The Ruby washi tape and this stamp set are only available through the Holidays from the Heart gift guide, so be sure to get yours before the end of the year!
Check out the fisher-birthday-boy!  Happy birthday, Doodlebug!

Monday, October 14, 2013

CTMH Holiday Gift Guide Blog Hop

Close To My Heart has just published a special Holiday Gift Guide that you are going to love!  About two dozen of my regular blog hop group have decided to share our favorites from the new Guide to inspire you to get crafting this holiday season.  If you've already started hopping, you should have arrived from Sheila's blog.  From here, you'll hop on over to Gina's Little Corner of Stampin' Heaven.  (If you get lost anywhere along the way, feel free to come back here and view the complete list HERE.)

My card uses the new Season's Tweetings stamp set, which is available only as a set to create 6 adorable gift bags.  (Extra gift bags can be purchased separately.)
I love all the birds in this set!  I decided to make a card rather share a gift bag.  To make my card, I began with a CTMH/Cricut Artbooking ornament shape that I cut at 4.5" (real dial size) on White Daisy card stock.  Then, I cut the ornament again with a piece of the new Sparkle & Shine paper pack.  I stamped the Owl with Slate ink, the hat  and sentiment with Ruby ink, and the banner with Juniper to match the paper pack.  I used all three of the new Sparkle & Shine washi tape to color and pattern to the card, and then adhered the stamped images.  I finished off the card with a little baker's twine.

Be sure to hop along the rest of the blog hop to see all kinds of great ideas with the new Holiday Gift Guide.  Go to Gina's Little Corner of Stampin' Heaven next.

Finally, I'm llinking this card up to the H2H You Better Shape Up challenge too.  Thanks for hopping by!

H2H Challenges: You Better Shape Up!

It is time to get in shape over at Heart 2 Heart Challenges!  We want to see you use a fun shape as the base of your project: no squares or rectangles allowed.  Are you up for it?  If so, be sure to head over there to link up your shapely creation.
Isn't she a hoot?  To make this card, I used the Huntington paper pack and my CTMH/Cricut Artiste cartridge.  This shape is not actually a card, so I'll explain how I made her.  First, I cut her out of two pieces of card stock (Colonial White for the base and Champagne for the front), setting my Cricut dial at 6".  Then, I cut the second layer ("feather" and eye pieces) first with Cocoa card stock and then with a piece of Huntington B&T.

To assemble the card, I scored the base at 1.5" from the top.  Hopefully you can see the line in the picture.  Then I added adhesive to that top portion, lined up the card front, and stuck them together.
Here's now she looks opened up.
Because I'm making this card for a special young lady, I added a little rosette with a scrap of another piece of Huntington B&T and one of the gorgeous Rosewood gems.  One other little detail is that I stamped the wood-grain stamp from the Huntington Workshop on the Go on the "wings" so that they stood out just a bit.

Thanks for taking a peek at my owl-shaped card!  Be sure to check out what the H2H DT came up with this week, and get in shape with us by 10/31!


Wednesday, October 9, 2013

Holiday Card Workshop (Invitation)

You're invited to a holiday card making extravaganza on Saturday, 11/23, from 1:00-5:00!

   
Early bird preorders for the card workshop kit will be taken through 10/27.  The total cost for the workshop is $41, including tax & shipping.  (Extra shipping charges will apply after 10/27 for a grand total of $46.)  You have the choice of the “Frosted” cards (in tans and light blues) or the Sparkle & Shine cards (pinkish red Ruby and mint green Juniper) AND a mini stamp!  You'll be able to select any of the stamps on p. 115 of the Idea Book, or a monogram letter of your choice.  Your kit will create 50 cards, 10 each of 5 designs.  You will receive a paper pack, 5 sheets plain card stock, 50 cards and envelopes, a roll of shimmer trim, and one of   We will cut all the cards and create at least one each.  (We will try to finish all of them!)  You may have to finish the rest of your cards (or easily turn them into holiday thank yous and more!).
Click HERE to see the Mini Stamp choices (the first 7 stamps, all beginning with order # M), and click HERE to see the 52 Monogram choices.   
Please plan to bring your trimmer, lots of adhesive, recommended stamping block(s), and ink colors to match your kit.  (If you don’t have them, you will be able to add the inks to your kit order.)  Frosted colors are Crystal Blue with Champagne and/or Slate.  Sparkle & Shine colors are Ruby and Juniper with optional Slate.   It would also be a good idea to bring 5 quart- or gallon-sized ziplock-type bags to hold pieces in case we don't finish all 50 cards. 
     
Space is somewhat limited, so prepayment will ensure your spot  You may also order a kit and receive complete assembly instructions if you are unable to attend the workshop but would like to create the 50 cards.  You may also substitute another (current) paper pack if you want to make "other" cards than holiday/winter cards.  Just let me know your preference when you are placing your order.
     
Orders taken from 10/28-11/15 will be $46 due to the cost of expedited shipping.  RSVP ASAP!

Monday, October 7, 2013

H2H Challenges: Little Black Dress

This week's Heart 2 Heart challenge is "little black dress," which to me means it's time to get dressed up!  We certainly did that this weekend, since my parents, brother, sister, and I were attending my youngest cousin's wedding.
Her card is a 5"x7" White Daisy card stock base paired with the For Always paper pack.  The heart and frame are from one (of the THREE) stamp sets you get with the CTMH/Cricut Artbooking collection, and of course the shapes were cut with the Artbooking cartridge.  The heart is stamped in Ruby and the frame in Slate.  The sentiment is from the 4 My Friend stamp set.
The shimmer and shine of the Black shimmer trim doesn't show up well in the photo, but you can see the sparkle flourish and the pin (from the black mini medley collection) well.  The heart is glued onto the black strip grosgrain ribbon with a glue dot (LOVE those things!!).

Here's the beautiful bride with my siblings and me:
Best wishes, Heather & Tom!

Now, it's time for you to check out the H2H little black dress inspiration and get fancy!

LinkWithin

Related Posts with Thumbnails