Thursday, September 15, 2016

CTMH Technique Blog Hop: Flower Power

This month's CTMH technique blog hop is featuring the brand new CTMH/Cricut FLOWER MARKET collection!  You are so going to love the beautiful creations you can make with this awesome collection.  It has lots of cuts that aren't floral, too.  (If you're already hopping, then you've arrived from Michelle Loncar's blog.  To continue the hop, visit Tonya next.)
For my 8"x3.5" card, I decided to use the pretty succulents on the Flower Market cartridge.  I selected my color palette of Juniper, Whisper, and Fern (from the Oh, Deer collection) plus Thistle after looking at several pretty succulent images online.  Who would have thought to use the Christmas/winter Oh, Deer paper for a something obviously not wintry?  I love how versatile Close To My Heart's themed papers are!

To begin, I cut several different succulents from p. 40: Juniper at 2.75" and Thistle at 1.5" and 1" plus the SHIFT succulents at 2" and 1.25" (Whisper) and Fern (2").  Below, you can see the Juniper succulent pieces after they were cut.
For each succulent, I sponged the matching ink color onto the two base/largest pieces and then added a little White Daisy ink to the smaller pieces.  I also bent and shaped the card stock as I glued the pieces together to give them some dimension.  For the succulent cuts (as opposed to the SHIFT succulent cuts), I didn't use all the pieces because they were just too bulky for a card.
To finish my card, I stamped the sentiment (from the Flower Market collection) in Black onto the large piece of Oh, Deer B&T.  I also added White shimmer trim and silver sequins, plus the twine from the Oh, Deer Workshop Your Way.

Thanks for hopping by!  Enjoy the Flower Power hop and visit TONYA'S BLOG next!


Tuesday, September 6, 2016

National Stamping Month Blog Hop

It's STAMTember or National Scrapbooking Month!  Close To My Heart has a darling card kit available this month only!  You're going to want it for the 8 (that's right, EIGHT) different stamps and the adorable container it comes in!  (If you're already hopping than you've probably arrive from Lauren's blog.  From here, you'll visit Darlys next.)
Since this set is a card kit, I decided to create a scrapbook layout instead!  I took three of the card bases and cut them in half on the scored fold line.  I then created a tile effect and added in three 3"x3" squares of White Daisy card stock. 
I adhered my squares to a 9.5" square of black card stock on both pages, then onto a 10" square of new Willow card stock, and finally onto the 12" square White Daisy scrapbook base.
After stamping 2 of the stamps from the kit in black, I quickly colored them in with a green and purple colored pencil.  Green shimmer trim and epoxy triangles easily finished off the pages.

Not bad for photos from this past weekend!  This kit is so much fun to use.  Thank you for hopping by!  You're going to love all the great ideas you'll find, so go visit Darlys's blog next!
Click HERE for all the hop participants and their blogs.

Monday, September 5, 2016

H2H Challenges: National Stamping Month

Since Close To My Heart has declared this month to be STAMPtember, we at H2H had to follow suit.  We are celebrating National Stamping Month by, of course, stamping on our projects!
My card (which will be sent to my college daughter one day soon) features two stamp sets: M1146 Swirling Stars on the background in Sea Glass and C1605 Happy To Be Friends in black for the sentiment and in Sea Glass for the flowers.  I used a piece of Memo Fundamentals B&T and Whisper card stock for the sentiment banner.  I embellished this card with aqua shimmer trim, rose gold foil, All Together Complements, and White & Gold Twine.

Be sure to check out all of the great National Stamping Month projects that the H2H Team Sea Glass has created for you!

Thursday, September 1, 2016

September Stamp of the Month: Blessed Beyond Measure

Welcome to the September stamp of the month blog hop featuring Blessed Beyond Measure.  This lovely stamp set has me thinking of fall, cooler temperatures, and my many blessings.  Join me and my fellow consultants as we give you ideas of how to use this stamp set.  (If you're already hopping then you've arrived from Jennifer's blog, and you'll go to Maureen's blog next.)

This set coordinates with the CTMH/Cricut Artbooking cartridge.  I knew that I wanted to create multicolored leaves, so rather than cut out leaves with the Cricut, I made a mask so that I could sponge color onto my card to create some of the leaves.  (The little leaf at the bottom right was cut out of a piece of Saffron from the Enchanted Fundamentals.)

I lined up my ink pads and a sponge or dauber so that I wouldn't accidentally mix my colors.  No one wants Ruby in in their Saffron ink pad!  I lined them up from lightest to darkest, plus Fern.  (From left to right, the colors are Saffron, Goldrush, Poppy, Ruby, and Fern.  Not pictured is Cocoa, also used on this project.)
Then I sponged onto my mask from lightest colors to darkest to create the beautiful leaves.  (I finished them off with stamping the veins in Cocoa.)

Thanks so much for hopping by!  I hope that you and yours are Blessed Beyond Measure.  Now go see Maureen's pretty project!
{Click HERE for all the hop participants and their blogs.}


Monday, August 22, 2016

H2H Challenges: For the Girls

With two daughters, this week's Heart 2 Heart Challenge, For the Girls, is an easy one!  Today I am showcasing our older daughter and her BFF with this Calypso layout and the Tickled Pink stamp set (only available until the end of the month!).
Everything you see on both pages (except ink, stamps, journaling, and photos) came with the Calypso Workshop Your Way: the paper pack, all the embellishments, and the washi tape.
Though I don't love my handwriting, it makes journaling fast and easy.  The alphabet set that I used is retired, but you can find a similar beautiful font stamp set.  Don't you love those pretty flamingos?!?


You have all month to play along with any of the August H2H challenges, so won't you join us?

Monday, August 15, 2016

CTMH Technique Blog Hop: Passionate About Pockets

It's time for "Passionate About Pockets," a blog hop featuring some cool pocket project ideas.  (If you're already hopping then you should have arrived from Wendy's blog.  From here, you'll visit Darlys next.)

With our summer trip to Europe, I have TONS of photos to scrapbook!  I decided to start at the beginning: our time in Copenhagen with my cousin Jeff.  I have so many pictures that using flip flaps helped me put 14 pictures on this one layout.  (Unfortunately the flip flaps add an unwanted glare to my pictures when I photograph the layout.  In person it is easy to avoid the glare.)  The sketch I used is a simple one from the how-to guide, Reflections.
 Here is the left page with the flaps closed...
 and open!
I used the new Memo Fundamentals paper plus some Cashemere card stock and the All Together Complements.  You will also notice a little rose gold foil tape and aqua shimmer trim.
 Above, the flaps are closed, and below all three of them are open.

Thanks for letting me share my love of flip flaps with you!  Please leave me a comment and then just click on her name to go see Darlys's pocket perfection!

Saturday, August 6, 2016

New Product Blog Hop: 2016-17 CTMH Annual Inspirations Idea Book

Have you had a chance to drool over the new Close To My Heart 2016-17 Annual Inspirations Idea Book?!?  (You'll notice that we don't call this gorgeous resource a catalog because it is so much more!)  This Idea Book has a core set of supplies that are available all year, with supplements of seasons products coming each quarter.  This New Product Blog Hop is going to give you all kinds of great ideas for what you'll find for the upcoming year.  {If you're already hopping, then you've arrived from Michelle R.'s blog.  From here, you'll visit Michelle L. next.)

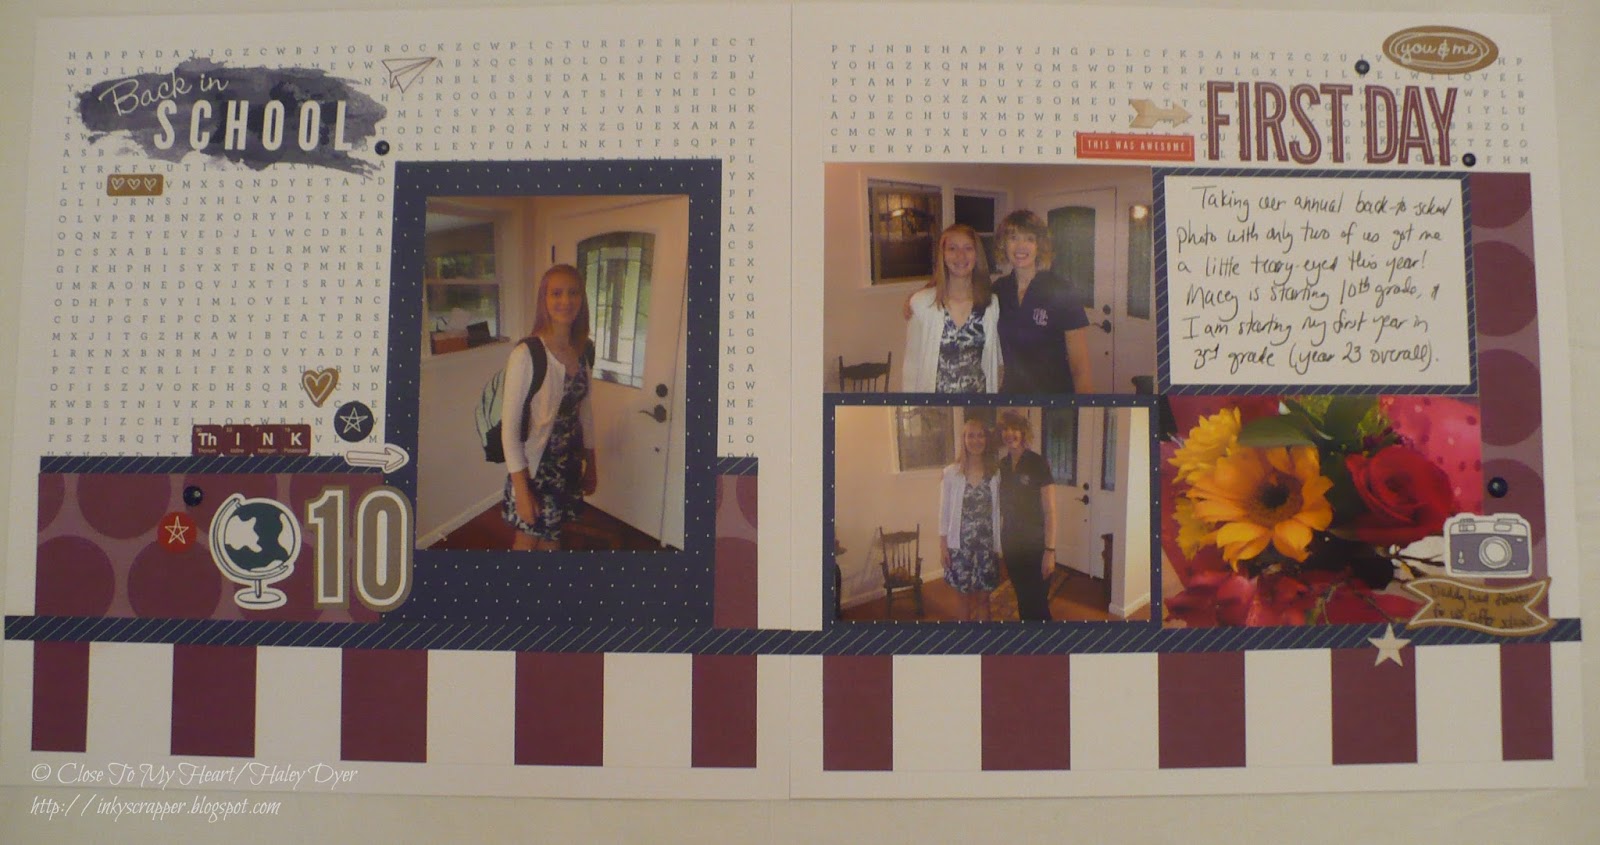
For my project, I chose to create a back-to-school layout of my daughter's and my first day of school (yesterday!) with the new Enchantment fundamentals paper pack and School 7-12 complements.  This layout is a sketch from Magic.
The only thing that I added in addition to the paper pack and complements is a few blue epoxy gems.

Thanks for letting me share our first day of school with you.  Please leave me a comment before going to see what Michelle L. has to share!
Click HERE for all the hop participants and their blogs.

Wednesday, August 3, 2016

Magical Superhero Layout

Just about all I've talked about the last few months is that our oldest just graduated from high school.  You may also remember that we threw a friends' superhero-themed graduation party.  I used the Magical Workshop Your Way collection to create this layout of that fun party.
 Both the camera and the white & Canary title piece are pieces of the Picture My Life sheet included in the collection.
 All of the embellishments except the shimmer trim come with the Workshop Your Way collection.
She is a hero to me!  We take her to college on the 19th.  I am not ready for that yet!

Monday, August 1, 2016

August Stamp of the Month Blog Hop: Purr-fect Halloween

Even though the temperatures continue to soar (and school is starting back), in the crafting (and retail!) world, our thoughts are always working ahead to upcoming holidays and events.  That's why Close To My Heart is introducing the Purr-fect Halloween stamp of the month set in August.  Along this month's blog hop, you'll see lots of creative ways to use this set (and not just for Halloween!).  {If you're already hopping, then you've probably arrived from Michelle R.'s blog.  You will visit Michelle L. next.}
Isn't this cat cute?!?  I had fun making this card with a sketch from Make It From Your Heart, Vol. 2 and the Sangria paper pack collection.  I used several techniques on this card.  You'll recognize the paper piecing on the hat and on the little banner.  (I stamped the banner on the card front with Cocoa ink and then stamped the pennant 3 times on scrap Colonial White card stock in Poppy, Pomegranate, and Eggplant then cut & attached the little pennants.)

One thing I am really excited about is having waterbrushes again for painting with our exclusive inks!  (In fact, we have 3 different sizes that you can see HERE.)  I knew that I wanted to color the cute cat with a waterbrush and Champagne ink.  You can read on for the technique, or you can skip directly to Michelle L.'s blog for the next project if you'd rather.  I stamped the cat in Cocoa so that it would have a nice dark outline.  Now for directions:

Step 1: Grab the waterbrush you prefer and your ink pad of choice.

Step 2: Squeeze the closed lid of the ink pad into itself to smoosh ink onto the inside of the lid to create your paint palette.

Step 3: Add a little water to your ink lid with the waterbrush.  (The cat is upside down because as I paint from the actual top of the paper/cat's feet to the bottom/cat's head, the ink will lighten.  I wanted the bottom of the cat to be darker than the top.)
Step 4: Begin painting!  Your paint will fade as you go, so you will need to repeat the first steps to get more ink.
Here you can see how I worked from top to bottom and left to right on the cat's body.
The finished painted cat.  (After it dried I stamped the eyes.)

Thanks for letting me share!  I hope you'll try painting with a waterbrush.  You'll have as many paint colors as ink colors, that all match perfectly.  Now go see Michelle L. next!
Click HERE for all the hop participants and their blogs.

H2H Challenges: Florence

You may or may not have noticed may lack of posts this summer, but my Heart 2 Heart Florence project will clue you in.  My family went on a month-long European adventure in June!  We had such an amazing trip!  You will probably get sick of me sharing all my pictures and stories.  First up is a layout of me parasailing in the Alps!
 I had so many pictures that I made an extra 6"x12" flip flap panel on the left page.  Above it is closed and below it is open.
 Here is the left page with the flap closed...
 ...and with it open.
 I had so much to say that I typed my journaling.  You can see the journaling "card" open below.
 And finally the right page.
I highly encourage you to purchase the Workshop Your Way collection for whichever paper packs you love.  Not only do you get the amazing paper, but you get fabulous embellishments!  I love the rose gold foil tape, the foil accents in the Complements, and the Florence sequins!  If you buy them all separately, you'll pay a little more than in the Workshop Your Way collection.

Thanks for flying with me!  Be sure to check out all of the H2H designers' Florence projects this week.  You will have until the end of August to contribute your project.

Sunday, July 31, 2016

Back to School Teacher Sign

Hello again!  It has been a long time since I have been able to post anything because our family took an epic adventure last month.  Now that we are back home, I am embarking on a new adventure, teaching 3rd grade for the first time (after 16 years in 5th grade).  I have been moving into and setting up my new classroom, trying to get ready for our official back-to-work start date (tomorrow).  I've made a little time for crafty play, and I'll be sharing some crafty classroom decorations off and on in the near future.
I decided that my new partner and crime and I needed name signs for outside our doors, so I made these two almost identical "chalkboard" signs with my Cricut & CTMH cartridges.  (I think I used Art Philosophy for the base and Artfully Sent for the letters.)
They were really easy to make and look great!

Friday, July 1, 2016

July Stamp of the Month Blog Hop: From the Notebook

Welcome to July's stamp of the month blog hop featuring From the Notebook!  (If you're already hopping, then you've probably arrived from Melinda's blog.  From here, you'll visit Darlys' blog next.)


Since I am such a fan of office & school supplies (which may have contributed to me becoming a teacher!), From the Notebook really appeals to me.  The challenge, however, was to use this set on a card.  I used the Magical paper pack, stamping my images in Sapphire, Cranberry, Black, and Honey.  The tag and circle were cut with the CTMH/Cricut Artistry cartridge.  All of embellishments are from the Magical collection, plus I added some black shimmer trim.

Thanks for visiting!  Be sure to check out all the awesome creations on this blog hop.  You'll visit the talented DARLYS next after leaving me a comment.  Thanks!
Click HERE for all the hop participants and their blogs.

LinkWithin

Related Posts with Thumbnails